Undefined ARM® Developer Suite Version 1.2 Developer Guide ARM Developer Suite Copyright ?1999-2001 ARM Limited. All rights reserved. Change History The following changes have been made to this book. Change History Date Issue Change October 1999 A Release 1.0 March 2000 B Release 1.0.1 November 2000 C Release 1.1 November 2001 D Release 1.2 Proprietary Notice Words and logos marked with ® or ™ are registered trademarks or trademarks owned by ARM Limited.
Preface Preface This preface introduces the ARM Developer Suite (ADS) Developer Guide. It contains the following sections: • • About this book Feedback. About this book This book provides tutorial information on writing code targeted at the ARM family of processors. Intended audience This book is written for all developers writing code for the ARM.
Preface developing code for the ARM family of processors. ARM periodically provides updates and corrections to its documentation. See http://www.arm.com for current errata sheets and addenda. See also the ARM Frequently Asked Questions list at: http://www.arm.com/DevSupp/Sales+Support/faq.html ARM publications This book contains general information on developing applications for the ARM family of processors.
Preface Feedback ARM Limited welcomes feedback on both the ARM Developer Suite, and its documentation. Feedback on the ARM Developer Suite If you have any problems with this book, please contact your supplier.
Introduction 1 Introduction This chapter introduces the ADS Developer Guide. It contains the following sections: • • • About the ARM Developer Guide General programing issues Developing for the ARM. 1.1 About the ARM Developer Guide This book contains information that will help you with specific issues when developing code for ARM-based processors. In general, the chapters in this book assume that you are using the ARM Developer Suite (ADS) to develop your code.
Introduction 1.2 General programing issues The ARM family of processors are RISC processors. Many of the programing strategies that give efficient code are generic to RISC processors. For example, under the ARM-Thumb Procedure Call Standard (ATPCS) the ARM compilers pass the first four integer-sized function parameters in registers r0 to r3. Additional parameters are passed on the stack.
Introduction 1.3 Developing for the ARM This book gives information and example code for some of the most common ARM programing tasks. The following sections summarize the subject of each chapter: • • • • • • • Using the Procedure call standards Interworking ARM and Thumb code Mixing C, C++, and Assembly Language Handling Processor Exceptions Writing Code for ROM Caches and tightly coupled memory Using the Debug Communications Channel. 1.3.
Introduction Data Abort Occurs when a data transfer instruction attempts to load or store data at an illegal address. Interrupt (IRQ) Occurs when the processor external interrupt request pin is asserted (LOW) and IRQ interrupts are enabled (the I bit in the CPSR is clear). Fast Interrupt (FIQ) Occurs when the processor external fast interrupt request pin is asserted (LOW) and FIQ interrupts are enabled (the F bit in the CPSR is clear).
Using the Procedure Call Standard 2 Using the Procedure Call Standard This chapter describes how to use the ARM-Thumb Procedure Call Standard (ATPCS). Adhere to the ATPCS to ensure that separately compiled and assembled modules can work together.
Using the Procedure Call Standard • be assembled with the -apcs options selected. 2.1.4 Processes and the memory model ATPCS applies to a single thread of execution or process. The memory state of a process is defined by the contents of the processor registers and contents of the memory that it can address. A process can address some or all of these types of memory: • • • • Read-only memory. Statically-allocated read-write memory. Dynamically-allocated read-write memory. This is called heap memory.
Using the Procedure Call Standard 2.2 Register roles and names The ATPCS specifies the registers to use for particular purposes. 2.2.1 Register roles The following register usage applies in all variants of the ATPCS except where otherwise stated. To comply with the ATPCS you must follow these rules: • • Use registers r0-r3 to pass parameter values into routines, and to pass result values out. You can refer to r0-r3 as a1-a4 to make this usage apparent. See Parameter passing.
Using the Procedure Call Standard 2.3 The stack This section describes how to use the stack in the base standard. See also Stack limit checking. ATPCS specifies: • • a full, descending stack eight-byte stack alignment at all external interfaces. 2.3.1 Stack terminology The following stack-related terms are used in ATPCS: The stack pointer Addresses the last value written to the stack (pushed). The stack base Is the address of the top of the stack, from which the stack grows downwards.
Using the Procedure Call Standard To comply with the ATPCS in assembly language, unless your object file contains no external calls, you must: • • Ensure that 8-byte alignment of the stack is preserved at all external interfaces. (The stack pointer must always move by an even number of words between entry to your code and any external call from your code.) Use the PRESERVE8 directive to inform the linker that 8-byte alignment is preserved (see the Directives Reference chapter in Assembler Guide).
Using the Procedure Call Standard 2.4 Parameter passing A routine with a variable number of arguments is variadic. A routine with a fixed number of arguments is nonvariadic. There are different rules about passing parameters to variadic and to nonvariadic routines. This section describes the base standard. For additional information relating to floating-point options, see Floating-point options. 2.4.1 Nonvariadic routines Parameter values are passed to a nonvariadic routine in the following way: 1.
Using the Procedure Call Standard 2.5 Stack limit checking Select the software stack limit checking (/swst) option unless the maximum amount of stack memory required by your complete program can be accurately calculated at the design stage. Select the no software stack limit checking (/noswst) option only if you can accurately calculate, at the design stage, the maximum amount of stack memory that your complete program requires. This is the default.
Using the Procedure Call Standard Note The names __ARM_stack_overflow and __Thumb_stack_overflow are illustrative and do not correspond to any actual implementation.
Using the Procedure Call Standard 2.6 Read-only position independence A program is Read-Only Position-Independent (ROPI) if all its read-only segments are position independent. An ROPI segment is often position-independent code (PIC), but could be read-only data, or a combination of PIC and read-only data. Select the ROPI option to avoid committing yourself to having to load your code in a particular location in memory.
Using the Procedure Call Standard 2.7 Read-write position independence A program is Read-Write Position-Independent (RWPI) if all its read-write segments are position independent. An RWPI segment is usually position-independent data (PID). Select the RWPI option to avoid committing yourself to a particular location of data in memory. This is particularly useful for data that must be multiply instantiated for reentrant routines. 2.7.
Using the Procedure Call Standard 2.8 Interworking between ARM and Thumb states Select the /interwork option when compiling or assembling code if you want: • ARM routines to be able to return to a Thumb state caller • Thumb routines to be able to return to an ARM state caller • the linker to provide the code to change state when calling from ARM to Thumb or from Thumb to ARM.
Using the Procedure Call Standard 2.9 Floating-point options The ATPCS supports two different floating-point hardware architectures and instruction sets: • • The VFP architecture (see The VFP architecture). The FPA architecture (see The FPA architecture). This is for backwards compatibility only. Code for one architecture cannot be used on the other architecture.
Using the Procedure Call Standard Format of VFP values Single-precision and double-precision values conform to the IEEE 754 standard formats. Double-precision values are treated as true 64-bit values: • • in little-endian mode, the more significant word of a two-word double-precision value, containing the exponent, has the higher address in big-endian mode, the more significant word has the lower address. Note Little-endian double-precision values in VFP are pure little-endian.
Interworking ARM and Thumb 3 Interworking ARM and Thumb This chapter explains how to change between ARM state and Thumb state when writing code for processors that implement the Thumb instruction set. It contains the following sections: • • • • About interworking Assembly language interworking C and C++ interworking and veneers Assembly language interworking using veneers. 3.
Interworking ARM and Thumb • • Thumb subroutines that might make indirect or virtual calls to ARM code ARM subroutines that might make indirect or virtual calls to Thumb code. Otherwise, you do not need to use the /interwork option. For example, your object file may contain any of the following without requiring /interwork: • • • • Thumb code that may be interrupted by an exception. The exception forces the processor into ARM state so no veneer is needed.
Interworking ARM and Thumb 3.2 Assembly language interworking In an assembly language source file, you can have several areas (these correspond to ELF sections). Each area can contain ARM instructions, Thumb instructions, or both. You can use the linker to fix up calls to, and returns from, routines that use a different instruction set from the caller. To do this, use BL to call the routine (see Assembly language interworking using veneers).
Interworking ARM and Thumb • A BX instruction to branch to the Thumb code and change processor state. The second section of the module, labelled ThumbProg, is prefixed by a CODE16 directive that instructs the assembler to treat the following code as Thumb code. The Thumb code adds the contents of two registers together. The processor is changed back to ARM state. The code again uses an ADR instruction to get the address of the label, but this time the least significant bit is left clear.
Interworking ARM and Thumb • If LDR, LDM, or POP load to the pc, they set the Thumb bit in the CPSR to bit[0] of the value loaded to the pc. You can use this to change instruction sets. This is particularly useful for returning from subroutines. The same return instruction can return to either an ARM or Thumb caller. For more information, see Assembler Guide and ARM Architecture Reference Manual. 3.2.
Interworking ARM and Thumb 3.3 C and C++ interworking and veneers You can freely mix C and C++ code compiled for ARM and Thumb, but in ARM architecture v4T small code segments called veneers are required between the ARM and Thumb code to carry out state changes. The ARM linker generates these interworking veneers when it detects interworking calls. 3.3.
Interworking ARM and Thumb To compile and link these modules: 1. Type tcc -c -apcs /interwork -o thumbmain.o thumbmain.c at the system prompt to compile the Thumb code for interworking. 2. Type armcc -c -apcs /interwork -o armsub.o armsub.c to compile the ARM code for interworking. 3. Type armlink -o hello armsub.o thumbmain.o to link the object files. Alternatively, type armlink -info veneers armsub.o thumbmain.o to view the size of the interworking veneers (Example 3-4).
Interworking ARM and Thumb 3.4 Assembly language interworking using veneers The assembly language ARM/Thumb interworking method described in Assembly language interworking carried out all the necessary intermediate processing. There was no requirement for the linker to insert interworking veneers. This section describes how you can make use of interworking veneers to: • • interwork between assembly language modules interwork between assembly language and C or C++ modules. 3.4.
Interworking ARM and Thumb armsd: list 0x8000 ARMProg 0x00008000: 0xe3a00001 0x00008004: 0xeb000005 0x00008008: 0xe3a02003 0x0000800c: 0xe3a00018 0x00008010: 0xe59f1000 0x00008014: 0xef123456 0x00008018: 0x00020026 ThumbProg +0000 0x0000801c: 0x2102 +0002 0x0000801e: 0x4770 $Ven$AT$$ThumbProg +0000 0x00008020: 0xe59fc000 +0004 0x00008024: 0xe12fff1c +0008 0x00008028: 0x0000801d +000c 0x0000802c: 0xe800e800 +0010 0x00008030: 0xe7ff0010 +0014 0x00008034: 0xe800e800 +0018 0x00008038: 0xe7ff0010 .... .... . .
Interworking ARM and Thumb 4. Type armsd add to load the code. 5. Type go to run the code. 6. Type list main to list the code generated for the main function. 7. Type list arm_function to list the code generated.
Mixing C, C++, and Assembly Language 4 Mixing C, C++, and Assembly Language This chapter describes how to write mixed C, C++, and ARM assembly language code. It also describes how to use the ARM inline assemblers from C and C++. It contains the following sections: • • • • Using the inline assemblers Accessing C global variables from assembly code Using C header files from C++ Calling between C, C++, and ARM assembly language. 4.
Mixing C, C++, and Assembly Language String copying example Example 4-1 shows how to use labels and branches in a string copy routine. This code is also in install_directory\examples\inline\strcopy.c. The syntax of labels inside assembler blocks is the same as in C. Function calls that use BL from inline assembly language must specify the input registers, the output registers, and the corrupted registers.
Mixing C, C++, and Assembly Language Note Using physical register names is not recommended, because it constrains compiler register allocation and can cause less efficient code to be generated. It is usually better to declare C local variables and use these as operands in inline assembler. Constants The constant expression specifier # is optional. If it is used, the expression following it must be constant.
Mixing C, C++, and Assembly Language • The LDR Rn, =expression pseudo-instruction is not supported. Use MOV Rn, expression instead (this can generate a load from a literal pool). • Label expressions are not supported. • The ADR and ADRL pseudo-instructions are not supported. • The & operator cannot be used to denote hexadecimal constants. Use the 0x prefix instead.
Mixing C, C++, and Assembly Language { MOV ip, #3 ADDS x, x, #0x12345678 ORR x, x, ip // this instruction is expanded } The compiler uses ip as a temporary register when it expands the ADD instruction, and corrupts the value 3 in ip. An error message is issued. • Do not use physical registers to address variables, even when it seems obvious that a specific variable is mapped onto a specific register.
Mixing C, C++, and Assembly Language int tmp; __asm { MRS tmp, CPSR ORR tmp, tmp, #0x80 MSR CPSR_c, tmp } } int main(void) { disable_IRQ(); enable_IRQ(); } Dot product Example 4-3 calculates the dot product of two integer arrays. It demonstrates how inline assembly language can interwork with C or C++ expressions and data types that are not directly supported by the inline assembler. The inline function mlal() is optimized to a single SMLAL instruction.
Mixing C, C++, and Assembly Language Writing the multiply routine in C: // long multiply routine in C long long smull(int x, int y) { return (long long) x * (long long) y; } The compiler generates the following code: MOV MOV MOV SMULL MOV MOV r2,r0 r0,r1 r1,r2 r12,r1,r0,r2 r0,r12 pc,lr r12 is corrupted in this routine. This is allowed under ATPCS.
Mixing C, C++, and Assembly Language 4.2 Accessing C global variables from assembly code Global variables can only be accessed indirectly, through their address. To access a global variable, use the IMPORT directive to import the global and then load the address into a register. You can access the variable with load and store instructions, depending on its type. For unsigned variables use: • • • LDRB/STRB for char LDRH/STRH for short (Use two LDRB/STRB instructions for Architecture 3) LDR/STR for int.
Mixing C, C++, and Assembly Language 4.3 Using C header files from C++ This section describes how to use C header files from your C++ code. C header files must be wrapped in extern "C" directives before they are called from C++. 4.3.1 Including system C header files To include standard system C header files, such as stdio.h, you do not have to do anything special. The standard C header files already contain the appropriate extern "C" directives. For example: // C++ code #include int main() { //.
Mixing C, C++, and Assembly Language } #endif /* The C header file can now be */ /* included in either C or C++ code.
Mixing C, C++, and Assembly Language 4.4 Calling between C, C++, and ARM assembly language This section provides examples that can help you to call C and assembly language code from C++, and to call C++ code from C and assembly language. It also describes calling conventions and data types. You can mix calls between C and C++ and assembly language routines provided you follow the appropriate procedure ATPCS call standard. For more information on the ATPCS, see Chapter 2 Using the Procedure Call Standard.
Mixing C, C++, and Assembly Language they have no base classes or virtual functions. If such a struct has neither a user-defined copy assignment operator or a user-defined destructor, it is a POD structure. • • • References are represented as pointers. Pointers to data members and pointers to member functions occupy four bytes. They have the same null pointer representation as normal pointers. No distinction is made between pointers to C functions and pointers to C++ (non-member) functions.
Mixing C, C++, and Assembly Language 2. Type armcc -c -g strtest.c to build the C source. 3. Type armlink strtest.o scopy.o -o strtest to link the object files 4. Type armsd -e strtest execute the example. Calling C from assembly language Example 4-11 and Example 4-12 show how to call C from assembly language.
Mixing C, C++, and Assembly Language int f() { S s(2); asmfunc(&s); // initialize 's' // call 'asmfunc' so it // can change 's' return s.i * 3; } Example 4-16 Defining the assembly language function AREA Asm, CODE EXPORT asmfunc asmfunc LDR r1, [r0] ADD r1, r1, #5 STR r1, [r0] MOV pc, lr END ; the definition of the Asm ; function to be called from C++ Calling C++ from C Example 4-17 and Example 4-18 show how to call C++ from C.
Mixing C, C++, and Assembly Language f STMFD MOV STR MOV BL LDR ADD LDMFD END sp!,{lr} r0,#2 r0,[sp,#-4]! ; initialize struct r0,sp ; argument is pointer to struct cppfunc ; call 'cppfunc' so it can change ; the struct r0, [sp], #4 r0, r0, r0,LSL #1 sp!,{pc} Passing a reference between C and C++ Example 4-21 and Example 4-22 show how to pass a reference between C and C++.
Mixing C, C++, and Assembly Language /* Definition of the C function to be called from C++.
Handling Processor Exceptions 5 Handling Processor Exceptions This chapter describes how to handle the various types of exception supported by ARM processors.
Handling Processor Exceptions 5.1.1 The vector table Processor exception handling is controlled by a vector table. The vector table is a reserved area of 32 bytes, usually at the bottom of the memory map. It has one word of space allocated to each exception type, and one word that is currently reserved.
Handling Processor Exceptions 5.2 Entering and leaving an exception This section describes the processor response to an exception, and how to return to the place where an exception occurred after the exception has been handled. The method for returning is different depending on the exception type. 5.2.1 The processor response to an exception When an exception is generated, the processor takes the following actions: 1.
Handling Processor Exceptions Returning from SWI and Undefined Instruction handlers The SWI and Undefined Instruction exceptions are generated by the instruction itself, so the program counter is not updated when the exception is taken. The processor stores (pc − 4) in lr_ mode. This makes lr_mode point to the next instruction to be executed. Restoring the program counter from the lr with: MOVS pc, lr returns control from the handler.
Handling Processor Exceptions 5.3 Installing an exception handler Any new exception handler must be installed in the vector table. When installation is complete, the new handler executes whenever the corresponding exception occurs. Exception handlers can be installed in two ways: Branch instruction This is the simplest way to reach the exception handler. Each entry in the vector table contains a branch to the required handler routine. However, this method does have a limitation.
Handling Processor Exceptions Sometimes during development work it is necessary to install exception handlers into the vectors directly from the main application. As a result, the required instruction encoding must be written to the appropriate vector address. This can be done for both the branch and the load pc method of reaching the handler. Branch method The required instruction can be constructed as follows: 1. Take the address of the exception handler. 2.
Handling Processor Exceptions /* instruction to cause long branch to address in `location'. */ /* Function return value is original contents of 'vector'.
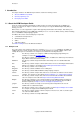
Handling Processor Exceptions 5.4 SWI handlers When the SWI handler is entered, it must establish which SWI is being called. This information can be stored in bits 0-23 of the instruction itself, as shown in Figure 5-1, or passed in an integer register, usually one of r0-r3. Figure 5-1 ARM SWI instruction The top-level SWI handler can load the SWI instruction relative to the link register (LDR swi, [lr, #-4]). Do this in assembly language, or C/C++ inline assembler.
Handling Processor Exceptions 5.4.2 SWI handlers in C and assembly language Although the top-level handler must always be written in ARM assembly language, the routines that handle each SWI can be written in either assembly language or in C. See Using SWIs in Supervisor mode for a description of restrictions. The top-level handler uses a BL (Branch with Link) instruction to jump to the appropriate C function.
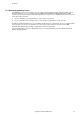
Handling Processor Exceptions Figure 5-2 Accessing the supervisor stack 5.4.3 Using SWIs in Supervisor mode When a SWI instruction is executed: 1. The processor enters Supervisor mode. 2. The CPSR is stored into spsr_SVC. 3. The return address is stored in lr_SVC (see The processor response to an exception). If the processor is already in Supervisor mode, lr_SVC and spsr_SVC are corrupted.
Handling Processor Exceptions From C/C++, declare the SWI as an __SWI function, and call it. For example: __swi(0) void my_swi(int); . . . my_swi(65); This allows a SWI to compiled inline, without additional calling overhead, provided that: • • any arguments are passed in r0-r3 only any results are returned in r0-r3 only. The parameters are passed to the SWI as if the SWI were a real function call.
Handling Processor Exceptions occur, for example, when there are a number of related operations that can be performed on an object, and each operation has its own SWI. In such a case, the methods described above are not appropriate. There are several ways of dealing with this, for example, you can: • • Construct the SWI instruction from the SWI number, store it somewhere, then execute it. Use a generic SWI that takes, as an extra argument, a code for the actual operation to be performed on its arguments.
Handling Processor Exceptions __swi (0) char __ReadCharacter (unsigned op); __swi (0) void __WriteCharacter (unsigned op, char c); These can be used in a more reader-friendly fashion by defining the following: #define ReadCharacter () __ReadCharacter (0); #define WriteCharacter (c) __WriteCharacter (1, c); However, if you use r0 in this way, only three registers are available for passing parameters to the SWI.
Handling Processor Exceptions 5.5 Interrupt handlers The ARM processor has two levels of external interrupt, FIQ and IRQ, both of which are level-sensitive active LOW signals into the core. For an interrupt to be taken, the appropriate disable bit in the CPSR must be clear. FIQs have higher priority than IRQs in two ways: • • FIQs are serviced first when multiple interrupts occur.
Handling Processor Exceptions MOV LDR SUB CMP BLEQ MOV STR ADD LDMFD SUBS ENDP r4,#0x80000000 r0,[r4,#0] sp,sp,#4 r0,#1 C_int_handler r0,#0 r0,[r4,#4] sp,sp,#4 sp!,{r0-r4,r12,lr} pc,lr,#4 Compare this with the result when the __irq keyword is not used: IRQHandler PROC STMFD MOV LDR CMP BLEQ MOV STR LDMFD ENDP sp!,{r4,lr} r4,#0x80000000 r0,[r4,#0] r0,#1 C_int_handler r0,#0 r0,[r4,#4] sp!,{r4,pc} 5.5.2 Reentrant interrupt handlers Note The following method works for both IRQ and FIQ interrupts.
Handling Processor Exceptions ; Add instructions to clear the interrupt here ; then re-enable interrupts. MSR STMFD CPSR_c, #0x1F sp!, {r0-r3, lr} ; ; ; ; ; ; ; ; ; BL LDMFD MSR C_irq_handler sp!, {r0-r3, lr} CPSR_c, #0x92 LDMFD MSR LDMFD END sp!, {r12, r14} SPSR_cf, r14 sp!, {pc}^ switch to SYS mode, FIQ and IRQ enabled. USR mode registers are now current. save lr_USR and non-callee saved registers branch to C IRQ handler. restore registers switch to IRQ mode and disable IRQs. FIQ is still enabled.
Handling Processor Exceptions IOPort1,IOPort2 Are offsets to the two data registers to be read. Reading a data register clears the interrupt for the corresponding port. r9 Points to the memory location to which data from the first port is being transferred. r10 Points to the memory location to which data from the second port is being transferred. r11,r12 Point to the last address to transfer to (r11 for the first port, r12 for the second).
Handling Processor Exceptions ; PC base address points to this ; instruction + 8 ; pad so the PC indexes this table. NOP ; Table of handler start addresses DCD Priority0Handler DCD Priority1Handler DCD Priority2Handler ; ... Priority0Handler STMFD sp!, {r0 - r11} ; ... LDMFD sp!, {r0 - r11} ; Save other working registers. ; Insert handler code here. ; Restore working registers (not r12). ; Now read-modify-write the CPSR to disable interrupts. MRS r12, CPSR ; Read the status register.
Handling Processor Exceptions MSRNE SPSR_cxsf, r0 ; LDMNEIA r13, {r0 - r14}^ ; NOP SUBNES pc, lr, #4 ; ; Insert "no next Restore the status. Get the rest of the registers and return and restore CPSR. process code" here.
Handling Processor Exceptions 5.6 Reset handlers The operations carried out by the Reset handler depend on the system for which the software is being developed. For example, it may: • • • • • • • Set up exception vectors. See Installing an exception handler for details. Initialize stacks and registers. Initialize the memory system, if using an MMU. Initialize any critical I/O devices. Enable interrupts. Change processor mode and/or state. Initialize variables required by C and call the main application.
Handling Processor Exceptions 5.7 Undefined Instruction handlers Instructions that are not recognized by the processor are offered to any coprocessors attached to the system. If the instruction remains unrecognized, an Undefined Instruction exception is generated. It could be the case that the instruction is intended for a coprocessor, but that the relevant coprocessor, for example a Floating Point Accelerator, is not attached to the system.
Handling Processor Exceptions 5.8 Prefetch Abort handler If the system has no MMU, the Prefetch Abort handler can simply report the error and quit. Otherwise the address that caused the abort must be restored into physical memory. lr_ABT points to the instruction at the address following the one that caused the abort, so the address to be restored is at lr_ABT - 4. The virtual memory fault for that address can be dealt with and the instruction fetch retried.
Handling Processor Exceptions 5.9 Data Abort handler If there is no MMU, the Data Abort handler should simply report the error and quit. If there is an MMU, the handler should deal with the virtual memory fault. The instruction that caused the abort is at lr_ABT - 8 because lr_ABT points two instructions beyond the instruction that caused the abort.
Handling Processor Exceptions 5.10 Chaining exception handlers In some situations there can be several different sources of a particular exception. For example: • • Angel uses an Undefined Instruction to implement breakpoints. However, Undefined Instruction exceptions also occur when a coprocessor instruction is executed, and no coprocessor is present. Angel uses a SWI for various purposes, such as entering Supervisor mode from User mode, and supporting semihosting requests during development.
Handling Processor Exceptions 5.11 Handling exceptions on Thumb-capable processors This section describes the additional considerations you must take into account when writing exception handlers suitable for use on Thumb-capable processors. Thumb-capable processors use the same basic exception handling mechanism as processors that are not Thumb-capable. An exception causes the next instruction to be fetched from the appropriate vector table entry.
Handling Processor Exceptions The following sections give a summary of the values to which the processor sets lr_mode if an exception occurs when the processor is in Thumb state. SWI and Undefined Instruction handlers The handler's return instruction (MOVS pc,lr) changes the program counter to the address of the next instruction to execute. This is at (pc − 2), so the value stored by the processor in lr_mode is (pc − 2).
Handling Processor Exceptions ; r0 now contains SWI number CMP LDRLS B r0, #MaxSWI pc, [pc, r0, LSL#2] SWIOutOfRange ; Rangecheck ; Jump to the appropriate routine. switable DCD DCD : : do_swi_1 do_swi_2 do_swi_1 ; Handle the SWI. LDMFD sp!, {r0-r3,r12,pc}^ ; Restore the registers and return.
Handling Processor Exceptions 5.12 System mode The ARM Architecture defines a User mode that has 15 general purpose registers, a pc, and a CPSR. In addition to this mode there are five privileged processor modes, each of which have an SPSR and a number of registers that replace some of the 15 User mode general purpose registers. Note This section only applies to processors that implement ARM architectures v4, v4T and later.
Writing Code for ROM 6 Writing Code for ROM This chapter describes how to build images for embedded applications. These images are typically programmed into ROM or flash memory. There are also suggestions on how to avoid the most common errors in writing code for ROM.
Writing Code for ROM 6.2 Memory map considerations A major consideration in the design of an embedded ARM application is the layout of the memory map, in particular the memory that is situated at address 0x0. Following reset, the processor starts to fetch instructions from 0x0, so there must be some executable code accessible from that address. In an embedded system, this requires ROM to be present, at least initially, at address 0x0. 6.2.
Writing Code for ROM 2. Execute the RESET vector: LDR PC, =0x0F000004 This causes a jump to the real address of the next ROM instruction. This assembles to a position-independent instruction LDR PC, [PC, offset] 3. Write to the REMAP register and set REMAP = 1. 4. Complete the rest of the initialization code as described in Initializing the system. System decoder ROM can be aliased to address 0x0 by the system memory decoder.
Writing Code for ROM 6.3 Initializing the system There are two initialization stages: 1. Initializing the execution environment, for example exception vectors, stacks, I/O. 2. Initializing the C library and application (C variables for example). For a hosted application, the execution environment was initialized when the OS starts (initialization is done by, for example, Angel, an RTOS, or ARMulator). The application is then entered automatically through the main() function.
Writing Code for ROM See the code in the Examples\embedded\cache directory for examples of cache initialization code. Initializing the stack pointers The initialization code initializes the stack pointer registers. You might have to initialize some or all of the following stack pointers, depending on the interrupts and exceptions you use: sp_SVC This must always be initialized. sp_IRQ This must be initialized if IRQ interrupts are used. It must be initialized before interrupts are enabled.
Writing Code for ROM 6.4 The reference C example using semihosting This example shows an application that uses the semihosting SWIs. printf() is compiled as a call to a C library function that uses a semihosting SWI to display information on the debugger console. The application consists of a single C file. The code for main.c is in install_directory\Examples\Embedded\embed directory, and is included in Example 6-1 for reference. To build the example from the CodeWarrior IDE: 1.
Writing Code for ROM By default, the stack pointer sp is initialized to 0x08000000 for ARMulator. If you are using a development board, you must set $top_of_memory. For example, for most (unexpanded) ARM Integrator boards, set $top_of_memory to 0x40000. 6.4.2 Sample code The C code fragment in Example 6-1 shows the use of semihosting SWIs to output text. See the main.c source code for the definitions of demo_malloc(), demo_printf(), demo_float_print(), and demo_sprintf().
Writing Code for ROM 6.5 Loading the ROM image at address 0 Scatter loading provides a flexible mechanism for mapping code and data onto your memory map. These options are described in detail in the Linker and Utilities Guide. The scatter-load description file, scat_b.scf, for this example is in install_directory\Examples\Embedded\embed. 6.5.
Writing Code for ROM vectors.o (Vect, +First) * (+RO) } RAM 0x28000000 { * (+RW,+ZI) } HEAP +0 UNINIT { heap.o (+ZI) } STACKS 0x28080000 UNINIT { stack.o (+ZI) } UART0 0x16000000 UNINIT { uart.o (+ZI) } } 6.5.3 Sample code The code in Example 6-3 contains example exception vectors and exception handlers. For this application, ROM is fixed at 0x0 and the exception table is hard-coded at 0x0. For Loading the ROM image at address 0, ROM/RAM remapping occurs and the vectors are copied from ROM to RAM.
Writing Code for ROM END The code in Example 6-4 performs ROM/RAM remapping (if required), initializes stack pointers and interrupts for each mode, and finally branches to __main in the C library (__main eventually calls main()). On reset, the ARM core starts up in Supervisor (SVC) mode, in ARM state, with IRQ and FIQ disabled. Example 6-4 init.
Writing Code for ROM EXPORT Reset_Handler Reset_Handler ; --- Initialize stack pointer registers ; Enter each mode in turn and set up the stack pointer IMPORT top_of_stacks ;defined in stack.
Writing Code for ROM ** ** #define USE_SERIAL_PORT ** ** or compile with ** ** -DUSE_SERIAL_PORT */ #include #include
Writing Code for ROM config.stack_base = SP; return config; // inherit sp from the execution environment } /* Below is an equivalent example assembler version of __user_initial_stackheap It will be entered with the value of the stackpointer in r1 (as set in init.s), this does not need to be changed and so can be passed unmodified out of the function.
Writing Code for ROM • • • a project file for the CodeWarrior IDE a batch file the command line. Using the CodeWarrior IDE To build the example from the CodeWarrior IDE, load the supplied embed project and select Target=EmbeddedScatter. This creates: • • an ELF debug image (embed.axf) for loading into a debugger (AXD or armsd) a binary ROM image (embed.bin) suitable for downloading into the memory of an ARM Integrator board.
Writing Code for ROM 6.6 Using both scatter loading and remapping This section describes how to convert the application in Loading the ROM image at address 0 into a more complex scatter-loading application. This example uses memory remapping to exchange the ROM and RAM regions after the application has started. The code for this example is in install_directory\Examples\Embedded. 6.6.1 Memory map Figure 6-5 shows: • • FLASH is at 0x24000000. An aliased copy of the FLASH appears at 0x0 on reset.
Writing Code for ROM HEAP +0 UNINIT ; ; ; ; The heap is not zero-initialized. The +0 specification means that the heap starts immediately after RW and ZI regions. A symbol in heap.o is used set the heap base. STACKS 0x40000 UNINIT { stack.o (+ZI) } ; ; ; ; The stack is not zero-initialized. The top of stack address is set absolutely. A symbol in stack.o is used to set the top of stack. UART0 0x16000000 UNINIT { uart.o (+ZI) } ; ; ; ; The UART is not zero-initialized.
Writing Code for ROM armasm -g vectors.s armasm -g -PD "ROM_RAM_REMAP SETL {TRUE}" init.s armasm -g stack.s armasm -g heap.s REM Use the following two lines to build without using the serial port. armcc -c -g -O1 main.c -DEMBEDDED -DROM_RAM_REMAP armcc -c -g -O1 retarget.c REM Use the following two lines to build using the serial port. REM armcc -c -g -O1 main.c -DEMBEDDED -DROM_RAM_REMAP -DUSE_SERIAL_PORT REM armcc -c -g -O1 retarget.c -DUSE_SERIAL_PORT armcc -c -g -O1 uart.c -I..
Writing Code for ROM 6.7 A semihosted application with interrupt handling This section illustrates an Reference Peripheral Specification (RPS) based interrupt-driven timer, suitable for embedded applications. The main() function initializes and starts two RPS timers. When a timer expires, an interrupt is generated. The interrupt is handled in int_handler.c. The code simply sets a flag and clears the interrupt. The interrupt flags are checked below in a endless loop.
Writing Code for ROM return (oldvec); } #endif /* Enabling and disabling interrupts Interrupts are enabled or disabled by reading the cpsr flags and updating bit 7. These functions work only in a privileged mode, because the control bits of the cpsr and spsr cannot be changed while in User mode.
Writing Code for ROM *Timer2Load = MED_FAST_LOAD; *Timer1Control = (TimerEnable | // Enable the Timer TimerPeriodic | // Periodic Timer producing interrupt TimerPrescale8 ); // Set Maximum Prescale - 8 bits *Timer2Control = (TimerEnable | // Enable the Timer TimerPeriodic | // Periodic Timer producing interrupt TimerPrescale8 ); // Set Maximum Prescale - 8 bits *IRQEnableSet = IRQTimer1 | IRQTimer2; // Enable the counter timer interrupts printf("Running...
Writing Code for ROM { *Timer2Clear = 0;/* clear the interrupt */ IntCT2++; /* set the flag */ } } Copyright ?1999 2001 ARM Limited 6-21
Writing Code for ROM 6.8 An embeddable application with interrupt handling This section describes how to convert the application in A semihosted application with interrupt handling into an embeddable application. Converting the application requires additional files: vectors.s This file contains exception vectors and exception handlers. For this example ROM is fixed at 0x0. init.
Writing Code for ROM REM -DUSE_SERIAL_PORT REM armcc -c -g -O1 retarget.c -DUSE_SERIAL_PORT armcc -c -g -O1 uart.c -I..\include armcc -c -g -O1 serial.c -I..\include armcc -c -g -O1 int_handler.c -I..\include armlink vectors.o init.o main.o retarget.o uart.o serial.o stack.o heap.o int_handler.o -scatter scat_c.scf -o rps_irq.axf -entry 0x24000000 -info totals -info unused fromelf rps_irq.axf -bin -o rps_irq.bin 6.8.3 Scatter-load description file The scatter-load description file is listed below.
Writing Code for ROM 6.9 Using scatter loading with memory-mapped I/O In most ARM embedded systems, peripherals are located at specific addresses in memory. You often need to access a memory-mapped register in a peripheral by using a C variable. In your code, you will need to consider not only the size and address of the register, but also its alignment in memory. ARM recommends word alignment of peripheral registers even if they are 16-bit or 8-bit peripherals.
Writing Code for ROM 000004 000008 ;;;12 00000c ;;;13 000010 000014 ;;;14 000018 ;;;15 00001c 000020 ;;;16 000024 ;;;17 00002c e3a00440 MOV r0,#0x40000000 e5801000 STR r1,[r0,#0] int_val = *PortLoad; e5901000 LDR r1,[r0,#0] *PortValue = (unsigned short) 0x0000; e3a01000 MOV r1,#0 e1c010b4 STRH r1,[r0,#4] short_val = *PortValue; e1d010b4 LDRH r1,[r0,#4] *PortClear = (unsigned char) 0x1F; e3a0101f MOV r1,#0x1f e5c01008 STRB r1,[r0,#8] char_val = *PortClear; e5d00008 LDRB r0,[r0,#8] }000028 e1a0f00e MOV pc,l
Writing Code for ROM Peripheral locations should not be accessed using __packed structs (where unaligned members are allowed and there is no internal padding), or using C bitfields. This is because it is not possible to control the number and type of memory access that is being performed by the compiler. The result is code that is non-portable, has undesirable side effects, and will not work as intended.
Writing Code for ROM The benefits of using a scatter description file are: • • All the (target-specific) absolute addresses chosen for your devices, code, and data are located in one file and maintenance is simplified. If you decide to change your memory map (for example if peripherals are moved), you do not have to rebuild your entire project but only to re-link the existing objects. For a description of scatter loading, see the Linker and Utilities Guide.
Writing Code for ROM 6.10 Troubleshooting This section provides solutions to the following common problems: • • • • Linker error __semihosting_swi_guard Setting $top_of_memory Vector table code eliminated. Errors with scatter-loading description files. 6.10.1 Linker error __semihosting_swi_guard The linker reports __semihosting_swi_guard as being multiply defined. Cause The linker loaded the semihosting implementation of a function from the ANSI C library.
Writing Code for ROM Retarget __user_initial_stackheap() __user_initial_stackheap() must be reimplemented if you are using scatter loading. Ensure that you have reimplemented the function correctly and that the new module is linked with your code. Use the reimplementation provided in the Examples directory as a starting point for your reimplementation.
Writing Code for ROM 6.11 Measuring code and data size To measure code size, do not look at the linked image size or object module size, as these include symbolic information that is not part of the binary data. Instead, use one of the following armlink options: -info sizes This option gives a breakdown of the code and data sizes of each object file or library member making up an image.
Caches and Tightly Coupled Memories 7 Caches and Tightly Coupled Memories This chapter describes some aspects of initializing cached processors. It also describes processors with tightly coupled memory, and ARMulator models of cached processors. It contains the following sections: • • • • • • • About caches and tightly coupled memory System control coprocessor Memory protection units Configuring a PU Memory management units Configuring an MMU Tightly coupled memory.
Caches and Tightly Coupled Memories • • • use the Pagetable model throughout your development work, unless you are writing an operating system. This option is recommended if you are writing a User Mode program. write your own PU or MMU programming code from the beginning use the Pagetable model during the early stages of development, then write your own PU or MMU programming code later.
Caches and Tightly Coupled Memories 7.2 System control coprocessor CP15 is the system control coprocessor. You must write to registers in CP15 to configure your core, and any caches or TCM. The registers in CP15 can only be accessed using the MCR and MRC instructions (for details of these instructions see the ARM Instructions chapter in Assembler Guide). For details of the registers in CP15, see ARM Architecture Reference Manual, and the Technical Reference Manual for your processor.
Caches and Tightly Coupled Memories 7.3 Memory protection units Protection Units (PUs) partition memory into regions. For each region you can specify: Size Typically this might range from 4KB to 4GB. Base address A region must start on a memory boundary that is a multiple of its size. Access permissions For example, you can mark a region for read access only from User mode. When the PU is enabled, it aborts accesses to addresses outside any defined region. 7.3.
Caches and Tightly Coupled Memories 7.4 Configuring a PU To configure a PU, you must do the following: 1. Define the starting addresses and sizes of protection regions, and enable them. To do this, write to coprocessor register c6 in CP15, the system control coprocessor (see Setting protection region addresses and sizes, and enabling each region). 2. Set the cacheable and bufferable attributes for each region.
Caches and Tightly Coupled Memories • • When you load from that region, the cache is searched. If the item is found, it is loaded from the cache. If the item is not found, a complete cache line including the required address is loaded. Some other cache line is evicted from the cache, unless there is an unused cache line available. When you save to that region, the cache is searched. If the item is found, the save is made to the cache. If the item is not found, the save is made to memory.
Caches and Tightly Coupled Memories 7.4.4 Configuring core operation Coprocessor register c1 of CP15 is the core configuration register. You must use a read-modify-write cycle to alter the contents of c1. Example 7-4 configures the core and enables the PU.
Caches and Tightly Coupled Memories 7.5 Memory management units Memory Management Units (MMUs): • • translate virtual addresses into physical addresses control memory access permissions. If the MMU is disabled, the external address bus outputs addresses without translation. MMUs are much more versatile than PUs. They can: • • provide fine grained control of the memory system relocate memory at runtime. You can use an MMU to implement a demand-paged virtual memory system. 7.5.
Caches and Tightly Coupled Memories 7.5.2 Memory access permissions and domains Translation tables also hold access permission fields and a domain field. There are 16 domains, Each region defined in the translation tables is controlled by the domain specified in the corresponding domain field. Each domain has two bits in the domain access control register in CP15.
Caches and Tightly Coupled Memories 7.6 Configuring an MMU To configure an MMU, you must do the following: 1. Build the translation table in memory. Translation tables include: • • • • virtual to physical translation cacheable and bufferable flags domain number access permissions. See Building the translation table. 2. Store the location of the translation table in CP15 register c2 (see Setting the location of the translation table). 3.
Caches and Tightly Coupled Memories LDR r1,=0x0 n at 0x0 LDR r2,[r0,r1,LSL#2] ORR r2,r2,#2_1000 ; Read first entry in translation table, which points to a 1MB sectio ; Set cacheable flag LDR r1,=0xFFF00000 STR r2,[r0,r1,LSL#2] ; Remap 0x0 to 0xFFF00000 MOV r0,#0xC0000000 MCR p15,0,r0,c3,c0,0 ; Set permissions for domain 15 ; Write value to CP15 c3 7.6.5 Configuring core operation Example 7-8 sets the bits in the core control register (c1) in CP15.
Caches and Tightly Coupled Memories 7.7 Tightly coupled memory Use normal memory access instructions to access TCM. The address is the only difference between an instruction to access TCM and an access to off-chip memory. Some cores, ARM966E-S for example, have TCM and no cache. Other cores, ARM946E-S for example, have both TCM and caches. TCM and caches can be enabled at the same time, but in general must not map the same regions of physical memory. Some details of ARM966E-S are described below.
Caches and Tightly Coupled Memories • • • • use literal pools set software breakpoints for debugging download code write self-modifying code. Instruction fetches from data TCM are not allowed. Warning An attempt to load an instruction from data TCM might result in an access to off-chip memory at the same address. This is core dependent. Refer to the Technical Reference manual for your processor. 7.7.
Caches and Tightly Coupled Memories • For one cycle, when a read from data TCM immediately follows a write to data TCM. • For one cycle, when a data read from instruction TCM occurs. • For two cycles, when a data write to instruction TCM occurs. • When external memory is accessed. In this case, the number of stalled cycles depends on: — — the write buffer draining the external memory system.
Debug Communications Channel 8 Debug Communications Channel This chapter explains how to use of the Debug Communications Channel (DCC). It contains the following sections: • • • • • • • • About the Debug Communications Channel Command-line debugging commands Enabling comms channel viewing Target transfer of data Polled debug communications Interrupt-driven debug communications Access from Thumb state Semihosting. 8.
Debug Communications Channel 8.2 Command-line debugging commands To access the debug communications channel from a command line using armsd use the following commands: ccin filename Selects a file containing data for reading into the target. This command also enables host to target comms channel communication. ccout filename Selects a file to write data from the target. This command also enables target to host comms channel communication.
Debug Communications Channel 8.3 Enabling comms channel viewing Debug communications channel viewing is supported in AXD. 8.3.1 Comms channel viewing in AXD To enable channel viewing in AXD, refer to the description of the Control system view pop-up menu in chapter 5 of the AXD and armsd Debuggers Guide. To use a channel viewer in AXD, refer to the description of the Comms Channel processor view in chapter 5 of the AXD and armsd Debuggers Guide.
Debug Communications Channel 8.4 Target transfer of data The debug communications channel is accessed by the target as coprocessor 14 on the ARM core using the ARM instructions MCR and MRC. Two registers are provided to transfer data: Comms data read register A 32-bit wide register used to receive data from the debugger. The following instruction returns the read register value in Rd: MRC p14, 0, Rd, c1, c0 Comms data write register A 32-bit wide register used to send data to the debugger.
Debug Communications Channel 8.5 Polled debug communications In addition to the comms data read and write registers, a comms data control register is provided by the debug communications channel.
Debug Communications Channel MCR p14,0,r3,c1,c0 SUBS r1,r1,#1 BNE pollout MOV r0, #0x18 LDR r1, =0x20026 SWI 0x123456 outdata DCB "Hello there!" END ; ; ; ; ; ; ; into r3 and update the pointer Write word from r3 Update counter Loop if more words to be written Angel_SWIreason_ReportException ADP_Stopped_ApplicationExit ARM semihosting SWI To execute the example: 1. Assemble outchan.s: armasm -g outchan.s 2. Link the output object: armlink outchan.o -o outchan.
Debug Communications Channel The following piece of target application code, supplied in file Install_directory\Examples\dcc\inchan.
Debug Communications Channel If you view the area of memory indata, you see its initial contents: examine indata 5. In the AXD main screen, select Go from the Execute menu (or press F5) to execute the image. 6.
Debug Communications Channel 8.6 Interrupt-driven debug communications The examples given above demonstrate polling the DCC. You can convert these to interrupt-driven examples by connecting up COMMRX and COMMTX signals from the Embedded ICE logic to your interrupt controller. The read and write code given above could then be moved into an interrupt handler. See Interrupt handlers for information on writing interrupt handlers.
Debug Communications Channel 8.7 Access from Thumb state Because the Thumb instruction set does not contain coprocessor instructions, you cannot use the debug communications channel while the core is in Thumb state. There are three possible ways around this: • • • You can write each polling routine in a SWI handler, which can then be executed while in either ARM or Thumb state. Entering the SWI handler immediately puts the core into ARM state where the coprocessor instructions are available.
Debug Communications Channel 8.8 Semihosting You can use the debug communications channel for semihosting if you are using Multi-ICE with $semihosting_enabled=2. See the Multi-ICE User Guide for more information.
Glossary Glossary ADS See ARM Developer Suite. ANSI American National Standards Institute. An organization that specifies standards for, among other things, computer software. Angel Angel is a debug monitor that enables you to develop and debug applications running on ARM-based hardware. Angel can debug applications running in either ARM state or Thumb state.
Glossary Interworking Producing an application that uses both ARM and Thumb code. Library A collection of assembler or compiler output objects grouped together into a single repository. Linker Software which produces a single image from one or more source assembler or compiler output objects. Little-endian Memory organization where the least significant byte of a word is at a lower address than the most significant byte. See also Big-endian.
Glossary processor and may or may not be associated with an image. Veneer A small block of code used with subroutine calls when there is a requirement to change processor state or branch to an address that cannot be reached in the current processor state. Word A 32-bit unit of information. Contents are taken as being an unsigned integer unless otherwise stated.