
Instructions / Assembly
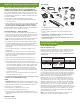
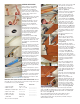
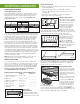
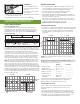
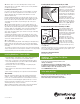

photo A
photo B
photo C
photo D
photo E
GENERAL INSTALLATION
In this example, we are installing
WoodHaven planks with Easy Up
track and clips over unfi nished
drywall. You can also install planks
direct to fl oor joists or studs, or other
existing ceilings, using the same
Easy Up
®
tracks.
When installing directly to an existing
ceiling, fi nd joists and mark with
chalk line. (photo A)
Running perpendicular to the joists,
mark where tracks will be placed.
Start 2-in from the starting wall.
Spacing is 24-in on center or less.
(photo B)
Ensure that you do not have tracks
running directly over light fi xture holes
or other ceiling obstructions. Adjust
tracks by reducing space between
tracks (never greater than 24-in
spacing.) (photo C)
Screw fi rst Easy Up track, making
screw connections at each joist
location. Start on your mark, 2-in from
the parallel wall, with the end of the
track against the perpendicular wall.
(photo D)
Attach second track. No need to place
end-to-end. Simply overlap tracks,
side-by-side, by at least 1-in. Leave a
1/8-in gap between tracks. (photo E)
If you need to cut track pieces shorter,
use a chop saw or hack saw. Ensure
you have the right blade for metal. Do
not crush track, as clips would not fi t.
And remember your protective safety
glasses and cut resistant gloves.
It is imperative to level your tracks.
Simply use a bubble level and insert
shims (loosen screw and tighten to
get a level track). Check both levels in
the direction of the track (parallel), as
well as across tracks (perpendicular.)
(photo F)
Continue screwing tracks to joists in
the ceiling. At the fi nishing wall, install
the last track 2-in away from the wall.
(photo G)
(In this picture, note that the installers
didn’t have to cut any metal pieces.
Overlapping the track by more than
an inch is fi ne!)
Determine Your Layout and Size of Your Border Planks. Measure
the length of the room, in the direction of your tracks, and opposite the joists,
to determine the size of your border planks.
Example: Your Room:
1. Total room length Room = 178" ____________
2. Divide total by 5" 178" ÷ 5" = 35.6 ____________
3. Multiply the remainder by 5" 0.6 x 5" = 3" ____________
4. Add 5" to the result 3" + 5" = 8" ____________
5. Divide results by 2 8" ÷ 2 = 4" ____________
6. This is your border Border plank ____________
plank width width = 4"
This is your fi rst row of planks.
Cut the “tongue” side off of the length
of the plank for your fi rst border
plank. TIP: Using a table saw or
circular saw helps to ensure a clean
straight line. (photo H)
Leaving 3/4-in from the starting wall
(closest to the end of the plank),
screw the 1st border plank in the
center of the plank right up against
your starting wall, with one screw
connecting with the track. (photo I)
Only use one screw to hold the plank
in place while you move the Easy
Up® clips into the groove edge of
the plank. Your future molding will
hold the planks in place. TIP: Another
option is to use three fi nish nails as a
ledge, located directly under the face
of the plank, on which you can rest
the plank while you slide the clips
into place.
Snap an Easy Up Clip onto every
track.(photo J)
Slide the clip on the track until it
connects with the “Groove” of the
plank. The clip should loosely hold
the upper edge of the groove on the
plank. (photo K)
Continue to build your ceiling by
connecting the tongue and groove on
the long side and end of the plank.
Ensure a 3/4-in gap* on fi nishing wall
to allow for expansion. This will be
covered by molding. (photo L)
*A 7-ft plank can expand/contract
as much as 1/4-in under extreme
humidity changes. This gap allows for
normal expansion and will be covered
by molding. Consistent humidity
levels must be maintained after
installation.
Lay out the room with staggered
seams. In most installations, you
should be able to use the leftover
cut plank from one row to start the
next row, with very little waste. Do
not use planks smaller than 26-in to
ensure attachment with two clips.
(photo M)
The tongue of the new plank will slide
into the groove of the receiving plank,
hiding the Easy Up clip.
Double check your math for the
width of the last plank. Measure the
remaining distance to the wall, and
cut off the groove edge of the plank
to fi t the space. There should be
a 3/4-in gap at the border. Tip the
tongue of the plank into the groove
of the receiving plank. (photo N)
Support the last plank by either screwing it to the Easy Up track with a
single screw (TIP: Pre-drilling helps) or create a ledge using fi nishing nails
hammered every 24-in into the wall directly below the face. (Molding will
hide screw or nails) (photo O)
We recommend fi nishing the job with crown molding (not sold by
Armstrong Ceilings), painted to match other trim in your space.
A slightly damp rag will remove any dust from your install, leaving you
with a beautiful new ceiling.
photo F
photo G
photo M
photo N
photo O
photo H
photo I
photo J
photo K
photo L
3/4" GAP