
Instructions / Assembly

Install Molding
1. Choose molding wide enough to
cover the expansion gap and any
plank edge.
2. Paint or stain decorative molding
before installing.
3. Install molding at the joint between the ceiling and walls. Nail to the wall. Do
not nail into the WoodHaven
™
plank.
4. Nail molding into the wall studs at least every 24-in. (illus. F)
Installing WoodHaven
™
Planks on a 15/16-in
Suspension System with Easy Up
®
Clips:
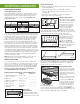
LARGE CEILING REQUIREMENT
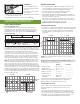
Easy Up
®
Expansion Joint
If your ceiling installation is greater than 21-ft in the length direction of
the WoodHaven
™
planks, an expansion joint is required. You will need to
plan this detail into the ceiling layout. Expansion joints can be placed more
frequently than 21-ft to achieve a balanced visual. A drawing of this
detail is shown below.
On 15/16-in grid, expansion joints should be located 6-in from a row of grid.
An additional row of 2-ft or 4-ft cross tees will need to be added 6-in on the
other side of the expansion joint to provide additional support for the WoodHav-
en planks. Depending on your grid layout and intended direction
of the planks, you may need to remove some 2-ft cross tees and add addi-
tional 4-ft cross tees to provide the required support (See detail below.) Use
a WoodHaven plank to create a spacer for the expansion joint. Rip down the
plank into 7/8-in wide and 6-ft long strips. Attach these strips to the face
of the grid and wall molding at every intersection with a screw. Countersink
the screws so they do not interfere with the installation of the fi nish molding.
NOTE: The fi nal step in creating the expansion joint will take place once the
ceiling is installed. When installing WoodHaven planks, they should be cut to
leave a 1/2-in gap on either side of the expansion joint spacer piece. Each
plank should be supported 6-in from the expansion joint with an Easy Up clip
attached to grid. After all the WoodHaven ceiling planks are installed, fi nish off
the expansion joint with a 2-1/2-in or wider piece of decorative trim or molding
(available from other manufacturers). Pre-painting the decorative trim will help
keep your ceiling installation clean. This trim should be attached to the expan-
sion joint assembly and grid using fi nishing nails or counter sunk screws. Putty
and touch up paint as needed.
GENERAL INSTALLATION:
• Do not install WoodHaven planks over an existing acoustical tile ceiling.
If you are updating an existing 15/16-in suspension system, be sure to
remove the ceiling panels prior to installing WoodHaven planks.
• If you need instructions for installing a new Armstrong
®
Prelude
®
suspension system, please visit ceilings.com/installation.
• Clips included in the WoodHaven packaging will only be utilized when a
plank’s leading edge lands on or near a parallel grid piece and an Easy Up
clip cannot be installed. See tip below.
• Easy Up
®
clips are sold separately. Visit ceilings.com to order a sample
Easy Up clip to test your grid. Clip should snap on with a snug fi t, be able
to slide on the grid, and require some force to remove.
• WoodHaven planks must be supported every 24-in.
Determine Plank Direction
• In a typical 2-ft x 4-ft suspended ceiling layout, install planks perpendicular
to the cross tees, parallel to the main beams as shown in the image below.
• In a typical 2-ft x 2-ft suspended ceiling layout, you can install planks
either perpendicular to or parallel with the cross tees as shown in the
image below.
NOTE: A 2-ft x 4-ft system can be converted to a 2-ft x 2-ft system by
adding 2-ft cross tees.
Determine Your Layout and Size of Your Border Planks. Measure
the length of the room, in the direction of your tracks, and opposite the joists,
to determine the size of your border planks.
Example: Your Room:
1. Total room length Room = 178" ____________
2. Divide total by 5" 178" ÷ 5" = 35.6 ____________
3. Multiply the remainder by 5" 0.6 x 5" = 3" ____________
4. Add 5" to the result 3" + 5" = 8" ____________
5. Divide results by 2 8" ÷ 2 = 4" ____________
6. This is your border Border plank ____________
plank width width = 4"
When starting or ending a WoodHaven Plank installation on 15/16-in
suspension system, screw the plank directly to the wall molding.
TIP: This should be covered with a molding of your choice.
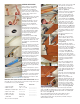
Installing the First Plank
Cut the “tongue” side off of the length of the plank for your fi rst border
plank. Using a table saw or circular saw helps to ensure a clean
straight line.
Leave 3/4-in gap along the starting wall. Lift the fi rst plank up into place
and insert the Easy Up clips into the groove side of the plank. Attach the
non-supported cut edge of each plank with a screw going into the existing
wall molding. These screws should be covered with molding at the end of
the installation. Molding will add additional support for the plank.
illus. F
WOODHAVEN
PLANK
15/16" GRID
EASY UP
CLIP
CROSS TEE CROSS TEE
DECORATIVE
TRIM
SPACER BLOCK
ATTACHED WITH SCREW
6" 6"
EASY UP
CLIP
2' x 2' GRID 2' x 2' GRID
REMOVE 2' CROSS TEES ADD ADDITIONAL
4' CROSS TEES
EXPANSION
JOINT
PLANK DIRECTION
WOODHAVEN
™
PLANK
2' x 4' GRID
(NOT TO SCALE)
MAIN BEAMS
2' x 2' GRID
WOODHAVEN
™
PLANK
WOODHAVEN
™
PLANK
(NOT TO SCALE)