
Installation Guide

2
THREE EASY STEPS TO INSTALL YOUR ARMSTRONG
®
CEILING
A
B
C
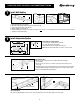
1. Mark height desired for new ceiling (A).
2. Add height of Wall Molding and mark a level line around 3 walls (B).
3. Snap a connecting chalk line on the 4th wall.
4. Nail Wall Molding to the wall studs (C).
5. If nailing molding directly to wall is not possible (for example, a solid
concrete or stone wall), hang a section of main runner next to the wall as a
substitute for regular wall molding.
Outside
Corner
C
C
Inside
Corner
Install Fasteners and Hanger Wires.
1. Snap Chalk Line for Main Beams 4 Apart (A).
2. Screw in Wire Fasteners 4 Apart (B).
3. Wrap hanger wire securely around itself 3 times (C).
NOTE:
Add extra wires for light fixtures, one at each corner of the light.
2'6"
2'6"
10'6"
9'
•••
•••
4'4'
4' 4'
Sample Room
A
B
Joists
A
C
B
4
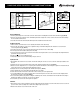
Prebend Hanger Wires
1. Measure up 7/8 from the bottom of the molding. Drive nail into wall just
above molding.
2. Do the same on other side of room. Stretch a string from nail to nail along a row
of wires
(A)
.
3. Swing hanger wires over to string and bend each one at 90° where they touch the string
(B). Stretch additional strings to prebend other hanger wires, to help level entire ceiling.
4. Remove Leveling String(s) after prebending wires.
Install Wall Molding
STEP
1
Install Suspension System
STEP
2
Use Main
Beam
instead
of Wall
Molding
B
A
Joist
90°
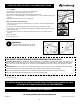
Set Trimmed End of Main Beam on
Wall Molding
Cross Tee Slot
Trim the Main Beam
Trim end of first Main Beam (A) so that a Cross Tee slot on the Main Beam is the border panel distance from the wall (B).
Step 1
A
Step 2
Border Panel Distance
AB
Leveling
String