
Installation Guide

3
THREE EASY STEPS TO INSTALL YOUR ARMSTRONG
®
CEILING
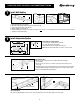
Hang First Main Beam
1. Stretch a guide string from one end of the room to the other below the molding where the first main beam will hang (A). (illus. A)
2. Place the cut end of the main beam on the wall molding and insert a hanger wire in a hole near the other end of the main and wrap
the wire around itself three times.
3. Insert the other wires into the main beam and wrap the wires around themselves three times.
Cut Border Cross Tees
1. Find the location of the first border cross tee. (Border panel distance from end of main).
2. Place the end of the white face of the cross tee against the edge of the wall molding at the side and cut the cross tee where it
crosses the guide string (B). (illus. A)
3. Insert the uncut end of the cross tee into the main and rest the cut end of the tee on the molding
4. The far edge of the main should be directly above the string.
5. If you are using hook end cross tees, measure from the wall to the string and cut the cross tee to that length. The string will then line
up with the near
edge of the main.
6. Cut the second cross tee to length and insert it.
7. Temporarily fasten the tees to the wall molding so they do not move.
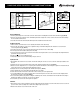
Squaring the Grid
1. Now install the first section of the second row of mains after cutting off one end so a cross tee slot is the border panel distance from
the end.
2. Install two four foot cross tees between the two mains in line with the first two border tees (C). (illus. A)
3. Measure across the diagonals of the 2 x 4 opening. The measurements will be the same if the grid is square. If the measurements are
not the same, shorten one of the mains until the diagonals are equal.
4. Complete the rows of mains joining the ends with the built-in splices. (illus. B)
5.
Finish cutting border cross tees between the wall the first row of mains.
6. Use the left-over ends of the mains to start other rows of mains if your room requires them.
7. If you have additional rows of mains to install, stretch a second string from one side of the room to the other aligning it with
the first 4 foot cross tee as shown
(D). (illus. A)
8. This second string will be your guide for cutting the remaining rows of mains. Just measure from the end wall to the string to
determine the distance for the first cross tee slot you will use.
9. You must line up cross tee slots for the grid to be square!
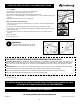
Install Grid
1. After the first section of main is installed in each row, and the grid is square, install the rest of the mains and cross tees. Use left over
pieces of main to start succeeding rows of mains after cutting to align cross tee slots.
2. Measure and cut border cross at the other side of the room.
A
B
Joist
Snap- In
Cross Tee
Hook- In
Cross Tee
B
B
C
D
illus. B
illus. C
illus. A
illus. D