
Installation Guide

How to Install Your Armstrong
®
Suspended Ceiling
INSTALL GRID
Prepare and Hang Main Beams
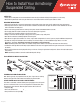
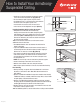
• To prepare the fi rst main beam, trim the end of the
main beam so that a cross tee slot on the main beam
is the border panel distance from the wall (B)
.
(Thi
s creates t
h
e proper
b
or
d
er t
il
e open
i
ng.
)
TIP
:
C
ut the top of the grid fi rst with tin snips and then
bend the grid open and cut the
f
ace o
f
the grid
(A).
• Pl
ace
th
e
cu
t
e
n
d
o
f th
e
fi r
s
t m
a
in
bea
m
o
n th
e
w
a
ll
molding and using the round holes in the grid, hang
main beams on the hanger wire or hook perpendicular
to joists. For installations using traditional hanger wire,
a
fter inserting the wire through the round hole, bend it
u
p and wrap the wire around wrap the han
g
er wire
a
round itself three times. Do this same ste
p
with the
n
ext ma
i
n
b
eam runn
i
ng para
ll
e
l
4
'
away a
l
ong t
h
e wa
ll
.
Prepare and
C
ut Border
C
ross Tee
s
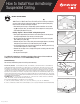
• Stretch a strin
g
line from one end of the room to the
o
ther below the wall moldin
g
and alon
g
the ed
g
e
f
u
rth
es
t fr
o
m th
e
w
a
ll
o
f th
e
m
a
in
bea
m
s
(
A
)
.
(
illus. A
)
• Install your
fi
rst cross tee in the main beam cross tee
s
lot that is your border panel distance
f
rom the wall
.
• Hold the end of your border cross tee a
g
ainst the wall
(
B
)
.
(
illus. A
)
Ma
r
k
a
n
d
cu
t t
he
c
r
oss
t
ee
w
he
r
e
i
t
c
r
osses
t
h
e str
i
ng
li
ne
.
• Insert the uncut end o
f
the cross tee into the main beam through the
r
ectan
g
ular hole and rest the cut end of the tee on the wall moldin
g.
• Cut the second border cross tee to length and insert it.
• Temporarily fasten the cross tees to the wall molding with a clamp or
tape so they do not move.
Squarin
g
the Gri
d
T
o ac
hi
eve t
h
e
b
est en
d
resu
l
ts,
i
t
i
s
i
mportant to ma
k
e sure your gr
id
i
s
square at this point in the installation. This will allow you to adjust if changes
are requ
i
re
d
.
N
O
TE
:
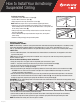
When connecting two cross tees in the same rectangular hole of a
main beam, insert the second tee into the slot by passin
g
on the
r
i
ght s
i
d
e
o
f
the already installed cross tee
.
TIP: Installing cross tees is easier if the tee is inserted into the rectangular
slot at a downward an
g
le from above the
g
rid plane. Listen for an audible
click to ensure a good connection
.
L
A2
9
4
998
-41
8
STEP
3
A
–
S
te
p
1
A
–
S
te
p
2
Set trimmed end of main
b
eam on wall moldin
g
Pl
ace
grid hooks or
hanger wire
g
g
i
n roun
d
g
g
holes
e
Border panel distanc
e
B
C
r
oss
t
ee
s
l
ot
W
a
ll
mo
ldi
ng
A
B
i
llus.
A
B
or
d
er tees
cut an
d
cli
pp
ed to
molding so
pp
pp
main aligns
g
g
w
ith
s
t
r
i
n
g
gg
First main
b
ea
m
Seco
n
d
m
ain bea
m
Guide strin
g
Insert cross
tee
h
er
e
Main beam
Existing
cross tee
Insert to
the RIGHT side
of existing tee
Insert at a
downward an
g
l
e