
Installation Guide

LA2
9
4
998
-41
8
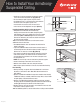
How to Install Your Armstrong
®
Suspended Ceiling
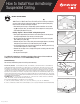
• In
s
t
a
ll tw
o
4'
c
r
oss
t
ees
be
tw
ee
n th
e
tw
o
m
a
in
bea
m
s
in lin
e
with th
e
fi r
s
t tw
o
bo
r
de
r t
ees
(C). (illus. B
)
• To check that your
g
rid is square, measure across
the diagonals of the 2' x 4' opening. The measurements
w
ill be the same if the grid is square. If the
measurements are not the same, trim one of the
mains further until the diagonals are equal.
(
illus. B
)
Installing Remaining
G
rid & Leveling the
S
ystem
• Complete the fi rst two rows of main beams by
h
anging main beams
f
rom the hooks and joining their
ends together. Listen
f
or an audible click to ensure a good
co
nn
ec
ti
o
n.
(
illus. C and illus. D
).
At th
e
f
a
r
e
n
d
o
f
eac
h
o
f these fi rst two rows,
y
ou’ll need to cut both main beams
to rest on t
h
e wa
ll
mo
ldi
ng.
TIP:
Use
th
e
l
ef
t-
o
v
e
r
e
n
ds
of
th
e
cu
t m
a
in
bea
m
s
t
o
s
t
a
rt
additional rows o
f
main beams
.
•
Cu
t
add
iti
o
n
a
l
bo
r
de
r
c
r
oss
t
ees
be
tw
ee
n th
e
w
a
ll
a
n
d
fi r
s
t
ro
w
o
f m
a
in
bea
m
s.
• I
f
y
ou have additional rows o
f
main beams to install, stretch a
s
econd string
f
rom one side o
f
the room to the other aligning it
w
ith the fi rst 4' cross tee as shown (D). (illus. B
)
• This second strin
g
will be your
g
uide for cuttin
g
the remainin
g
rows of main beams. Just measure from the end wall to the
s
tring to determine the distance
f
or the
fi
rst rectangular cross
tee s
l
ot
y
ou w
ill
use.
N
O
TE
:
You must line up cross tee slots for the grid to be square
!
•
I
nsta
ll
a
ll
rema
i
n
i
ng ma
i
n
b
eams an
d
4
'
cross tees
.
•
M
easure an
d
cut
b
or
d
er cross tees a
l
ong t
h
e
l
ast wa
ll
.
• Now that your
g
rid is installed, it's time to check or do fi nal levelin
g.
F
i
nal Level
i
ng
• Start by attaching a magnetic level to the bottom of a main beam
located in a corner o
f
the room. Note: Main beam should rest on
w
all molding
.
• Systems installed with traditional han
g
er wire should be level already.
I
f
additional leveling is needed, untwist the hanger wires, raise or lower
the grid slightly, re-bend and twist the wires.
•
S
ystems using
Q
uickHang hardware, hold the main beam, squeeze
the spring tabs on the QuickHang bracket to allow the hook to slide up
o
r
do
wn
(
F
).
Releasin
g
the tab will lock the hook in place
.
• Working from the corner of your room, check and level cross tees and
main beams until the s
y
stem is level
.
TIP:
For additional guidance, see our video online at ceilings.com
/
installation
.
D
C
Full 4'
c
ross tee
s
Second strin
g
Check diagonal
measuremen
ts
g
i
llus.
B
Joist
i
llus. C
Trad
i
t
i
onal W
i
re Han
g
e
r
i
ll
us
. D
QuickHan
g
Grid Hook
s
F
Joist
oist
st
t
J
Jo
oist