
Installation Guide

How to Install Your Armstrong
®
Suspended Ceiling
L
A2
9
4
998
-L
O
WE
S
-
5
1
8
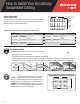
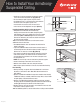
STEP
4
A
B
C
Pencil line
nc
e
li
e
c
W
a
ll
m
o
ldi
n
g
New tegular
edge reveal
g
g
INSTALL CEILING PANELS
STEP
Installing Panels
STEP
4
• Lift panel at angle up through the grid; drop into place
4
(
A
).
T
IP
:
If there’s an obstruction in the area where you are inserting a ceiling tile,
y
ou may need to lift the ceilin
g
tile throu
g
h an ad
j
acent openin
g
and
g
ently
move it across the back of the
g
rid into place
.
• Trim border panels using a straight edge; panels should be cut face side
up
(B).
F
or tegu
l
ar t
il
es, you w
ill
nee
d
to cut t
h
e e
d
ge t
h
at
’
s rest
i
ng on t
h
e
w
all molding to allow it to lay fl at
.
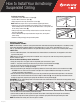
Cuttin
g
“Te
g
ular”/“Recessed Grid” ceilin
g
border panel
s
• Trim tegular edge border panels to the same dimensions as
f
or
fl
at panels.
T
he tegular edge detail must now be cut into the panel
.
• Set the panel into the
g
rid. Draw a li
g
ht pencil line on the panel usin
g
the
w
a
ll
mo
ldi
n
g
as a
g
u
id
e
(
C
).
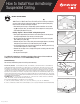
• Remove the panel. Use a sharp utility kni
f
e and straight edge to cut hal
f
way
through the panel
f
rom the
f
ace side along the pencil line
(D).
• La
y
the utilit
y
knife on its side next to the
p
anel and, with the
p
anel face u
p
,
cut in at blade hei
g
ht for a reveal cut
(E).
• Remove the cut edge. If the cut edge of the panel is visible, paint with a fl at
whi
te
l
atex pa
i
nt
.
• Fit the panel into the
g
rid
.
For additional information on installin
g
suspended ceilin
g
s, please visit our website at
ceilin
g
s.com or call Techline at 1-877-ARMSTRONG
(
276-7876
)
.6).
L
i
m
i
ted Warrant
y
For warranty information, please visit ceilings.com
/
warranty
.
Precaut
i
onar
y
Measures
:
P
recautionary Measures: Durin
g
the installation be certain that the work site is well ventilated and
a
void breathin
g
dust. Avoid contact with skin or eyes. Wear lon
g
-sleeve, loose fi ttin
g
clothes,
g
loves and eye protection. Cut and
trim with kni
f
e, razor or hand saw. Do not cut with
p
ower e
q
ui
p
ment unless either a dust collector is used on the e
q
ui
p
ment or
local exhaust is used and a NIOSH a
pp
roved res
p
irator is worn to
p
revent overex
p
osure to airborne silica. Ex
p
osures to res
p
irable
c
rystalline silica are not detected in industrial hy
g
iene testin
g
on workers installin
g
acoustical ceilin
g
panels
f
or an 8 hour wor
k
day and are not expected durin
g
the normal use o
f
this product; however, actual levels must be determined by workplace hy
g
iene
testin
g
. Prolon
g
ed and repeated exposure to airborne free respirable crystalline silica can result in lun
g
disease
(
i.e., silicosis
)
and
/
o
r lun
g
cancer. Panels do not release respirable dust in their installed state and there
f
ore do not present any known health hazards
when installed and
p
ro
p
erl
y
maintained.
First Aid Measures
:
If e
y
e or skin contact occurs, fl ush with
p
lent
y
of water for at least 15 minutes and remove contaminated
c
lothin
g
. After installin
g
material, wash with warm water and mild soap.
R
efer to Armstrong World Industries
S
afety Data
S
heet for more information
.
If
y
ou have an
y
technical or installation
q
uestions, or to re
q
uest a Safet
y
Data Sheet,
p
lease call: 1 877 ARMSTRONG.
Do not store or install under conditions where relative humidity exceeds 70%.
(
Except Humi
G
uard
®
Plus and Humi
G
uar
d
®
M
ax
)
C
ut line
E
P
encil
/
C
ut
li
ne
D
Tile
f
ace