
Installation Guide


Installing WoodHaven
™
Planks Directly to Ceiling
Joists with Furring Strips and WoodHaven Clips:
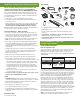
LARGE CEILING REQUIREMENT
Furring Strip Expansion Joint
If your ceiling installation is greater than 21-ft in the length direction of the
WoodHaven
™
planks, an expansion joint is required. You will need to plan
this detail into the ceiling layout. Expansion joints can be placed more
frequently than 21-ft to achieve a balanced visual. A drawing of this
detail is shown below.
Locate where you will place your expansion joint. This joint will run parallel
to the other furring strips. Mark the expansion joint location and install a row
of furring strips along those marks. The furring strips should be installed
end to end with a 1/2-in gap between the ends. Next, use a WoodHaven
plank to create a spacer for the expansion joint. Rip down a WoodHaven
plank into 7/8-in wide strips. One plank should yield about 5 spacers.
Attach these strips to the face of the installed furring strip with screws.
Countersink the screws so they do not interfere with the next step. Leave a
1/2-in gap between the ends of these strips. The fi nal step in creating the
expansion joint will take place once the ceiling is installed. When installing
WoodHaven planks, they should be cut to leave a 1/2-in gap on either side
of the expansion joint spacer piece. After all the WoodHaven ceiling planks
are installed, fi nish off the expansion joint with a 2-1/2-in or wider piece of
decorative trim or molding (available from other manufacturers). Pre-painting
the decorative trim will help keep your ceiling installation clean. This trim
should be attached to the expansion joint assembly using fi nishing nails.
Putty and touchup paint as needed.
NOTE: Furring strips should be installed within 6-in of either side of an
expansion joint. These strips will support the WoodHaven ceiling.
GENERAL INSTALLATION
Locate ceiling joists if not exposed. Tap on the plaster or drywall ceiling
until you hear a solid thud, or use a stud fi nder. Generally, joists are spaced
16-in or 24-in on center. If not exposed, mark with a chalk line. Level and
attach furring strips perpendicular to the joists, starting 2-in from the fi rst
wall. Spacing should not exceed 24-in on center. If you have a sloped
surface (not covered in these instructions) contact Techline at
1-877-ARMSTRONG (276-7876) for guidance.
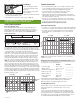
Determine Border Plank Size for a Balanced Appearance
Example: Your Room:
1. Measure room width same Room = 178" ____________
direction as the joists
2. Divide by 5" 178"÷5" = 35.6 ____________
3. Multiply the remainder by 5" 0.6 x 5" = 3" ____________
4. Add 5" to the result 3"+ 5" = 8" ____________
5. Divide result by 2 8"÷ 2 = 4" ____________
6. Record your border Border plank ____________
plank width width = 4"
Install Planks
Snap a Chalk Line
1. Measure the calculated border
plank width and snap a chalk line
at that distance from the front wall.
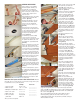
Cut First Border Plank
1. Familiarize yourself with the plank edges and face before you begin cutting
your fi rst plank. (illus. A)
2. Cut the fi rst row of plank to the border plank width, removing the
tongue edge. TIP: Using a table saw or circular saw helps to ensure a
clean straight line.
3. Each plank for the fi rst row will be cut to the border plank width
minus 1/2-in to allow for an expansion gap.
Install First Row of Planks
1. Align the groove edge of the border
plank with the chalk line. (illus. B)
2. Slide clips into the groove at the
furring strips and screw clips to
the underside of the furring strip.
Ensure screws are installed
straight into furring strip. If
installed at an angle, the screw
head could interfere with installation. NOTE: Plank’s groove must slide freely
with the clip. Tightening the screw too much could cause the clip to twist and
keep the planks from fl oating properly. Ensure the clips are level.
3. Continue measuring, cutting
and installing fi rst row of planks.
Cut last plank to the length
that leaves a 3/4-in gap at the
opposite side wall. (illus. C)
NOTE: 1/2-in and 3/4-in gap
are critical for normal expansion
and contraction. The gaps will be
covered by crown molding.
Instructions if Installing Item 1149 Bead Board:
Plank ends meet with a shiplap joint. When you install the second plank with
the shiplap joint facing up (illus. D) apply a small amount of water-based
wood glue to the joint. Any material expansion due to room conditions will
take place at the ends of each course of plank.
I nstall Remaining Planks
1. Seams from row to row should be
staggered. Cut some length from
the fi rst plank of the second row
to stagger the seams from row to
row keeping the 1/2-in and 3/4-in
gaps at the ends.
2. Start the second row by inserting
the tongue into the groove of the
piece in the fi rst row. (illus. E)
3. Measure the distance to the wall,
and cut the last row of planks to
fi t. Cut off the groove side. Insert
the tongue of the last row into
groove of previous row. Run 1
screw per plank into the plank at the furring strip location. OPTION: You can
drive three fi nishing nails per plank into the wall directly under the face of the
plank to hold in place. Molding will complete the installation.
FURRING STRIP
WOODHAVEN SCREW
CEILING CEILING
WOODHAVEN
CLIP
WOODHAVEN
PLANK
DECORATIVE
TRIM
SPACER BLOCK
ATTACHED
WITH SCREW
Factory
Tongue
Factory Tongue
Factory
Tongue
Factory
Groove
Surface
illus. A
Chalk Line
Furring
Strips
Second plank goes here
Side Wall
Front Wall
1st plank
illus. B
Side Wall
Side Wall
1/2" Gap
3/4" Gap
Furring Strips
illus. C
Second plank being installed
First plank in place
Glue
illus. D
Tongue
Groove
Ceiling Joist
Ceiling Joist
Tongue
Groove
Furring Strips
Furring Strips
illus. E