
Instructions / Assembly

4. INSTALLING SUSPENSION SYSTEM FOR ALL-IN-ONE SELF-STOP FASTENERS
4.1 Suspension System Overview
AcoustAffix
™
panels are required to be screw-attached to Furring or Armstrong
®
Drywall Grid. The use of furring or grid helps to
increase the product’s overall NRC performance.
4.2 Furring Recommendations
Furring for AcoustAffix panels can be either metal or wood. For steel channel/hat channel, Armstrong Ceilings recommends
25-gauge 7/8" furring, however, ranges of 20- to 25-gauge metal furring can be used. For wood furring, 3/4" x 1-1/2" or
3/4" x 2-1/2" is recommended. Furring layout will be based on panel orientation.
The furring must be attached to the structure in a method that supports the full weight of the panels. Armstrong Ceilings does
not provide guidance regarding the attachment of furring to structure and is therefore not liable for any damage or installation
complications that may occur from an improper installation of furring. For guidance on the attachment of the furring to structure
please refer to the manufacturer’s instructions.
4.3 Armstrong Drywall Grid Recommendations
All installations using Armstrong Drywall Grid will require 12' Drywall Grid mains (HD8906) and Uptight Clips (QSUTC). For
side-by-side installations, you will also need 40" Drywall Grid cross tees spaced 48" on center between the two main beams.
A row of 48" Drywall Grid cross tees (XL8945P) will be installed at the midpoint of the 40" cross tees to provide attachment
points for the center row of hardware. End-to-end installations will only require Drywall Grid main beams spaced 16" apart,
and Uptight Clips.
4.4 Drywall Grid or Furring Layout
The layout of the suspension is dependent upon the desired panel layout. Panels are installed in single panel width rows with the
edges butting together long edge-to-long edge (nominally 4' wide) or short edge-to-short edge (nominally 2' wide).
NOTE: The spacing and straightness of structural components in the deck may vary so it is recommended to use an alignment
method that can operate independently from these components (e.g. laser, chalk line). The drywall grid or furring should be
leveled to within 1/4" over 10' (ASTM C636) to ensure a satisfactory visual.
Make sure at least 6" of clearance is given between the outside edges of the and the nearest possible obstruction as the panels,
when installed, will extend 4" beyond the edge of the suspension and may interfere with obstructions if sufficient clearance
is not given.
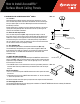
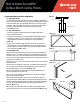
4.5 4' (nominal) Wide Rows
Rows with panels butting long edge-to-long edge require three rows of
suspension. Suspension is installed perpendicular to the length of the panels.
Suspension must be spaced 4" On Center (O.C.) in from the desired short edges
of the panels, with a center row of suspension installed at the midpoint of the
panels, leaving 20" O.C. spacing between the three rows. Where the rows start
and end, the suspension should be cut 1"- 2" short of the desired panel edges
to avoid visibility of the suspension (illus. 4.5).
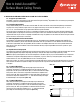
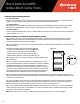
4.6 2' (nominal) Wide Rows
Rows with panels butting short edge-to-short edge require two rows of
suspension. Suspension is installed parallel to the length of the panels.
Suspension must be spaced 4" O.C. in from the desired long edges of the
panels, leaving 16" O.C. spacing between the two rows. Where the rows
start and end, the suspension should be cut 1"- 2" short of the desired
panel edges to avoid visibility of the suspension (illus. 4.6).
How to Install AcoustAffix
™
Surface Mount Ceiling Panels
20"
4"
illus. 4.5
16"
4"
illus. 4.6
RC-3832-1019