
Instructions / Assembly

For all panel layouts, the same spacing and fastener attachment rules apply:
• Each full-size panel requires six self-stop fasteners
• Exact fastener spacing is based on alignment with furring but should target 20" O.C. between fasteners along the length of
the panel and 16" O.C. between fasteners across the width of the panel
• Each fastener is placed roughly 4" in from panel edges (between 3" and 5" is acceptable)
• For parallel rows, there must be at least 2" of space between panel ends of separate rows
Make sure at least 6" of clearance is given between the outside edge of the last suspension and the nearest possible
obstruction as the panels, when installed, will extend 4" beyond the edge of the suspension and may interfere with
obstructions if sufficient clearance is not given.
5.6 Field Cutting
AcoustAffix
™
panels can be cut to length, as long as the panels follow the same attachment rules, and the panels are
supported within 4" of the edges.
If the field-cut edge is placed against a factory painted edge then the bottom of the cut edge should be painted.
5.7 Touch-up Paint Recommendations
All field-cut edges should be colored to match the factory finish.
6. ALTERNATE INSTALLATION OPTIONS:
6.1 Attachment to I-Beam
AcoustAffix is mounted to I-beams using metal furring channel and the All-in-one Self-stop Fastener. Panels must be
installed in single panel height rows, with the 2' edges of each panel end to end. Panels can be installed with ends butted
up or installed with a reveal between ends.
6.2 I-Beam Requirements
• The I-beam web must be tall enough to accommodate two rows of furring spaced at least 4" O.C. up to a maximum of
16" O.C running the same direction as the beam.
• Fastener connections of the furring channel to the I-beam structure are specified by the contractor and must follow the
manufacturer’s instructions and reference code.
6.3 Installation Steps:
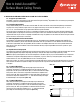
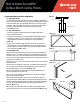
Spacing of the furring will be based on the panel size and necessary fastener
locations. All panels require four fasteners, one in each corner, within 4" of each
edge. Furring must be installed accordingly so that it is behind each fastener
location (illus. 6.3).
Once your furring is installed, make sure you have sufficient clearance to install
your panel between the flanges of the I-beam. Measure the space between
the flanges of the I-beam to determine if the panels need to be cut to size. It
is recommended that the panel have at least 1" of clearance at the top since
I-beam flanges taper inwards in most cases. If cuts are required the panels can
be cut with a utility knife.
Once your panels fit, you can install them using the self-stop fasteners. When installing AcoustAffix panels for this application,
only four fasteners are needed for each panel when following the spacing detailed above.
When panels are cut, they still must be supported with a fastener located near each corner of the panel, approximately 4" in
from each edge. You can either rest the panels on the bottom flange of the I-beam as a method of aligning panels end to end,
or, if installing the panels up off the flange, use a laser or string line to ensure a level installation. Panel ends are intended to be
butted up against each other for the most pleasing visual.
How to Install AcoustAffix
™
Surface Mount Ceiling Panels
4"
4"
AcoustAfx
™
Panel
Furring
illus. 6.3
RC-3832-1019