
Instructions / Assembly

How to Install AcoustAffix
™
Surface Mount Ceiling Panels
7. INSTALLING PANELS WITH TRUSS MOUNTING KIT
7.1 Attachment to Truss
It is recommended to have two installers for truss installations. AcoustAffix
™
panels can be mounted to flat trusses using the Truss Mounting Kit. The panels
must be installed in pairs and cover both sides of the truss. Panels must be
installed in single panel height rows, with the 2' edges of each panel end to
end. Panels can be installed with ends butted up or installed with
a reveal between ends.
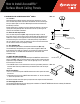
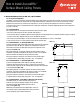
7.2 Truss Requirements:
• The truss must have a horizontal flange on the bottom edge greater
than the width of the panel.
• It must be no smaller than 6" in height between top and bottom flanges.
• Webs/Braces of the truss can be no more than 4" (max dimension of
air gap between panels that truss fastening kit will accommodate)
(illus. 7.2).
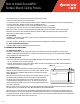
• It must have a sufficient number of webs or braces for the panels to be
fastened against. It is recommended that there are at least two webs or
braces contacting each pair of panels when installed, thereby eliminating
any risk of movement (illus. 7.2-1).
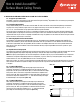
7.3 Installation Steps:
Make sure you have sufficient clearance to install your panels between the
flanges of the truss. The panels should rest on the bottom flange of the truss
and have at least 1/2" of clearance between the panel and the top flange of
the truss when pressed up against the webs or braces. If your panel does not
fit, you must cut it down to size.
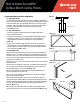
Once the panels are cut to fit, pre-mark the locations for your truss mounting
kit onto the panel.
Four mounting kit assemblies (2 weld nuts, 1 threaded rod) are required per
panel. It is required to have one assembly located near each corner of the
panel, approximately 4" in from each edge (illus. 7.3).
With your holes marked, screw one weld nut onto the threaded rod such
that it sits flush with the end of the rod.
Once in place, crimp the base of the weld nut so it cannot be unscrewed.
Do this for all needed assemblies.
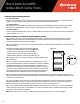
Next, move your panels into the truss (one on each side of the web) and
align your two panels together. With the marked side of the panel facing you,
take your threaded rod/crimped weld nut and tap the uncapped side through
the panel, the air gap between panels, and out through the panel on the
other side (illus. 7.3-1).
Once through, cap off the other side with a weld nut by hand tightening it
against the panel. Use pliers to cut off the excess threaded rod (illus. 7.3-2).
4" Max. Truss width
Truss Mounting Kit
illus. 7.2
2
1
illus. 7.2-1
4"
4"
illus. 7.3
illus. 7.3-1
Clip threaded rod
ush to weld nut
illus. 7.3-2
RC-3832-1019