
Instructions / Assembly

How to Install AcoustAffix
™
Surface Mount Ceiling Panels
8. ADHESIVE INSTALLATION CONSIDERATIONS
8.1 Area Preparation:
Surfaces must be dry and free of dust, grease, oil, dirt or any other material that may deter adhesion. If the paint is flaking or
peeling it must be removed. Existing finish paint must be well-bonded and not flaking or peeling.
8.2 Painted Surfaces:
Avoid applying to a newly painted ceiling. Glossy painted surfaces must be abraded. For painted or sealed surfaces, install a
small test area and observe after 12 hours. For plaster ceilings, plaster must be painted, non-chipping, and smooth.
8.3 Surface Flatness:
To ensure a finished installation that is level, it is recommended that the ceiling surface for attachment be free of irregularities
and be level within 1/4" in 12'.
9. INSTALLING PANELS WITH ADHESIVE TO DRYWALL/CONCRETE/PLASTER
9.1 For drywall, concrete, and plaster installations with AcoustAffix
™
panels, reference the follow sections. The Titebond
®
GREENchoice Acoustical Ceiling Tile Adhesive provides a secure bond and does not require any supplemental mechanical
attachment as long as these instructions are followed.
9.2 Panels should have at least a 1/4"-3/8" reveal between edges. This will help alleviate slight differences in the levelness of
adjacent panel faces.
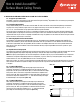
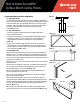
9.3 Adhesive should be applied per the following guidelines:
• Your glue lines should be 20" long and 4" wide (illus. 9.3).
• Maximum distance from glue line end to panel edge: 2"
• Maximum distance from glue center line to panel edge: 6"
• Maximum distance between center line of the glue rows: 18"
9.4 Utilizing the trowel, ensure that the adhesive is uniformly spread to cover
your specified area.
9.5 Once in position, push the panel against the ceiling applying even hand
pressure to the board where the adhesive is located in the center first, followed
immediately by the edges of the panel. By attaching the center first, you can
still pivot the panel slightly left or right before adhering the edges. This ensures
that the panel can be aligned correctly first before the edges are solidified into
place. Avoid excessive pressure to minimize panel flexing that will disturb the
previously pressed areas of adhesive and result in release of the adhesive.
9.6 Any slight adjustments to the panel placement should be done immediately to not weaken the adhesive bond once it has
started to set. Once the panel is evenly pressed into position, the adhesive should provide an immediate bond to hold the panel
in place while the adhesive sets.
9.7 Press a sponge float across all areas of the panel where glue was applied to ensure all glue spots and lines are properly
compressed and adhere to the deck. Lastly, measure adjacent panel edges to check levelness as panels are installed; the
levelness of the finish face of adjacent panels should be within 1/8" to ensure a satisfactory visual
9.8 For wall installations, follow steps 9.1 – 9.6 and apply the same methods in the vertical. Use a square or straight edge to
confirm that the face of the panels are flush within 1/8" to ensure a satisfactory visual. The bottom edge of the panel should
be at least 6' from the floor to avoid damage.
NOTE: Panel creep may occur as the glue is setting. Panels should creep no more than 1/8" during installations.
24"
48"
2" max.
6" max.
illus. 9.3
RC-3832-1019