
Instructions / Assembly


• Measure the distance between your marks.
- If the distance is 5 feet, your corner is square.
- If the distance is less than 5 feet, your corner has a measurement of less than 90 degrees.
- If the distance is over 5 feet, your corner has a measurement of more than 90 degrees.
• If the walls are out of square by a large margin, you may want to balance out the difference.
• It is critical to get the first row of tiles straight.
• This is accomplished by following the string line and not the wall.
• Walls can be irregular throughout a room, especially in corners.
• Trim tile to fit as you follow the string.
• Use a scrap piece of tile to “tap in” and line up the good tile.
• You can tap the scrap tile gently with a hammer to avoid damaging the tile you’re installing.
BEGIN INSTALLATION
Locate ceiling joists
To locate hidden joists, use either a stud finder or tap on the ceiling until you hear a solid thud.
Mark the joist locations with chalk lines. Repeat this to locate other joists and determine their
direction. Generally, joists are spaced 16" or 24" on center.
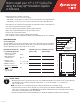
Determine border tile size
for a balanced appearance
Example Calculate your room
(side to side)
Calculate your room
(front to back)
1. Measure room width
in feet and inches 10' 8"
2. Disregard full feet
measurement 10' – 8"
3. Add 12" to the
remaining inches 8" + 12" = 20"
4. Divide result by 2 20" ÷ 2" = 10"
5. Record your border tile
width (side wall) 10"
6. Repeat 1-5 for
opposite wall
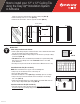
INSTALL TRACK
• Run Easy Up track in the opposite direction of the joists. Install track with #6 coarse thread screws. Screw length may
vary, depending on your existing ceiling type. Over plaster – 3" screw; over drywall – 2" screw; direct to
joists – 1 5/8" screw.
NOTE: If necessary, you can shim Easy Up tracks to improve the flatness of your existing ceiling.
• Screw first row of track 2" from the side wall. Use a screw at every joist. Continue installing first row of track
end-to-end or overlapped side to side. (illus. A) Track should be installed flush to the front and back walls. To finish
a row of track, cut to fit using tin snips or a hacksaw.
• From the side wall, measure border tile width minus 2". (Border tile width was calculated on the first page.)
STEP
1
LA-297872-821
Exposed
joists
Plaster ceiling
or drywall
10"
10"
7"
7"
7"
7"
10' 8"
FRONT WALL
S
I
D
E
W
A
L
L
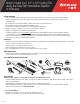
How to install your 12" x 12" Ceiling Tile
using the Easy Up
®
Installation System
or Adhesive
X