
Instructions / Assembly
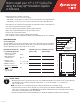


Install second row of track parallel to the first at that point. (illus. B)
• Install remaining rows 12" on center. (illus. B)
• Install the last track row 2" from the opposite side wall. (illus. C)
INSTALL TILE
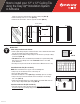
Guide String and First Border Tile Cut
• Install a guide string along the front wall. Position at the calculated border width
from the front wall, about 3/4" below the tracks.
• Familiarize yourself with the flanged edges of the tile before you begin cutting
your first tile. (illus. D)
• Side wall: Cut tile to the side wall border tile width, face-up with sharp utility
knife. Do not cut off flange sides of tile. Front wall: Cut tile to front wall
border dimension.
• The flange is not part of the border tile measurement. Measure tile face only.
Install First Border Tile (Tile 1 in illus. E)
NOTE: Refer to Illustration E for proper order of installing tiles.
• Snap a clip onto the first two tracks, teeth facing out.
• Push clips flush against wall.
• Push first tile firmly into corner (illus. F) by embedding clips into cut edge.
• Snap 2 new clips onto tracks and slide teeth over flange to secure flange
side of tile. (illus. G)
• Lightly tap clips with hammer to seat tile tightly to front wall. Make sure the
tile face edge is aligned with guide string. (illus. H)
Install Second Border Tile (Tile 2 in illus. E)
• Follow the same procedure as first border tile, measuring and trimming
along front edge only (not flange edge). Push flange edge firmly into first
border tile.
LA-297872-821
STEP
2
flange
Tile face
illus. D
illus. F
FRONT WALL
S
I
D
E
W
A
L
L
How to install your 12" x 12" Ceiling Tile
using the Easy Up
®
Installation System
or Adhesive
illus. E
FRONT WALL
S
I
D
E
W
A
L
L
1 2 5 6 7 8 9
3
11 12
14
4 13
10
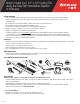
1/8"
1/4"
illus. A
2"
2"
Joist Direction
12"
Last Track
illus. C
10"
2"
2"
Joist Direction
2"
12"
FRONT WALL
1st Track 2nd Track 3rd Track
S
I
D
E
W
A
L
L
*Border tile width calculated on the first page.
illus. B
*