
Instructions / Assembly


Begin Installing Row Two (Tile 3 in illus. E)
• Trim tile to the side wall border tile width.
• Install with clips.
• Slide into place making sure the face edge is aligned with tile 1.
Install First Full Tile (Tile 4 in illus. E)
• Align tile squarely with the adjacent 3 tiles. Make sure all face edges
are aligned.
Install Remaining Tiles
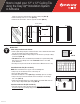
Complete first row (border) keeping tile face edge, not flange edge, flush with
guide string. (illus. E and illus. H on page 2)
• Continue installing tile using diagonal sequence shown. (illus. E)
• Snap a clip onto the track before inserting the last row of tile, and push
flush with end wall.
• Cut the border tiles against the end wall 1/2” short to allow for expansion
as room conditions change.
• Install end wall border tiles and use a screwdriver next to the wall to embed
the clip into the cut edge of the tile. (illus. I)
INSTALL WALL MOLDING
• Paint or stain decorative molding before installing.
• Install molding at the joint between the ceiling and walls.
• Nail molding into the wall studs at least every 24". (illus. J)
NOTE: All Armstrong 12" x 12" ceiling tiles can be painted with latex paint. The front and back of the tile should be painted.
Armstrong cannot guarantee that the published surface-burning characteristics, fire-resistance ratings, acoustical performance,
dimensional stability/sag, or light reflectance will remain the same after repainting. Field painting will void the warranty.
For additional information and videos about installing ceilings, including special installation tips and warranty, please visit our
website at ceilings.com or call Techline at 1-877-ARMSTRONG (276-7876).6).
LA-297872-821
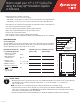
STEP
3
illus. J
How to install your 12" x 12" Ceiling Tile
using the Easy Up
®
Installation System
or Adhesive
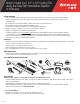
illus. G
FRONT WALL
S
I
D
E
W
A
L
L
7"
Tile
Face
Flange
Front Wall
Side Wall
Guide String
illus. H
illus. I