
Instructions / Assembly
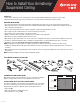


Traditional Hanger Wire
• Snap Chalk Line for Main Beams 4' Apart (A).
• Screw in Wire Fasteners 4' Apart (B).
• Wrap hanger wire securely around itself 3 times (C).
NOTE: Additional hanger wires may be needed to support light fixtures.
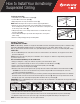
• Measure up 7/8" from the bottom of the molding. Drive nail into wall just
above molding. Do the same on other side of room. Stretch a string from nail
to nail along a row of wires (D).
• Swing hanger wires over to string and bend each one at 90° where they
touch the string (E).
• Stretch additional strings to pre-bend other hanger wires, to help level
entire ceiling.
• Remove Leveling String(s) after pre-bending wires.
QuickHang
™
Hardware
FOR RESIDENTIAL USE ONLY:
NOTE: The QuickHang
™
hardware is designed to work with solid wood and engineered wood joists in residential ceiling
applications. QuickHang hardware allows for ceiling drops from 2.5" to 6" with 6" grid hook kits or 2.5" to 12"
with 12" grid hook kits, below the bottom of the joists. QuickHang hardware is not for use on finished drywall ceilings.
SAFETY TIPS
• Do not cut QuickHang hooks. If the hook needs to be shortened due to an obstruction, the top portion can be bent
by hand or with pliers.
TIPS: Measure and mark your joists prior to installation. Use a string line or chalk line to align marks perpendicular
to joists across the room.
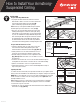
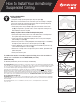
How to Install the QuickHang
™
Hooks and Brackets
• Hang your string line or snap your chalk line to position your main beams 4' apart.
• Make a 1" long vertical mark up the side of each joist where a bracket will be located (A).
• Use the center hole in the brackets to line the brackets up with your marks (B).
• Hammer in the 2 tabs for a temporary hold (C).
• Nail the bracket to the joist through the two openings above the hammer tabs with the nails included in the kit (D).
– OPTIONAL: You can also secure the bracket to the joist with a single #5 Wood Screw through the center hole
(screws not included in kit hardware.)
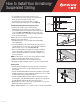
• With the bracket securely attached to the joist, insert the grid hook using the diamond-shaped holes in the brackets.
Thread the small end of the hook, from the back, through the lower hole (E). Push the hook up and rotate to thread
through the upper hole, squeezing the spring tabs to allow the wire to go through (F).
IMPORTANT: Do not cut QuickHang hooks. If the hook needs to be shortened due to an obstruction, the top portion can be
bent by hand or with pliers.
• Turn all hooks in the same direction, parallel to the joists.
• Set the hooks at about the same height; the bottom of the hooks should align with the top of the wall molding.
• To adjust the height of the hook, squeeze the upper and lower spring tabs while lifting or lowering the hook.
NOTE: You will do final leveling once all of the grid is installed.
How to Install Your Armstrong
®
Suspended Ceiling
LA294998-1219
A
B
C
Insert
grid hook
Main beam
Existing
cross tee
Insert to
the RIGHT side
of existing tee
Align
center
of bracket
with vertical
mark
1" long
vertical
mark
Bracket
Hammer
tabs
Joist
C
Insert
grid hook
Main beam
Existing
cross tee
Insert to
the RIGHT side
of existing tee
Align
center
of bracket
with vertical
mark
1" long
vertical
mark
Bracket
Hammer
tabs
Joist
A
Insert
grid hook
Main beam
Existing
cross tee
Insert to
the RIGHT side
of existing tee
Align
center
of bracket
with vertical
mark
1" long
vertical
mark
Bracket
Hammer
tabs
Joist
B
Insert
grid hook
Main beam
Existing
cross tee
Insert to
the RIGHT side
of existing tee
Align
center
of bracket
with vertical
mark
1" long
vertical
mark
Bracket
Hammer
tabs
Joist
E
Insert
grid hook
Main beam
Existing
cross tee
Insert to
the RIGHT side
of existing tee
Align
center
of bracket
with vertical
mark
1" long
vertical
mark
Bracket
Hammer
tabs
Joist
D
Insert
grid hook
Main beam
Existing
cross tee
Insert to
the RIGHT side
of existing tee
Align
center
of bracket
with vertical
mark
1" long
vertical
mark
Bracket
Hammer
tabs
Joist
F
D
E
Leveling
string