
Installation Guide


Metallaire
™
Installation Instructions
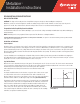
Wood Furring Option
:
Nail furrin
g
strips to the ceilin
g
around the perimeter of the room about 1-1/2-in from the walls. Nail furrin
g
strips across the
j
oists where the
panels will overlap each other every 24-in
(
check your layout for these locations
)
. Nail furrin
g
on 12-in centers between the furrin
g
you have
already installed.
S
him the furring to make it level. Fasten cross furring to the ceiling where the panels will overlap on the ends (again, chec
k
your layout for these locations
).
B
o
r
de
r P
a
n
e
l In
s
t
a
ll
a
ti
on
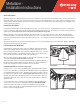
Install border panels fi rst.
O
nce you know the width of the borders on each side of the room, cut and install border panels to reach from the
wall to 1 inch past the edge of where the last full panel will be installed along that wall. You can use tin snips or electric sheet metal shears to
cut the
p
anels.
U
se cone head nails to secure the panels to the plywood or furring strips.
With the long edge o
f
the border panel against the wall, place the nails close to the wall so that the cornice will hide the nails when it is
installed later. Nail the other long edge o
f
the border panels very close to the edge toward the center o
f
the room. The
f
ull panels will later
hide these nails. Overla
p
the border
p
anels when the
y
meet b
y
1/2-in – 3/4-in. Com
p
lete the border
p
anel installation around the
p
erimeter
o
f th
e
r
oo
m.
Wh
en t
h
e
b
or
d
er pane
l
s meet eac
h
ot
h
er, t
h
ere w
ill
b
e
hi
g
h
spots on one pane
l
meet
i
ng
l
ow spots on t
h
e ot
h
er pane
l
.
T
ap t
h
ese
hi
g
h
spots
down usin
g
a nail head or small tack hammer
.
F
u
ll D
eco
r
a
t
i
v
e
P
a
n
e
l In
s
t
a
ll
a
t
ion
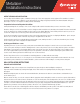
Install full panels startin
g
in the center of the room. Ali
g
n the ed
g
es of the fi rst panel
with the
p
er
p
endicular chalk lines and nail the
p
anel in
p
lace. Nail down the center of
the panel using cone head nails every 12-in before nailing the edges. Place cone head
nails alongside the buttons or raised bumps along the edges to secure the
fi
rst panel.
These nails will not inter
f
ere with the overlap o
f
the next
f
ull panel.
When the
p
anels overla
p
, the buttons will fi t over each other like a ball and socket. Drive
cone
h
ea
d
na
il
s
di
rect
l
y t
h
roug
h
t
h
e
b
uttons every 6-
in
at the edges of the panels.
n
Ti
g
h
ten any seams t
h
at are not c
l
ose
d
b
y tapp
i
ng aga
i
nst t
h
e over
l
app
i
ng e
d
ge w
i
t
h
a
block of wood and a hammer. When four panels overlap at a corner, you might have to
predrill a hole through the four layers of metal for the cone head nail
.
Co
rni
ce
In
s
t
a
ll
a
ti
o
n (Used onl
y
with nail-up panels
)
Install the cornice so it covers an equal amount o
f
the ceiling and the wall. Fasten the
cornice to the ceiling with cone head nails driven through the buttons. We suggest that
y
ou
p
redrill the buttons on the cornice. This makes it much easier to nail the cornice to
the ceiling. I
f
you predrill the cornice,
d
rill the buttons
f
rom the back sid
e
,
as t
h
e
d
r
ill
will walk off the button if
y
ou drill from the front side. It is not necessar
y
to drive cone
head nails in the bottom o
f
the cornice. The nails in the top will hold the cornice tight
against the wall.
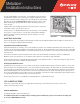
Y
ou can make inside corners relatively easy by installing wood blocks (plinths) in the
corners of the room so the cornice simply butts a
g
ainst them
(
See Illustration B
)
.
They can be made
f
rom solid wood or made up
f
rom lumber pieced together. No
miters or coping necessary. We recommend fi nishing the wood block the same as the
panels to create a pleasin
g
appearance.
Illustration B Plinth O
p
tio
n
Illustration C Cope Optio
n
R
C
-
30
17-1
0
17