A R MSTRO N G ® VIN YL TIL E FL O O R I N G INSTALLATION, CARE AND MAINTENANCE
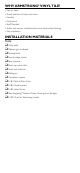
WHY ARMSTRONG® VINYL TILE? • Easy to clean • Broad selection of styles and colors • Durable • Economical • Scuff Resistant • Softer and warmer underfoot than most hard-surface flooring • Easy installation INSTALLATION MATERIALS Tools: ❑ Utility knife ❑ Medium grit sandpaper ❑ Sanding block ❑ Smooth edge trowel ❑ Tape measure ❑ Short nap paint roller ❑ Chalk and chalk line ❑ Rolling pin ❑ Carpenter’s square ❑ S-184 Patch & Skim Coat ❑ S-183 Underlayment ❑ S-185 Latex Primer ❑ New Beginning Resilient Deep C
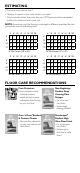
ESTIMATING • Find your room size on chart • Number in square is how many cartons you need • Charts include at least five extra tiles per 100. These extra tiles are needed to allow for waste and odd room size. NOTE: Armstrong vinyl tile flooring is packaged in different quantities. Be sure you use the correct estimating chart.
PREPARE SUBFLOOR Step 1. Inspect and prepare subfloor. Subfloor must be clean, dry, and smooth. A subfloor is the surface over which your new Armstrong® tile flooring is installed. IF INSTALLING OVER… VINYL FLOORING (only single-layer) Must be noncushioned-backed and firmly bonded. Check for loose vinyl, gapped seams, cuts, tears, rips, or other damage. Do not install over tile below grade level. PLYWOOD If installing a new plywood subfloor, use APA Underlayment Grade.
WARRANTY LIFETIME THE ARMSTRONG DIY LIMITED RESIDENTIAL WARRANTY FOR DIY VINYL TILE FLOORING† Premium Floors – Harbor™ Collection, Natural Visuals™ Deluxe Floors – Granite Mills™ • What is covered and for how long? The Armstrong Do-It-Yourself (DIY) lifetime warranty for Armstrong resilient tile means that for the lifetime from the date of purchase, if for ANY reason you are dissatisfied with your floor, we will give you replacement tile.
Installation requirements Proper installation plays a key role in the performance of Armstrong floors. For installation of vinyl tile, these basic guidelines should be followed: • Store tiles for 48 hours in room where they will be installed. Keep room at a minimum of 65º F during that time and during installation. After installation, temperature should not fall below 65º F for the first 48 hours, and not below 55º F after that.
Care and maintenance Proper care and maintenance will help ensure your floor always looks its best. Simply follow our maintenance and prevention steps outlined below. Immediately after installation • Maintain room temperature at 65º F for 48 hours after installation is completed. This assures proper curing, setting and bonding of products. • The adhesive under your floor needs time to thoroughly dry after installation. Therefore, we recommend that you do not scrub or wash your floor for five days.
STAIN REMOVAL TO REMOVE THE STAIN, FOLLOW THESE INSTRUCTIONS IN ORDER, UNTIL NO TRACE OF STAIN REMAINS. CRAYON • Rub the stain with mineral spirits** or turpentine** on a clean white cloth. • Scrub the area with Armstrong New Beginning ® Resilient Deep Cleaning Floor Stripper* and a nonabrasive white scrubbing pad, following instructions on the label. LIPSTICK • Rub the stain with rubbing alcohol (isopropyl alcohol)** on a clean white cloth.
HAIR DYE • Rub the stain with rubbing alcohol (isopropyl alcohol)** on a clean white cloth. • If stain still shows, use mineral spirits** or turpentine** on a clean white cloth. • If stain still shows, very carefully wipe with fingernail polish remover** containing acetone (follow use instructions on label) on a clean white cloth. • Scrub the area with Armstrong New Beginning ® Resilient Deep Cleaning Floor Stripper* and a nonabrasive white scrubbing pad, following instructions on the label.