
Warranty


moisture changes, show a slightly raised area or buckle near a perimeter pinch
point. Typically, if this happens, it will occur during prolonged periods of cold
w
eather when indoor conditions become very dry and the wood subfloor/
underlayment components dry out and shrink.
S
hould this happen and a buckle occurs, the flooring should be gently lifted or
pulled back from the pinch point and retrimmed. If the flooring shows fullness at
a doorway or other area where tape has been applied, gently lift from the tape
and push out the fullness and rebond. Use a fresh section of tape if necessary.
Wherever practical, the No-Glue Vinyl Sheet flooring should be allowed to
float freely over wood subfloors as the wood can grow and shrink with changes
in temperature and humidity. The following guidelines will help to minimize the
effects of seasonal movement when installing over wood subfloors:
● The flooring must be cut 3/16˝ to 1/4˝ away from all vertical surfaces such
as walls, cabinets, pipes, etc., to allow an expansion zone for seasonal
movement. (This gap will be covered with moldings or wall base.)
● Door trim, where the expansion zone cannot be covered with wall base,
must be undercut to allow for free movement of the flooring underneath.
● Moldings and wall base covering the expansion zone must be raised slightly
to allow for free movement of the flooring. The wall base should be nailed
into the wall surface, not the floor surface.
● At doorways where new flooring meets another floor surface, use a trim
molding that covers the edge of the floor. This is the preferred method of
installation.
● Plan the layout for a minimum number of seams.
● Do not install over particleboard subfloors.
● Always keep the flooring rolled face-out until ready to install.
NOTE: Installation on stairs is not recommended. Installations in bathrooms are
acceptable; however, the Acrylic Double-face Tape should be used where the
flooring butts up against tubs, shower stalls or toilets. To
prevent water seepage and damage to the subfloor,
silicone caulk must be used to seal the edges of the
flooring at these fixtures. Leave a smaller gap of
approximately 1/16˝ to 1/8˝ between the floor and
these bathroom fixtures. Fill the gap with a neat bead
of caulk at the floor/fixture juncture using a high quality,
nonshrinking, pigmented caulk of appropriate color.
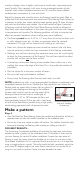
Make a pattern
Step 4.
● Your No-Glue Vinyl Sheet flooring should be unrolled and allowed to lay flat in a
separate room or area with similar conditions as the installation area.
● Do not lay it out over carpet or other soft surface. The subfloor should be solid
to prevent distorting the flooring while working or walking on top of it.
FOR BEST RESULTS...
The Armstrong Guaranteed Installation Kit provides the tools and instructions
needed to make a pattern of the installation area. The pattern is then used to
cut new flooring for correct fit before installation. If more than one piece of
flooring is used, the seams should be double-cut or trace cut as shown in the
Guaranteed Installation Kit. It is important that the seam be cut in a straight line
using a straight edge as a guide. The knife should be held completely vertical to
put a clean 90 degree edge at the seam. Seams should be cut net, not full or
snug as it can result in buckles. Center the tape beneath the seam.
Undercut decorative trim
and jamb moldings
at doorways.
scrap of
c
ardboard