
Warranty


Apply installation tape
Step 5.
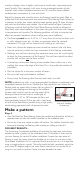
● Before moving your flooring to installation
a
rea, it’s best to apply Acrylic Double-face
Tape where needed at doorways and
underneath heavy moveable appliances.
(
See diagram.)
● Tape should be placed in the form of a large X under
the appliance. Do not overlap tape. Leave release
liner on top surface of tape and press tape securely to
the substrate using a dry cloth and hand pressure.
Step 6.
● If more than one piece of flooring is used, tape at seam
will be applied after the flooring is in place and the seam
is cut.
Lay floor in place and final trim
Step 7.
● Make a final check to be sure your prepared subfloor
is clean, dry, flat and dust-free.
● Carefully reroll the new flooring with design side out
and take into the room.
● Unroll it and position in the room taking care not to
distort it by creasing or putting sharp folds into it.
● Inspect around walls, cabinets, etc. to be sure that an
adequate expansion zone of 3/16˝ to 1/4˝ exists at all
vertical surfaces and that the flooring can freely slide
beneath doorway trim.
● Flooring should be laying flat and "balanced" in
the room.
NOTE: If additional flooring needs to be trimmed around the perimeter, do it
now. A simple method that works along most wall surfaces is using a short strip
of wood, approximately 2˝ high x 18˝ long x 3/16˝ thick, and holding it as a guide
along the base of the vertical surface, trim with a utility knife. Keep knife blade
up against the trim guide as you cut. Keep fingers out of blade path.
Bond with tape
Step 8.
NOTE: Armstrong recommends Acrylic Double-face Tape to install
No-Glue Vinyl Sheet flooring. Carpet tapes may show through and
impact the final installed appearance of your floor. Carpet tapes
may also cause vinyl discoloration.
● If there is a seam in your room, it should be
bonded with tape first, before bonding the other
selected tape locations.
● After the seam is properly put together and
bonded, gently fold back the edge of the flooring at
other areas selected to have tape, and remove
release liner from the tape.
● Carefully reposition the flooring. It must be laying flat when put down on top of
tape. You can gently lift and reposition again if necessary. Continue removing
release liner from tape and bonding at selected areas until complete.
● Final bonding step, use clean, dry cloth and hand pressure to firmly seal
flooring into double-face tape.
● Seal any seams with the S-564 Seam Coating Kit to protect against dirt and
moisture. Follow instructions on kit.
P
antry
T
a
p
e
a
t
S
e
a
m
Refrigerator
Cutout
T
ape
Tape at
d
oorway
C
arefully position
n
ew floor in room.
Pantry
T
ape
at Seam
Refrigerator
Cutout
Tap e
Tape at
doorway
Trim Option
Be sure to leave
expansion zone of
3/16˝ – 1/4˝ gap.
3/
16"
T
hi
c
k
S
pac
er
3/16” – 1/4” GAP