
Operating instructions


11.
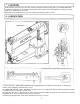
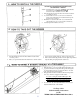
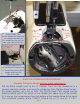
1. The outside presser foot pressure is adjusted by
loosening nut
#
(3).
2. To increase the holding capacity of the Outside presser
foot, turn the regulator
#
(1) clockwise.
3. To reduce the holding pressure, turn the regulator
Counter-clockwise. Be care not to fully unscrew the
regulator. It is spring loaded and will “pop” out.
4. Tighten the locking nut
#
(3).
The standard height of the presser foot regulator
#
(1)
from the casting to the top of the regulator screw
is about 5/8” to 3/4”.
12.
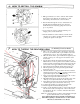
For Leather Stitching: The Feed Dog used in artisan models
TORO-3000, 3200 & 4000 R is smooth, without teeth so not to
damage your leather. The TORO-4000 LA-25 and TORO 4000 P may
use a different system.
For Fabric Stitching: All models should use a course tooth feed dog.
To adjust the height of the feed dog:
Either of the two methods are possible.
1. Open the bobbin case to reveal the feed dog attaching screw.
2. Loosen the screw
#
(4) and move the feed dog up or down as re-
quired.
3. Re-tighten the fed dog attaching screw.
OR a second method is to do the following:
3. Loosen and remove the two screws and small springs
#
(1) that hold
the oscillating shuttle/bobbin case in place.
4. Remove the shuttle race and bobbin case from the casting and re-
veal the feed dog attaching screw.
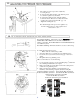
5. Remove the Feed Dog attaching screw and Feed Dog to
install any of the following except the standard needle plate.
Slotted Needle Plate (A) #43332 Stirrup Needle Plate (B) #43333
Holster Needle Plate (C) #43334 Standard Needle Plate (D) #43337
Fabric Feed Dog w/teeth (E) 211-63400
Leather Needle Plate (F) 43337-L
Leather Smooth Feed Dog (G) 21163400-L
A.
B.
C.
D.
E.
F.
G.
8.