
Owner manual


Belt Pack UHF Transmitter
with connection cable
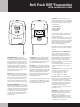
INSTRUMENT CABLE - The belt pack
transmitter comes supplied with a cable for
connecting to your instrument. One end of
this has a mini (4 pin) connector, this plugs
directly into the top end of the belt pack
transmitter. To insert - rotate the plug so the
locating key lines up with the socket and
gently push until it latches into position. To
remove – push the button on the back of the
plug to unlatch it and gently pull to release
the plug from the socket.
BELT CLIP - The transmitter has a Belt Clip
fixed to the back of the unit for attaching it to
a belt or clipping to the waistband of your
trousers. Once the belt pack transmitter has
been secured in position on your person
make sure the small flexible antenna is free
and not covered or obscured by clothing etc.
BATTERY COMPARTMENT - On the rear of
the belt pack transmitter, just below the belt
clip is the battery compartment, this can be
opened by sliding the latch towards the base
of the unit. 2 x AA 1.5v batteries are required
to be fitted for the unit to operate. Please
note the orientation of the batteries printed
inside the battery compartment when
inserting these.
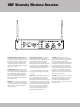
LCD DISPLAY - The front of the unit features
an LCD display with blue backlighting for
showing the various parameters of the belt
pack transmitter that can be selected using
the SELECT & CH/ON keys below it.
CH/ON KEY - Press and hold the CH/ON key
for a few seconds to turn the transmitter ON.
The unit will BEEP to indicate it is active. The
LCD display will be back lit for a few seconds.
Initially the current Channel Number will be
shown along with the battery condition
indicator. The transmitter will always revert to
this display after a few seconds from any
other parameter display.
Press and hold the CH/ON key again to turn
the transmitter OFF. A BEEP will be heard as
the CH/ON key is pressed and a longer BEEP
to confirm the unit has turned OFF.
CH/ON KEY - Turn the transmitter ON by
using the CH/ON key. Once the transmitter is
turned ON subsequent presses of the CH/ON
key will cycle through 4 x operation modes,
in order these are:
1. Channel Digit One
2. Channel Digit Two
3. RF Power Level
4. Lock/Unlock
A further press of the CH/ON key will return
you once again to Mode 1. and the cycle
continues round again.
No matter what display you are on if you wait
more than a few seconds without pressing
another key your current choice of parameter
will be automatically saved and the display
returned to the initial display of Channel
Number and Battery Condition.
The SELECT key is used to cycle through the
parameter selections available in each of the
4 modes.
Channel Digit One and Channel Digit Two
modes are used to select the Channel
number the transmitter is operating on, for
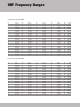
details of the specific frequency of each
Channel Number see the chart at the end of
these instructions. The selected Channel
Number is remembered when the unit is
turned OFF and will be recalled next time the
unit is turned ON for use.
The same Channel Number must be used on
receiver and transmitter for the system to
operate.
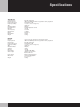
RF Power Level mode is used to select the RF
output power in the following ranges:
PL.0 – the output power = 3dBm
PL.1 – the output power = 5dBm
PL.2 – the output power = 12dBm
Lock/Unlock mode – pressing the SELECT
key while in Lock/Unlock mode will alternate
between the Lock and Unlock settings.
If Lock is selected then no other parameters
can be changed without first entering into
Lock/Unlock mode and selecting Unlock
first. This is to prevent accidental
modifications of the parameters whilst the
transmitter is in use.
SELECT KEY - The Belt Pack Transmitter has a
MUTE function to allow the signal to be
muted silently without having to turn the
transmitter OFF and ON again.
MUTE is operated anytime by pressing and
holding the SELECT key for a few seconds.
To UNMUTE the signal, again press and hold
the SELECT key for a few seconds.