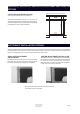
XXL DISHWASHER INSTALLATION INSTRUCTIONS NT! before IMPORll TofAthese instructrio. ns Read a he dishwashe gt installin AUTOMATIC HIGH LOOP The drain hose is fastened to the back of the machine at the best height. To eliminate potential drain problems, leave this hose in place.
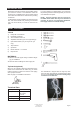
Introduction Read these instructions carefully and completely before you install the machine. The installation should be carried out by a qualified person who is familiar with all local codes and ordinances for electrical and plumbing connections. If a dishwasher is being installed in this area for the first time, most of the cabinet work, plumbing, and electrical has to be done before you move the machine into place.
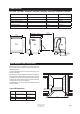
DIMENSIONS DD3232XLFI,D3251XLFI,D3531XLF D5112XXL, D5122XXL, D5152XXL, D5132XXL, D5223XXL, D5233XXL, D5253XXL, D5833XXL U.S.
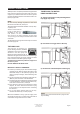
Dimensions Unit Dimensions D5232XXLFI, D5233XXLFI, D5251XXFI, D5253XXLFI, D5531XXLFI, D5731XXLFI, D5833XXLFI U.S. Metric 33-3/4” to 35-3/4” 857 to 908 mm Width 23-5/8” 600 mm Depth (Includes high loop) 22-7/8”** 581 mm 49-3/4” 1266 mm Height (Adjustable) Depth W/Door Open Weight: 108 Ib Technical Data Electricity 120V, 60Hz, 15 amp Heating element: 1200 watt Water pressure: Max loading 49 kg 4.2-140 psi, 0.03-1.0 MPa, 0.
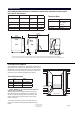
custom door panel dimensions Fitting the D5232XXLFI, D5233XXLFI, D5251XXFI, D5253XXLFI, D5531XXLFI, D5731XXLFI, D5833XXLFI ASKO-Made or custom door panel - 4 inch toe kick. The D5232XXLFI, D5233XXLFI, D5251XXFI, D5253XXLFI, D5531XXLFI, D5731XXLFI and D5833XXLFI can be installed with a fully integrated, buyer supplied custom door panel or ASKO accessory panel that extends from the toe kick to the counter top. The unit comes with everything needed to make installing the door panel easy.
D5233xXLFI, D5253xXLFI, D5833xXLFI DOOR PANEL INSTALLATION OPTIONS 4-iNCH TOE KICK INSTALLATIONS Panel extends from toe kick to cabinet top. Custom panels that extend to the cabinet top 30-1/8" 765 mm The preferred installation option for a 4” toe kick is to extend the custom panel to the cabinet top (as illustrated). A one-piece ASKO accessory panel with a curved handle is available for 4-inch toe kick installations.
CORNER INSTALLATION If the dishwasher is installed in a corner, there must be a minimum clearance of 2” (50 mm) from the side wall so the door can open. Installing the Tip Guards (optional) When it is not possible to fasten the dishwasher to the cabinet, you should install a tip guard to prevent the machine from tipping when the door is opened. The tip guards can be attached either to the floor or the wall.
DRAIN CONNECTIONS ASKO provides a 7/8” (22 mm) diameter corrugated drain hose which is connected to the back of the unit to form a high loop. If additional drain hose is needed, please purchase an ASKO drain hose extension kit with a 7/8” (22mm) copper tube. THREE WAYS TO INSTALL DRAIN CONNECTIONS A) Typical connection to sink plumbing before trap (high loop drain) NOTE: Do not use any fittings anywhere in the drain line that are less than 7/8” (22 mm) ID.
ELECTRICAL connections WARNING! Before working on wiring for any electrical appliance, be sure the electrical power has been turned off at the breaker/fuse box. Warning! Do not use an extension cord for this appliance. WARNING! Disconnect electrical power supply and place a tag at the disconnect switch indicating that you are working on the circuit. WARNING! Electrical and grounding connections must comply with the applicable portions of the national electrical code and/or other local electrical codes.
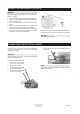
Moving the machine into place WARNING! Make sure you put the protective slides on the legs to prevent damaging the floor when you slide the unit into place (see page 9). 1. Position the machine in front of the cabinet opening. 2. Make the height adjustment while the dishwasher is in front of the opening. 3. Pull out the drain hose to ensure there are no sharp bends. 4. Start to feed water and drain lines and electric cord (if necessary) into the access hole in the cabinet. 5.
CONNECTING THE WATER SUPPLY In order to prevent heat damage to the inlet valve, all solder connections must be made before the water supply line is connected. Flush the water supply line prior to connecting it to the water fill tube. The unit has a float switch in the base pan to protect against flooding. If the inlet valve connection is not seated properly, water may leak into the base pan and activate the float switch.
Adjusting the LEVELING LEGS Now that all the connections are made and the machine is in place under the cabinet, you should make the final height adjustment. 1. You should set the rear foot first. To do this, use a screwdriver to rotate the adjusting screw on the bottom front of the machine. Turn the screw clockwise to raise the foot and counter clockwise to lower it. 2. Using a 5/8” (16 mm) wrench, adjust the locking nuts until the machine is level.
INSTALLATION CHECKLIST Asko - Dishwasher Appliance Installation Checklist • Remove packaging and check for cosmetic damages. • Remove the information packets from inside the dishwasher. • Attach any accessories as required by the installation. Fill strips, wooden door panels, accessory door panels... • Attach the drain line using the largest section of the disposer boot allowable. Leave the high loop in place. • Attach the PEX fill hose. Don’t forget to use the O-ring. • Plug the dishwasher into the wall.
index C Cabinet, fastening unit to 12 Connecting to water supply 11 Cosmetic damage 2 D Door springs, adjusting 9 Drain connections 8 E Electrical cable connection 10 Electrical connections 9 F Fastening unit to cabinet 12 G Grounding instructions 9 H High loop 8 Hot water supply 7 L Leaks, testing for 11 Leveling legs, adjusting 12 M Materials 2 S Slides for rear legs 9 T Technical data 2 Tip guards 2 installing 7 Toe kick, installing 12 Tools 2 V Water connection 11 Water flow volume 7 Customer Care Cen
Notes Customer Care Center 1-800-898-1879 www.askousa.
Customer Care Center 1-800-898-1879 www.askousa.com Art. No 80 820 16 Rev.