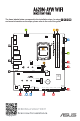
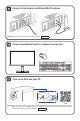
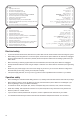
DIGI+ VRM ATX_12V HDMI ADD_GEN 2_1 ADD_GEN 2_2 The items labeled below correspond to the installation steps, for steps and more information on the steps, please refer to the rest of the guide. CPU_FAN SOCKET AM5 USB_1_13_14_15 U32G1_89 LAN_U32G2_2_6 AUDIO U32_C7 256Mb BIOS M.2(WIFI) M.2_1(SOCKET3) PCIE SATA 4.
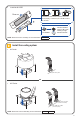
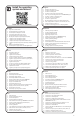
Q23079 / First Edition / January 2024 Prepare the components CPU Chassis Memory M.2 SSD CPU Cooler Power supply unit SATA device Graphics card NOTE: The components listed above are recommendations, please prepare components according to your needs. Install key components • Install the CPU Thermal paste OR OR NOTE: Do not remove the PnP cap before the CPU is properly installed.
• Install the M.2 SSD Remove Remember to rotate the M.2 Q-latch, secure the screw properly, or insert the pin of the M.2 Anchor into the hole. Install the bundled rubber for M.2 when installing a single sided M.2 module.
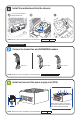
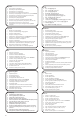
Install the motherboard into the chassis For non pre-mounted I/O shield models only.
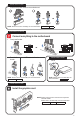
Connect cables from PSU • Connect the power cables to the motherboard OR OR NOTE: Please refer to the manual(s) for more information: Motherboard PSU Connect cables from Chassis Connect everything to the motherboard • Front panel header Power PLED Power CHASSIS PLED PWRSW SPEAKER PWRSW OR PIN 1 HDD_LED • Front Audio header • PIN 1 RESET HDD_LED RESET PLED USB connector/header NOTE: Please refer to the manual(s) for more information: Motherboard Chassis Connect cables from PSU • SA
Connect to the Internet via Ethernet/Wi-Fi antenna NOTE: Please refer to the manual(s) for more information: Motherboard Connect peripherals (monitor, keyboard, mouse, etc.) Turn on the PSU and your PC FAQ NOTE: P lease check the Q-LEDs or Q-LED Core on selected motherboards when powering on your PC for system status.
Install the operating system and drivers Driver and Utilities installation Стъпки: 1. 2. 3. 4. 5. 6. 7. 8. 9. 10. Подгответе компонентите Инсталирайте ключови компоненти Инсталирайте охлаждащата система Install the motherboard into the chassis Инсталирайте дънната платка в корпуса Монтирате и свържете захранващия блок (PSU) Свържете всичко към дънната платка Свържете всичко към дънната платка Свържете към Интернет чрез Ethernet/Wi-Fi антена Свържете периферни устройства (монитор, клавиатура, мишка и др.
Βήματα: 1. 2. 3. 4. 5. 6. 7. 8. 9. 10. 11. 12. Προετοιμάστε τα εξαρτήματα Εγκαταστήστε τα βασικά εξαρτήματα Εγκαταστήστε το σύστημα ψύξης Εγκαταστήστε τη μητρική πλακέτα στο πλαίσιο Συνδέστε με τον ανεμιστήρα τους πλαισίου και τις φίσες ARGB/RGB Εγκαταστήστε και συνδέστε τη μονάδα τροφοδοσίας (PSU) Συνδέστε τα πάντα στη μητρική πλακέτα Εγκαταστήστε την κάρτα γραφικών Συνδεθείτε στο διαδίκτυο μέσω Ethernet/Κεραίας Wi-Fi Συνδέστε τα περιφερειακά (οθόνη, πληκτρολόγιο, ποντίκι κ.λπ.
Kroki: Kroky: 1. 2. 3. 4. 5. 6. 7. 8. 9. 10. 11. 12. 1. 2. 3. 4. 5. 6. 7. 8. 9. 10. 11. 12. Przygotuj podzespoły Zainstaluj główne podzespoły Zainstaluj układ chłodzenia Zainstaluj płytę główną w obudowie Podłącz do wentylatora i złączy header ARGB/RGB w obudowie Zainstaluj i podłącz zasilacz (PSU) Podłącz wszystko do płyty głównej Zainstaluj kartę graficzną Nawiąż połączenie z Internetem za pomocą anteny Ethernet/Wi-Fi Podłącz urządzenia peryferyjne (monitor, klawiatura, mysz itp.
:الخطوات Кроки: 1. 2. 3. 4. 5. 6. 7. 8. 9. 10. 11. 12.
Button/Coin Batteries Safety Information 1. Remove and immediately recycle or dispose of used batteries according to local regulations and keep out of reach of children. Do not incinerate or dispose of batteries in household trash. 2. If ingested or inserted inside any part of the body, call a local poison control center for treatment information. Even used batteries may cause serious injury or death. 3. This product uses CR2032 type batteries with a nominal voltage of 3V. 4.
General Notices FCC Compliance Information Responsible Party: Address: Phone / Fax No: Asus Computer International 48720 Kato Rd., Fremont, CA 94538, USA (510)739-3777 / (510)608-4555 This device complies with part 15 of the FCC Rules. Operation is subject to the following two conditions: (1) This device may not cause harmful interference, and (2) this device must accept any interference received, including interference that may cause undesired operation.
Declaration of compliance for product environmental regulation ASUS follows the green design concept to design and manufacture our products, and makes sure that each stage of the product life cycle of ASUS product is in line with global environmental regulations. In addition, ASUS disclose the relevant information based on regulation requirements. Please refer to http://csr.asus.com/Compliance.
Notices for Wi-Fi model FCC RF Caution Statement WARNING: Any changes or modifications not expressly approved by the party responsible for compliance could void your authority to operate the equipment.
Japan RF Equipment Statement 屋外での使用について 5GHz帯(W52/53)及び6GHz帯(LPI)の屋外での使用は、電波法により禁じられています(法令により許可され た場合は除く) (6GHz帯は対応製品のみ)。 法律および規制遵守 本製品は電波法及びこれに基づく命令の定めるところに従い使用してください。日本国外では、その国の法律ま たは規制により、本製品の使用ができないことがあります。このような国では、本製品を運用した結果、罰せられ ることがありますが、当社は一切責任を負いかねますのでご了承ください。 Précautions d’emploi de l’appareil : a.
Simplified EU Declaration of Conformity Simplified EU Declaration of Conformity ASUSTek Computer Inc. hereby declares that this device is in compliance with the essential requirements and other relevant provisions of Directive 2014/53/EU. Full text of EU declaration of conformity is available at https://www.asus.com/support/ The WiFi operating in the band 5150-5350MHz shall be restricted to indoor use for countries listed in the table below: Déclaration simplifiée de conformité de l’UE ASUSTek Computer Inc.
Uproszczona deklaracja zgodności UE Firma ASUSTek Computer Inc. niniejszym oświadcza, że urządzenie to jest zgodne z zasadniczymi wymogami i innymi właściwymi postanowieniami dyrektywy 2014/53/ EU. Pełny tekst deklaracji zgodności UE jest dostępny pod adresem https://www.asus. com/support/ W krajach wymienionych w tabeli działanie sieci Wi-Fi w paśmie 5150–5350 MHz powinno być ograniczone wyłącznie do pomieszczeń: Declaração de Conformidade Simplificada da UE A ASUSTek Computer Inc.
Warranty EN: ASUS Guarantee Information • ASUS offers a voluntary manufacturer’s Commercial Guarantee. • ASUS reserves the right to interpret the provisions of the ASUS Commercial Guarantee. • This ASUS Commercial Guarantee is provided independently and in addition to the statutory Legal Guarantee and in no way affects or limits the rights under the Legal Guarantee. For all the guarantee information, please visit https://www.asus.com/support.
SL: Informacije o garanciji ASUS • ASUS ponuja prostovoljno tržno garancijo proizvajalca. • ASUS si pridržuje pravico do razlage določb tržne garancije družbe ASUS. • Ta tržna garancija družbe ASUS je na voljo neodvisno in kot dodatek zakonsko predpisani pravni garanciji ter na noben način ne vpliva na pravice, ki jih zagotavlja pravna garancija, oziroma jih omejuje. Vse informacije o garanciji najdete na spletnem mestu https://www.asus.com/support.
ASUS contact information ASUSTeK COMPUTER INC. Address: 1F., No. 15, Lide Rd., Beitou Dist., Taipei City 112 ASUS COMPUTER INTERNATIONAL (America) Address: 48720 Kato Rd., Fremont, CA 94538, USA ASUS COMPUTER GmbH (Germany and Austria) Address: Harkortstrasse 21-23, 40880 Ratingen, Germany ASUSTeK (UK) LIMITED Address: 1st Floor, Sackville House, 143-149 Fenchurch Street, London, EC3M 6BL, England, United Kingdom Service and Support Visit our multi-language website at https://www.asus.com/support.
15060-26PM0000