
Service manual


7 - 34 Genie GS-1530 & Genie GS-1930 Part No. 39528
Service Manual - First Edition
Section 7 - Repair Procedures
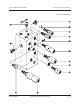
SCISSOR COMPONENTS
18 Install the new wear pad.
Note the position of the old wear
pad before it is removed so when
the new one is installed it will be in
the correct position.
19 Move the scissor assembly towards the other
side of the machine until the other scissor arm
wear pad is accessible.
The scissor assembly will fall if
both wear pads are allowed to
slide out of the drive chassis.
20 Install the new wear pad.
Note the position of the old wear
pad before it is removed so when
the new one is installed it will be in
the correct position.
21 Slide the scissor assembly back into the drive
chassis.
22 Lower the scissor assembly into position and
install the pivot pins.
Component damage hazard. Be
careful not to damage the level
sensor box, limit switch or level
sensor while installing the scissor
assembly.
3-5
Lift Cylinder
How to Remove the Lift Cylinder
This procedure requires specific
repair skills, lifting equipment and
a suitable workshop. Attempting
this procedure without these skills
and tools may result in death or
serious injury and significant
component damage. Dealer
service is strongly recommended.
When removing a hose assembly
or fitting, the O-ring on the fitting
and/or hose end must be replaced
and then torqued to specification
during installation. Refer to
Section Two, Hydraulic Hose and
Fitting Torque Specifications.
1 Raise the platform approximately 7 to 8 feet
(2.1 to 2.4 m).
2 Rotate the safety arm away from the machine.
3 Lower the platform onto the safety arm.
Crushing hazard. Keep hands
clear of the safety arm when
lowering the platform.
4 Tag and disconnect the wiring from the
solenoid at the barrel end of the lift cylinder.
5 Loosen the adjustment nuts on the solenoid,
then disconnect the manual lowering cable from
the solenoid.
During assembly, the manual
platform lowering cable needs to
be properly adjusted. Refer to 4-1,
How to Adjust the Manual Platform
Lowering Cable.
6 Remove the mounting fasteners from the
manual lowering cable mounting bracket.
Remove the bracket from the cylinder.