
Service manual


Part No. 39528 Genie GS-1530 & Genie GS-1930 7 - 45
Service Manual - First Edition Section 7 - Repair Procedures
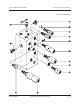
Non-steering Axle Components
8-1
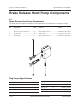
Drive Brake
How to Remove a Drive Brake
When removing a hose assembly
or fitting, the O-ring on the fitting
and/or hose end must be replaced
and then torqued to specification
during installation. Refer to
Section Two,
Hydraulic Hose and
Fitting Torque Specifications.
1 Remove the fasteners from the entry ladder and
remove the entry ladder.
2 Block the steer wheels and center a lifting jack
under the drive chassis at the non-steer end.
3 Remove the cotter pin from the wheel castle nut.
Always replace the cotter pin with
a new one when removing the
castle nut.
4 Loosen the wheel castle nut. Do not remove it.
5 Raise the machine 2 inches (5.1 cm) and place
blocks under the drive chassis for support.
6 Remove the wheel castle nut, then remove the
wheel.
7 Disconnect the hydraulic hose from the brake
and plug it. Cap the fitting on the brake.
Bodily injury hazard. Spraying
hydraulic oil can penetrate and
burn skin. Loosen hydraulic
connections very slowly to
allow the oil pressure to
dissipate gradually. Do not
allow oil to squirt or spray.
8 Place a second lifting jack under the brake for
support.
9 Remove the fasteners that attach the brake to
the drive chassis, then remove the brake.
Crushing hazard. The brake will fall
if it is not properly supported when
the mounting fasteners are
removed.
Torque specifications
Castle nut 300 ft-lbs
406.7 Nm