
User's Manual


Using the optical drive
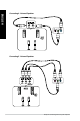
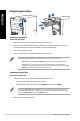
Inserting an optical disc
To insert an optical disc:
1. While your system is on, press the eject button to open the tray.
2. Place the disc on the optical drive with the label side outward if the desktop is positioned
vertically and the label side up if the desktop is positioned horizontally.
3. Push the tray gently to close it.
4. Select a program from the AutoPlay window to access your les.
If AutoPlay is NOT enabled in your computer, to access the data on an optical disc:
• OnWindows
®
7, click the Start > Computer, and double-click the CD/DVD drive icon.
• OnWindows
®
8.1, hover your mouse pointer over the lower left corner of Windows
®
desktop then right-click on the Start screen’s thumbnail. From the popup menu, click File
Explorer, and then double-click the CD/DVD drive icon.
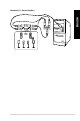
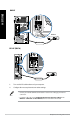
Removing an optical disc
To remove an optical disc:
1. While the system is on, do either of the following to eject the tray:
• Presstheejectbuttonbelowthedrivebaycover.
• Right-clicktheCD/DVDdriveiconontheComputer screen, and click Eject.
To open the Computer screen on Windows
®
8.1, hover your mouse pointer over the lower left
corner of Windows
®
desktop then right-click on the Start screen’s thumbnail. From the popup
menu, click File Explorer to open the Computer screen.
2. Remove the disc from the disc tray.
36 Chapter 3: Using your computer
ENGLISH
ENGLISH