
Instruction Manual

8
GigaX3112 Series Layer 3 Managed Switch
3 Quick Start Guide
This section provides the basic instructions to set up the GigaX environment.
Refer also to the GigaX Series Installation Guide.
Part 1 shows you how to install the GigaX on a flat surface or on a rack.
Part 2 provides instructions to set up the hardware.
Part 3 shows you how to configure basic settings on the GigaX.
Obtain the following information from your network administrator before proceeding:
IP address for the switch
Default gateway for the network
Network mask for this network
3.1 Part 1 — Installing the hardware
3.1.1 Installing the switch on a flat surface
The switch should be installed on a level surface that can support the weight
of the switches and their accessories. Attach four rubber pads on the marked
location on the bottom of the switch.
3.1.2 Mounting the switch on a rack
Attach brackets to each side of the switch and make the posts insert to the switch.
Insert and tighten two screws to securely attach the bracket to the rack on each side.
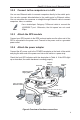
3.2 Part 2 — Setting up the switch
Connect the device to the power outlet, and your computer or network. See Figure 5.
3.2.1 Connect the console port
For console management, use an RS-232 (DB9) or a USB cable to connect the
switch. If you want to use WEB interface, connect your PC to the switch using
the Ethernet cable.