E6155 FlexSave User Guide
Contents License and Warranty Agreement.............................................................................. 3 FlexSave Start.............................................................................................................. 4 Introduction on the FlexSave software and user interface...................................... 5 Overview ........................................................................................................ 5 Easy Transfer.......................................
License and Warranty Agreement By using the enclosed Software you indicate your acceptance of all terms and conditions of this license agreement. If you do not agree with these terms then FNet Co., Ltd. is unwilling to license the Software to you, in which event you should return the full product with proof of purchase to the dealer from whom it was acquired within thirty days of purchase for a refund of the purchase price, or by destroying all copies of the Software and the accompanying documentation.
FlexSave Start 1. Connect the external hard drive to the USB port. FlexSave will start automatically. If FlexSave does not start automatically, open My Computer and double-click the FlexSave icon in the Devices with Removable Storage field. Please do not eject or delete the FlexSave virtual optical disc drive, or the software will not run normally. 2. You are required to enter the FlexSave serial number printed on the orange label on the software package.
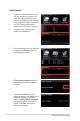
Introduction on the FlexSave software and user interface Overview The FlexSave main screen is divided into three fields. The upper field shows the main functions of FlexSave. The “Easy Transfer” function will be shown after starting FlexSave. The middle field shows different configuration and operation options if you switch among the FlexSave functions. The lower field shows the free space of external storage devices in real time.
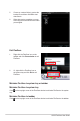
Easy Transfer 1. 2. 3. Connect the external hard drive to the USB port and launch FlexSave. The application will be minimized to the system tray. Double-click the FlexSave icon to open the FlexSave main screen. The Easy Transfer screen will be displayed once FlexSave is launched. Locate the file(s) you would like to backup in the Local field. 4. Click and drag the file(s) you would like to backup to the External field. The file(s) will start to transfer. 5.
. You may also right-click a file and click Delete to delete file(s) in the Easy Transfer main screen. 8. A dialog box appears requiring your confirmation. Click Yes to delete the file or No to cancel. The file(s) will be directly erased from the hard drive and will not be moved to the Windows Recycle Bin.) Backup Two sub-functions are included in Backup: Backup Plan and Restore. For Backup Plan, you can further choose between Manual backup and Scheduled backup. Backup Plan (manual) 1. 2. 3.
4. 5. 6. Select the folder(s) or file(s) to backup. You may select the root folder to select all files within the drive, or click Reset to cancel selection. After selection, choose a Backup Type between Manual (continue to step 6) and Scheduled (skip to step 11). If you choose Manual in step 5, click Backup below to start file backup. 7. You may cancel or pause file backup. 8. If you pause file backup, click Continue to continue the backup plan. 9. To stop file backup, click Cancel.
Backup Plan (Scheduled) 11. 12. To create a scheduled backup plan, repeat step 1 to step 4, and then choose Scheduled. Select the time and day for scheduled backup plan, and then click Backup. The backup plan will automatically start on the assigned time and day. If you have assigned other folders to backup afterward, please click Backup again to save the change. Backup Restore 1. 2. 3. 4. If you have completed a backup plan, you can run Restore under the Backup function.
5. 6. Choose or create a folder to restore the backup file, and then click OK to start data restore. When data restore completes, you can start using the restored files in the folder you assigned. Exit FlexSave 1. Right-click the FlexSave icon on the taskbar and click Close window to exit FlexSave. 2 Or, right-click the FlexSave icon on the system tray and click Exit to exit FlexSave. Minimize FlexSave to system tray or taskbar Minimize FlexSave to system tray Click tray.
Configuring FlexSave Power Setting You can assign the time for the external hard drive to enter power saving mode. 1. 2. 3. Click Advanced Settings on the FlexSave main screen. Select General under Advanced Settings. Assign the time for the external hard drive to enter power saving mode under the Power Setting field. Hotkey button configuration By pressing the hotkey on the external hard drive, you can start Hotkey Backup to backup the assigned folder. 1. 2. 3.
Configure username and password for logging in 1. 2. 3. 4. Click Advanced Settings on the FlexSave main screen. Select Security in Advanced Settings. Enter your username and password in the Log in field. Retype your password to confirm, or you may click Show password to confirm your password. When finished, click Apply. Log in and password query Log in If a username and password is set, you are required to enter the username and password every time you use FlexSave.
Software version and update query 1. Click Advanced Settings after starting FlexSave. 3. The software version appears after clicking software information. Click Check to check software updates with the default web browser. 2. Click Software information under Advanced Settings. Technical Support 1. Click Advanced Settings after starting FlexSave. 3. Click Visit ASUS in the Technical Support field for software manual and technical support with the default web browser. 2.
www.asus.