
User Guide


26 ASUS P3B-F User’s Manual
3. HARDWARE SETUP
CPU
3. H/W SETUP
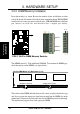
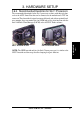
4. Secure the SECC2/SECC/SEPP
Secure the SECC2/SECC/SEPP in place by pushing the SECC2/SECC/SEPP
until it is firmly seated on the Slot 1 connector.
SECC with Pentium
®
II only: The SECC locks should be outward when se-
cured so that the lock shows through the retention mechanism’s lock holes.
SECC SECC2/SEPP
CPU fan cable to
fan connector
CPU fan
cable to fan
connector
Lock hole
Lock hole
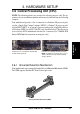
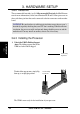
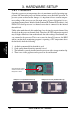
3. Insert the SECC2/SECC/SEPP
SECC with Pentium
®
II only: Push the SECC’s two locks inward until you hear
a click (the picture in step 2 shows the locks in the outward position and inward in
the picture below).
With the heatsink facing the motherboard’s chipset, push the SECC2, SECC, or
SEPP gently but firmly into the Slot 1 connector until it is fully inserted.
SECC2/SEPP
Push lock inward
SECC
CPU fan cable to
fan connector
CPU fan cable to
fan connector