
User`s guide


Chapter 5. Configuring Firewall/NAT Settings Solwise Asus SL6000 ADSL Ethernet Router User’s Guide
44
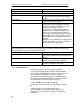
Begin
Enter the starting port number of the range
End
Enter the ending port number of the range
Destination Port
Any
Select this option if you want this rule to apply to
all applications with an arbitrary destination port
number.
Single, Range
Select any of these and enter details as described
in the
Source Port
section above.
Service
This option allows you to select any of the pre-
configured services (selectable from the drop-
down list) instead of the destination port. The
following are examples of services:
BATTLE-NET, PC-ANYWHERE, FINGER,
DIABLO-II, L2TP, H323GK, CUSEEME, MSN-
ZONE, ILS, ICQ_2002, ICQ_2000, MSN, AOL,
RPC, RTSP7070, RTSP554, QUAKE, N2P, PPTP,
MSG2, MSG1, IRC, IKE, H323, IMAP4, HTTPS,
DNS, SNMP, NNTP, POP3, SMTP, HTTP, FTP,
TELNET.
Note:
service is a combination of protocol and port
number. They appear here after you add them in
the “Firewall Service” configuration
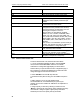
Port Mapping
Select “IP Address” if you want to direct the incoming traffic to a specific computer (usually a server
such as web server) in your LAN; otherwise, select “None”.
None
Select this option to not use NAT.
IP Address
Select this option to specify the IP address of the
computer that you want the incoming traffic to be
directed.
Log
Select “Enable” radio button to enable logging for
this ACL rule; otherwise, select “Disable”.
VPN
This option allows you to select the check box if
this policy corresponds to VPN policy.
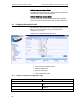
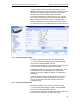
5.3.2 Add Inbound ACL
To add an inbound ACL rule, follow the instructions below:
1. Log into Configuration Manager as admin, click the
Firewall
menu, and then click
Inbound ACL
submenu. The Firewall Inbound
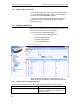
ACL Configuration page displays, as shown in Figure 8.1.
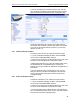
Note that when you open the Inbound ACL Configuration page, a
list of existing ACL rules are also displayed in the lower half of the
configuration page such as those shown in Figure 8.2.
2. Select “
Add New
” from the “
ID
” drop-down list.
3. Set desired action (Allow or Deny) from the “
Action
” drop-down
list.
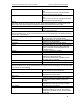
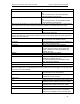
4. Make changes to any or all of the following fields:
source/destination IP, source/destination port, protocol, port
mapping, log, and VPN. Please see Table 8.1 for explanation of
these fields.