
Specifications


recommended to avoid hot spots like the rewall, engine compartment, or tail
pipe. The mounting location must also be safe from water seepage or areas with
bad seals (rubber gaskets, not sleek furry mammals who eat salmon). If there are
old (or new) water stains, stay away.
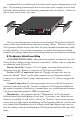
We have provided brackets to assist you in mounting The Epicenter InDash
chassis under your dashboard or wherever you may choose. The screw holes on
The Epicenter InDash chassis also allow for easy installation underneath a radio
or with a dash kit. It is of utmost importance to mount The Epicenter InDash
securely to avoid any undue stress or breakage from over acceleration or braking.
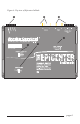
B. The Epicenter InDash Power Wiring
• ENLIGHTENING INFO • Disconnect the negative terminal of your car’s
battery before working on any electrical connections. Failure to do so could lead
to a dramatic spark in your life.
Remote Turn-On: Connect a 22 to 18 gauge wire from the head-unit’s re-
mote turn-on to the “Remote” connector on The Epicenter InDash.
Positive (+12V) Connection: Insert an 18 gauge or larger wire into the
connector labeled “Power” on the nifty connector of your Epicenter InDash.
Connect it to a good, fused (1 amp), constant source of 12 volts (we suggest the
battery).
Ground Connection: Use the same gauge wire as you did for the positive
connector and run it from the “Ground” connector on The Epicenter InDash to
the negative terminal of the battery, a ground buss, or a veried ground location.
The factory head unit ground is NOT recommended.
Illumination: The connector labeled “Illumination” on The Epicenter
InDash controls the backlighting of your unit. If you run a wire from this con-
nector to a switched 12-volt source, such as the “Remote” turn on wire on your
source unit, you light up the backlighting on The Epicenter InDash. A better idea
is to connect the illumination wire to a factory dash light dimmer and you now
have the ability to dim the backlighting of The Epicenter InDash with your dash
lights.
page 10