
Specifications


page 5
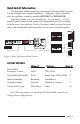
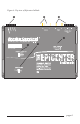
Figure 2: The Epicenter InDash Front Panel
A GUIDED TOUR OF The Epicenter InDash
The Front Panel
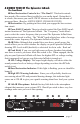
➊ Bass Restoration Control a.k.a. “The Knob”: This knob controls
how much of the restored bass is added to your audio signal. Being that it
is a knob, this means you can SLOWLY increase or decrease the amount of
processed bass. (Read as: LISTEN FIRST, CRANK SECOND!)
➋ Restoration: By pushing in this switch you engage the bass restora-
tion circuit.
➌ Para-BASS Controls: These two knobs control the Para-BASS equal-
ization functions of The Epicenter InDash. The “Frequency” knob allows
you to select the center frequency that you want The Epicenter InDash bass
maximization circuit to affect. The “Width” knob adjusts how wide of a range
around the center frequency The Epicenter InDash will affect.
➍ dB/Volts: Although this sounds like a new heavy metal group, this
switch allows you to select whether the display on your Epicenter InDash is
showing SPL levels in dB (decibels) or electrical levels in volts. Rock on!
➎ Peak Hold: If you ever got high score on Space Invaders but nobody
was there to watch, you know what this switch is for. When engaged, the dis-
play on your Epicenter InDash will show the highest SPL or voltage reading
that it measured (as long as your Epicenter InDash is turned on).
➏ SPL/Voltage Display: This super bright display will show either the
sound pressure levels or battery voltage depending on where the dB/Volts
switch is set.
➐ Bass Restoration Indicator: If this light is ashing, your car should be
bump’n!
➑ High SPL Warning Indicator: Since you will probably brush over
our warning about SPL and potential hearing damage, this indicator light
comes on at 120 dB to give you a gentle warning about how loud your system
is.
➒ 160 dB Microphone: Behind this tiny little hole is the microphone
element that measures your systems SPL. Should you wish to have very low
readings make sure you cover this opening.
➊
➋
➌ ➍
➎
➏ ➐
➑
➒