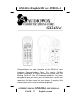
GX2411ci English I/B ver. 09010A-1 GX2411ci Congratulations on your selection of the GX2411ci from Audiovox Communications Corp. This quality 2.4GHz cordless telephone all Digital Answering System with Call Waiting Caller ID, like all Audiovox® products, has been designed to give you many years of continuous service and represents the best value for your money. It requires little maintenance and is easy to setup and operate.
GX2411ci English I/B ver. 09010A-1 IMPORTANT SERVICE INFORMATION Read this manual before attempting to setup or use this instrument. It contains important information regarding safe installation and use. Keep this manual for future reference. Also save the carton, packing and proof of purchase to simplify and accelerate any needed action. If you need assistance or service, call (800) 229-1235 between 9:00a.m. & 5:00p.m. Eastern Standard Time, Mon. – Fri. You can also visit our web site at: http://www.
GX2411ci English I/B ver. 09010A-1 SAVE THESE INSTRUCTIONS IMPORTANT SAFETY INSTRUCTIONS When using your telephone equipment, basic safety precautions should always be followed to reduce the risk of fire, electric shock, and injury to persons, including the following: 1. Read and understand all instructions. 2. Follow all warnings and instructions marked on the product. 3. Unplug this product from the wall outlet before cleaning. Do not use liquid cleaners or aerosol cleaners. Use a damp cloth for cleaning.
GX2411ci English I/B ver. 09010A-1 participating in an industry program to collect and recycle these batteries at the end of their useful lives. When taken out of service within the United States, the RBRC program provides a convenient alternative to placing used Nickel-Cadmium batteries into the trash or municipal waste, which is illegal in some areas.
GX2411ci English I/B ver. 09010A-1 interference that may cause undesired operation of the device. A label is located on the underside of the Base Unit containing either the FCC registration number and Ringer Equivalence Number (REN) or the IC registration number and Load Number. You must, upon request, provide this information to your local telephone company. This equipment is compatible with inductively coupled hearing aids.
GX2411ci English I/B ver. 09010A-1 requirement that the sum of the REN does not exceed five (5.0). NOTICE: The Industry Canada label identifies certified equipment. This certification means that the equipment meets certain telecommunications network protective, operational and safety requirements. The Department does not guarantee the equipment will operate to the user’s satisfaction.
GX2411ci English I/B ver. 09010A-1 • • • Products which may have been modified or incorporated into other products. Products purchased and/or operated outside the USA, its territories, or Canada. Products serviced by the owner or a service facility not expressly authorized by Audiovox Communications Corp. • Products purchased more than 12 months from current date. • Units purchased in “AS IS” condition, or units purchased as “Distressed Merchandise”.
GX2411ci English I/B ver. 09010A-1 TWO-WAY RECORDING . ………………………………….…. VOX (VOICE ACTIVATED) DETECTION …………………… REMOTE OPERATION ……………………………………………….. CALLER ID OPERATION……………………………………………… INTRODUCTION TO CALLER ID AND CALL WAITING ID… RECEIVING NEW CALL………………………………………… VIEWING CALL RECORDS AND NEW CALL RECORDS…. SAVING CALL RECORDS……………………………………… DELETING CALL RECORDS………………………………….. CALLBACK FROM CALL RECORDS………………………… PROGRAMMING MODE………………………………………. NEW CALL / MESSAGE INDICATOR………………………..
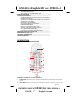
GX2411ci English I/B ver. 09010A-1 3. MEMO (Memory) Button: Used for storing / retrieving phone numbers to / from the 20 Memory Dialing Directory. 4. TONE ( * ) Button: Used to temporarily change the dialing mode from pulse to tone 5. 6. 7. 8. 9. 10. 11. 12. 13. 14. 15. 16. 17. for rotary service user.
GX2411ci English I/B ver. 09010A-1 4. 5. 6. 7. 8. 9. 10. 11. 12. 13. 14. 15. 16. PLAY Button: Press to playback Incoming Message(s) (ICM) or Two Way Recording(s). PREV Button: Press to skip to the previous message during playback. STOP Button: Press to stop current activity. ERASE Button: Press to erase message. REMO (Remote) Button: Allows you to access most of the GX2411CI’s functions away from the base unit using the handset.
GX2411ci English I/B ver. 09010A-1 8. 9. 10. 11. 12. 13. 14. 15. 16. 17. 18. 19. 20. Two Way Recording(s) or to stop the current activity. ERASE Button: Press to erase a single message or all messages in order to conserve message space in memory. MEMO PLAY Button: Press to playback the Memo message(s). ANS. ON/OFF Button: Press to activate or deactivate answer function. (Skip) Button: Press to skip to the next message during playback. OGM PLAY Button: Press to playback Outgoing Message (OGM).
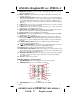
GX2411ci English I/B ver. 09010A-1 Studs Base Unit (Side View) Wall Mount Bracket Wall Mounting Slots (Figure 5) 2. Connect the short telephone line cord to the TEL Line jack on rear of the base. 3. Connect the opposite end of the telephone line cord to the modular wall jack. 4. Align the wall mounting slots with the studs located on the modular wall plate and slide the base down to lock in place.
GX2411ci English I/B ver. 09010A-1 Headset Jack Headset Plug (2.5mm) (Figure 8) to answer or place a call using the manufacturer’s headset details. Press the TALK button the headset. Refer to manual for more POWER INSTALLATION BASE UNIT POWER CONNECTION CAUTION: You must use a Class 2 Power Source 9VAC 500 mA. The plug must correctly fit the unit's adapter jack. 1. Plug the adapter into a standard AC outlet. 2. Insert the small plug into the adapter jack on the rear of the base as shown in Figure 9.
GX2411ci English I/B ver. 09010A-1 1. Remove the battery compartment cover of the handset. Connect the rechargeable Ni-Cd battery as shown on Figure 10. Handset Battery Compartment Insert the End of the Battery Pack Wire RED Wire BLACK Wire 2. 3. (Figure 10) Insert the Ni-Cd battery into the battery compartment of the handset. Slide the battery compartment cover firmly in its closed position. INITIAL SETUP Before you can use your cordless telephone, the handset must be charged for at least 20 hours.
GX2411ci English I/B ver. 09010A-1 page 25. SETTING THE CALLER ID CALL WAITING (CIDCW) FUNCTION The CIDCW function must be set to ON position in order to use CIDCW function. See PROGRAMMING MODE section on page 25. TELEPHONE OPERATION TO PLACE A CALL IN TALK MODE 1. Press the TALK button on the handset. The LCD Display will show "TALK" and the symbol will flash while the unit auto-scans and will light steadily when it finds a clear channel. (Figure 13) 2. Listen for a dial tone. 3.
GX2411ci English I/B ver. 09010A-1 2. Press the RE/PA button. This will automatically redial the last telephone number you called (Up to 31 digits). STORING TELEPHONE NUMBERS INTO MEMORY DIALING DIRECTORY In addition to your Call Records, you can store up to 20 speed dial names and telephone numbers into memory and you can then dial any of the stored phone numbers. You can also transfer a Call Record into the Memory Dialing Directory. A. STORING TELEPHONE NUMBERS INTO THE SPEED DIALING LIST 1.
GX2411ci English I/B ver. 09010A-1 3. Press handset MEMO button. If there is an empty slot, the Call Record is saved automatically and you can see the saved memory location on the screen. Example saved at memory location 10. If there is no empty slot, the transfer will fail. You must erase one of the speed dialing numbers. MEMORY FULL 4. The screen returns to the Call Record after 1 second. DELETING STORED TELEPHONE NUMBERS 817-456-7890 A. DELETING SINGLE MEMORY LOCATION 1.
GX2411ci English I/B ver. 09010A-1 In some cases, such as PABX or long distance service, a pause may be needed in the dialing sequence. Pressing the RE/PA button inserts a four-second delay between dialed numbers. FLASH FUNCTION Used to access custom calling features such as Call Waiting or Three-Way Calling provided by your local phone company. Flash can also be used to restore a dial tone to make a new call. CHANNEL SELECTION (40 Channels) A.
GX2411ci English I/B ver. 09010A-1 A sophisticated Voice Menu System has been designed and pre-programmed into the GX2411CI. This system will verbally guide you through key operational procedures. TIME / DAY STAMP ICMs and Memo messages are automatically voice-stamped with the current time and day. NOTE: After power failure, the time / day stamp will be lost. In this case, the time will be incorrect. Please refer to the INITIAL SETUP section on how to set the system time and day.
GX2411ci English I/B ver. 09010A-1 CHECKING THE OGM 1. In standby mode, press the OGM PLAY button on the base unit to hear your previously recorded OGM. (Figure 20) 2. You can stop OGM playback anytime during playback by pressing the STOP button. RECORDING A MEMO Memo message(s) is recorded remotely on the handset. The maximum recording time is 2 minutes. 1. In standby mode, press the REMO button on the handset. The GX2411CI will prompt “You have no new message. For help, press 9.” 2. Press MEMO REC button.
GX2411ci English I/B ver. 09010A-1 C. ERASING ALL MEMO MESSAGES 1. In standby mode, press the ERASE button briefly for less than 2 seconds and press and hold MEMO button for about 2 seconds. (Figure 25) 2. The GX2411CI will announce “Message erased. You have no Memo message”. D. ERASING OGM 1. During OGM playback, press ERASE button. 2. The GX2411CI will announce “Erase your announcement. You have no announcement.
GX2411ci English I/B ver. 09010A-1 NOTE: If memory is full, the unit will announce “ Memory full.” and Two-Way recording is not possible. You can erase any or all the messages remotely after listening to them. Refer to the REMOTE OPERATION section for more details. Recording two-way conversations may be subjected to Local State and Federal laws and regulations VOX (VOICE ACTIVATED) DETECTION During ICM recording, the GX2411CI uses VOX (voice activation) to conserve message storage space.
GX2411ci English I/B ver. 09010A-1 9 Voice Help Menu * Stop Function # Set Answer Mode to OFF During playback, you can press the following keys: 7 Playback Previous Message 8 Repeat a Message 9 Skip Forward to the Next Message 0 Erase a Message * Stop Function B. STOP FUNCTION Press * to abort the current function. C. CHANGING THE PASSWORD 1. Press the 1 key. The unit will prompt “(current code). Enter new password.” 2.
GX2411ci English I/B ver. 09010A-1 Review Previous Message : Press 7, to go to the previous message. Repeat Messages: Press 8, to restart the same message from the beginning. Skip Message : Press 9, to skip forward to the next message . Erase a Message : Press 0, to erase a particular message. Stop Message Playback : Press * , to terminate message playback. NOTE: The GX2411CI will announce “End of message.” when all messages have been played.
GX2411ci English I/B ver. 09010A-1 1. 2. In standby mode, press (+) or (-) button to move through the Call Record list. If there is new call(s), the new call(s) will be displayed at first. When you reach either end of the Call ALL: 10 NEW: 00 Record list, it will return to standby mode. If you continue to press (+) or (-) button, you scroll through the list again. Once a new call record is reviewed, the record is not a new call record anymore.
GX2411ci English I/B ver. 09010A-1 neighboring area code. 3. The area code of incoming telephone number is different from user's area code or neighboring area code. • 1+ 10 digits • 1+ 10 digits B. CALLBACK OPTION 2 In this option, Callback dials 1+10 digits and your Call Record will be changed to 1+10 digits automatically. 456-7890 1. In standby mode or talk mode, press (+) or (-) button to see NAME your Call Record on the LCD Display. 2. Find the desired Call Record to dial. 18174567890 3.
GX2411ci English I/B ver. 09010A-1 3. 4. 5. Enter your 3 digits area code. If your area is not Split area, press SCAN / PRG button to save and exit. If your area is one of the Split area, enter neighboring area code. 817 _ _ _ _ _ _ AREA CODE 817 913 412 AREA CODE 817 = User's area code, 913 and 412 = Neighboring area code. Press SCAN / PRG button to save and exit. NOTE: If the number is incorrect, press DEL button and restart on step 3. E.
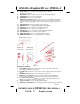
GX2411ci English I/B ver. 09010A-1 TALKING TIME AND CHANNEL DISPLAY In talk mode, the LCD Display shows the talking time. The LCD Display as shown means 1 hour and 12 minutes and 10 seconds. The using channel is 32. 1:12 10 32 TALK CALL WAITING ID OPERATION Call Waiting ID lets you know who is on call waiting while you are still using the telephone. Before, only a tone alerts you if you have a call waiting.
GX2411ci English I/B ver. 09010A-1 11:10 AM 10/10 CALL# 03 234-567-8901 NO NAME 11:10 AM 10/10 CALL# 03 234-567-8901 JOHN SMITH * TALK [M] OUT OF RANGE MSG WAIT ON MSG ALL:10 NEW:05 NO NAME The Caller Name might not be available from the caller's area. REPEAT CALL This blinking * indicates that the Call record information comes multiple. TALK The handset is ON and ready for you to dial. [ M ] means that the volume level is medium.
GX2411ci English I/B ver. 09010A-1 4. The GX2411CI is now ready for regular use. Discharge and charge the Ni-Cd battery again once you notice a decrease in the useable charge time. TECHNICAL INFORMATION This cordless phone uses radio frequencies to allow mobility. There are certain difficulties in using radio frequencies with a cordless telephone. While these are normal, the following could affect the operation of your system. NOISE: Electric pulse noise is present in most homes at one time or another.
GX2411ci English I/B ver. 09010A-1 TROUBLESHOOTING SYMPTOMS No dial tone • • • Does not ring • • No power on the handset unit • • Does not charge • • Range is limited • • POSSIBLE SOLUTION / CAUSE Check that the telephone line cord connectors at both ends are pushed in firmly until they click. If you had a power failure or had unplugged the base unit, replace the handset on the base unit for two to five seconds to reset the system. Check the RING ON/OFF switch on the handset.
GX2411ci English I/B ver. 09010A-1 Interference on reception Cannot access Remote Operation Excessive static Incoming calls/ Memo messages are cut off • • • • • • • Announces “Memory Full ” The Caller ID panel is blank The Caller ID does not show the caller's name and / or phone number. • • • • • • • • Random characters and / or "NO DATA" appear on the LCD Display. Cannot get Call Waiting identification on the LCD Displayl. • • Refer to the section "Improving Cordless Reception".
GX2411ci English I/B ver. 09010A-1 09010A-1 32 OWNER’S MAN # GX2411ci VER.
GX2411ci English I/B ver. 09010A-1 Distributed Exclusively Worldwide by: Audiovox® GX2411ci / 09010A-1 33 09010A-1 OWNER’S MAN # GX2411ci VER.