Aug/2009 C3-RS 1100 OLED PROFESSIONAL 2-WAY OLED REMOTE CAR STARTER & ALARM SYSTEM With Built in Temperature & Voltage Sensor And Two-way Serial Port Data Link Compatible OPERATION MANUAL Please register your product at: www.autopageusa.
Aug/2009 WARNINGS: This unit is designed for Automatic Transmission vehicles only! As with any product that performs automatic functions, there are certain safety precautions that you must practice and be aware of. 1. Keep the transmitter out of children’s reach. 2. Do not leave anyone in the vehicle while running on remote control. 3. Alert servicing personnel that the vehicle can be started automatically. 4. Do not start the vehicle by remote while it’s in an enc losed area or garage. 5.
Aug/2009 O. SYSTEM’S STATUS CHECK ……………………………………………………………..……….……………………. 17 P. DRIVER PAGING / LOSE AND FOUND ………………………….…………..……………………...……………..…...17 Q. DOME LIGHT CONVENIENCE DELAY & SUPERVISION ……………………..………………….………..…..…....17 R. IGNITION CONTROL THE DOOR LOCK/UNLOCK. ………..………………….…………………………………..….17 S. TRUNK RELEASE (CHANNEL 3) OUTPUT ………..……………………………………………….…………..…..….17 T. CHANNEL 4 / 5 / 6 / 7 TIMER CONTROL OUTPUT ………..……………………………………………….……..…..17 U. MULTI-VEHICLE SECURITY OPREATION: ………..
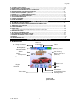
Aug/2009 Antenna switch OLED Display button switch Button Button 1 Button Button 2 Button Button 3 Button Button 4 B. CHARGING THE BATTERY The XT-1100 is powered by a built-in 3.7V lithium polymer battery. If the OLED screen display low battery or is flashing, charge your remote transceiver. While the battery of the Remote Transceiver is being charged, you can push the ” ” button to check charging condition. 1. ONLY CHARGE THE TRANSMITTER WITH THE INCLUDED USB WALL CHARGER. 2.
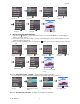
Aug/2009 While the TRIGGERED icon is flashing. Push the button to display triggered area. Push the While the While the icon is flashing button to see the display Push the button, the c ount down timer will display. Press button 2 to turn off the count down time or While the icon flash Push the or button, the OLED screen will display these icons individually i.e. daily s tart timer, timer start or temperature start, depend on which you selected.
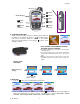
Aug/2009 Spin up the switch Spin up the switch Spin up the to page 2 to page 1 Spin up the switch to page 5 switch Spin up the switch to page 6 Spin up the Spin up the switch to page 4 to page 3 switch To return to main page . E. SELECT THE TRANSCEIVER FEATURES : 1. Spin down the Switch to select the transceiver feature you need and the OLED screen will display the features you have selected. 2. Press buttons 1, 2, 3 or 4 once within 3 seconds .
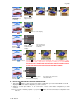
Aug/2009 Spin down the switch to page 1 Press button 2 and it will display the current setting Press the button 1 to change the setting Press the button and the setting is done. D- P1- 3. “MELODY / VIBRATION MODE” SETTING: Example: Set the Vibration mode.
Aug/2009 flash on the main page. D- P2- 3. “PARKING AREA” SETTING: Example: Set the “Parking Area to “B120 of parking structure” Spin down the switch to page 2 Press button 3, it will display previously parking area Press button 1 to confirm the programmed segment and move forward to next segment for setting. Spin do wn the Press button 1 and confirm the programmed segment and move forward to next segment for setting.
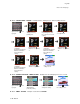
Aug/2009 Spin down the switch to page 3 Press button 2 to set the “minute” digit to “20” Press button 1 and the ”hour” digit flashes for adjusting. Press button 2 to set the ”hours” digit to “08” Press button 1 and the ”A” digit flashes for adjusting. Press button 2 to set the “P” for PM Pre s s button 1 and the ”minute” digit flashes for adjusting. Press the button 3 and the setting is done. D- P3- 2.
Aug/2009 Press button 3 to start the count down Press button 2 to set the ”minute” digit to “30”. timer and the icon will flash on the main page. C- P3- 4. “DAILY START TIMER” SETTING: Spin down the switch Press button 2 to set the ”minute” digit to “00” Press button 2 to stop the count down time. Example: Set the Daily Start Timer to 05:00AM Press button 4 and the ”hours” digit flashes for adjusting.
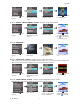
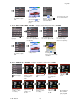
Aug/2009 Chose the car and the color. Spin up or down to select car photo, Push the button to confirm your selection Spin up or down to select color, Push the button to confirm your selection D- P5- 1. “NAME OF CHANNELS” SETTING: Example: Set Name of channel 4 to GARAGE DOOR Spin down the s witch to page 5 Press button 1 and the “-” flashes for setting. Spin up the switch to set the ”G”. Press button 1 and the “-” flashes for setting. Press button 1 and the “-” flashes for setting.
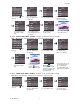
Aug/2009 Spin down the Press buttons 1 & 2 at same time to set the remote defaults. Press button 4. switch to page 6 OPERATION: A. REMOTE TRANSMITTER OPERATION: Transmitter Button System Function Lock Doors & Arm System / Button 1 Remark 1 - Arm and Bypass Zone 4. Shock Sensor Press twice within 3 seconds Arm System and Hidden, (Silent) Alarm Function Press within 3 seconds (3-second) Car Locator Panic function Upon armed Press and Hold for 3 seconds. To cancel.
Aug/2009 6 chirps Car Locator Constant On Under Remote Start E. ACTIVE ARMING – LOCK & ARM: 1.Press the button on the transmitter. 2.The siren will chirp once and parking light will flash once indicating that the system is now armed. The vehicle doors will lock upon arming when interfaced with the security system. AJAR WARNING: If the siren sounds 3 chirps, then you have left a door, trunk, or hood lid ajar.
Aug/2009 2. The siren will chirp twice and parking light flash twice to indicating that the security system is now disarmed. The vehicle’s door will unlock and dome light turns on for 30 seconds upon disarming when interfaced with the security system.
Aug/2009 I. VALET MODE: (System in Disarm or Valet mode) The valet switch allows you to temporarily bypass all alarm function, eliminating the need to hand your transmitter to a parking attendants or a garage mechanic. When the system is in valet mode, all alarm function and remote start functions are bypassed, however the remote panic feature and remote door locks will remain operational. To use the valet mode, the system must first be disarmed. Enter Valet Mode: 1.
Aug/2009 Here’s how the “Noise Abatement Circuit” works: If the alarm triggers five times, each time the same sensor (zone 4) is triggered the “Noise Abatement Circuit” will interpret this pattern of triggers as false alarms. After the fifth trigger, the “Noise Abatement Circuit” ignores, or bypasses that sensor until any other sensor or switch is triggered.
Aug/2009 Indoor Driving Paging If the ignition switch is in the “off” position, press and hold the valet switch for 2 seconds to page the driver. One chirp sound shall be emitted from the vehicle and the paging melody will sound from your Remote OLED transceiver. “DRIVER PAGING” indication will flash on the OLED screen. Q. DOME LIGHT CONVENIENCE DELAY & SUPERVISION The alarm with a unique feature which will turn on your vehicle dome light as following: 1.
Aug/2009 The four transmitters will be display on the OLED screen, you can Now you can press button to remote control select The “ TX 3 “ vehicle’s one of them through your hand hold Spin up the switch security system. unit. Press button 3 and the setting is done also the to page 6 “TX 3” will display on the OLED screen V. OUT OF RANGE AND TEMPERATURE INDICATION: If this feature is selected, the system will automatically check the range and update the temperature every 33 minutes. 1.
Aug/2009 3.The engine will run until the pre-programmed time elapsed or a shutdown input is received. D. TURBO TIMER MODE: (Turbo charged cars only, Programmable) Turbo timer mode keeps the engine running after arriving at your destination for a programmable period of 1, 3 or 5 minutes. This allows the system time to conveniently cool down the turbo after you have left the vehicle. To activate the turbo timer: 1.
Aug/2009 When the engine is running by remote start and you want to stop it, 1. Press button on the remote transmitter while in remote start mode. 2. Move the optional remote start enable toggle switch to OFF position.(If installed) 3. Press the brake pedal. The vehicle will shut down and turn off the parking light to indicate engine stopped. I.
Aug/2009 LIMITED LIFETIME WARRANTY PROVISIONS ( U.S. ,Continental U.S. and Canada Only) 1. Auto Page, Inc. WARRANTS that this new unit has been thoroughly inspected and tested at the factory prior to delivery.
Aug/2009 You must register your product online at http://www.autopageusa.com to receive any warranty service. Please go to the customer service tab and select product registration. It is the purchaser’s responsibility to register this product for any future warranty service. Warning: Some batteries may contain Perchlorate What is Perchlorate? Perchlorate is both a naturally occurring and manmade contaminant increasingly found in groundwater, surface water and soil.
Aug/2009 It is recommended to have a minimal digital service plan on your cell phone Your RS -1100 is CI3 compatible and will open your world to the true power of two way communication. Complete tracking and full cell phone functionality can be added to your system. For more information please visit your local authorized Autopage dealer or go to www.autopageusa.com .
Aug/2009 C3 RS-1000 OP 24
Aug/2009 Compatible 2-Way Communication to the Power of 3 960 Knox Street Unit B, Torrance, CA 90502 Tel: (310) 323-1800 or (800) 262-2527 www.autopageusa.
Aug/2009 C3 RS-1000 OP 26