
Owner manual


AW58300HTP-PAIR
User’s Manual
PAGE 9
Technical Support (650) 384-0000
www.avalanwireless.com
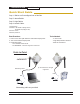
Physical Setup
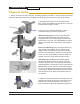
1. Mount each unit securely using the mounting brackets provided or other means as necessary.
Maximize lightning resistance by providing a strong DC ground connection to the metal housing.
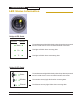
A. Assemble both bracket arms using the Rotator
Bolt, a Large Lock Washer and the Hex Nut. Leave the
bracket loose enough to rotate.
B. Use one of the following methods, or other
methods necessary to seccure the bracket.
Wide Pole Mounting: Place the pole between the
two large wedges of Bracket Arm A and the Pole
Clamp Bar. Use the two Clamp Bolts to bind the bar
and bracket to the pole. Use Large Washers and Lock
Washers if needed. Leave the clamp loose enough to
rotate.
Narrow Pole Mounting: Place the pole between the
large wedge of the Bracket Arm A and the small
wedge on the reversed side of the Pole Clamp Bar.
Use the two Clamp Bolts to bind the bar and bracket
to the pole. Use Large Washers and Lock Washers if
needed. Leave the clamp loose enough to rotate.
Wall Mounting: Hold Bracket Arm A ush against
the wall then drill four holes of roughly 3/16 inch
diameter using the four corner holes of bracket as a
measuring guide. If mounting on wood, simply use the
Wall Mounting Screws to secure the bracket through
its four corner holes and those that you have drilled.
If mounting on drywall press Drywall Anchors into the
drill-holes then do the same but instead screw into
the anchors.
C. Adjust the bracket apparatus so the square face of
Bracket Arm B faces the direction of the device your
radio will be communicating with. Then using a ½
inch wrench fully tighten all applicable components.