Operator's Handbook 0 28028 Monarch® Pathfinder ® Ultra® Platinum Printer 653258 04/18/07 7512 $15.50 SALE 4 58523 32232 9 $25.00 PEARL EARRINGS 8 99565 45453 9 04/18/07 7512 $200.00 TC6039OH Rev. AK 9/10 ©2007 Avery Dennison Corp. All rights reserved.
Each product and program carries a respective written warranty, the only warranty on which the customer can rely. Avery Dennison Corp. reserves the right to make changes in the product, the programs, and their availability at any time and without notice. Although Avery Dennison Corp. has made every effort to provide complete and accurate information in this manual, Avery Dennison Corp. shall not be liable for any omissions or inaccuracies. Any update will be incorporated in a later edition of this manual.
TA B L E O F C O N T E N T S INTRODUCTION ...................................................................................................................... 1-1 Using this Manual............................................................................................................... 1-2 Audience ........................................................................................................................... 1-2 Getting Started .............................................................
CARE & MAINTENANCE .......................................................................................................... 5-1 Cleaning............................................................................................................................ 5-1 Cleaning the Printhead .................................................................................................... 5-1 Cleaning the Platen Roller ..........................................................................................
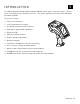
INTRODUCTION 1 The Monarch® Pathfinder® Ultra® Platinum 6039™ printer prints, scans bar codes, collects data, and communicates with other devices. The printer operates on a Microsoft Windowsbased CE platform.
Using this Manual Following is a summary of the contents of this manual: Chapter Contents 1 Introduction Information you should know before using the printer. 2 Using Batteries Charging, changing, and using batteries safely. 3 Using Supplies Supply loading and removal. 4 Entering and Printing Data Information about using the display, keypad, scanner, and printing. 5 Care & Maintenance Clearing supply jams and cleaning the printer. 6 Troubleshooting Common problems and their solutions.
Helpful Reminders Always start with a fully charged battery. Attach the safety strap to your wrist before using the printer. Do not pound the printer when applying labels printed in peel mode. Switch to a fully charged battery every time you load a new roll of supplies (doing so ensures optimum print quality). Turn off the printer when you are not using it. Operate and store the printer with the recommended temperature and humidity ranges.
1-4 Operator’s Handbook
2 U S I N G B AT T E R I E S The printer uses two batteries: a main battery and a backup battery. Battery Use Main Running the printer. It is also rechargeable using the Monarch 9462 single-station or the Monarch 9465 four-station charger. Backup Maintaining the printer’s system settings. Using the Main Battery The printer’s main power source is a 7.4V lithium-ion battery. Note: The printer only takes this battery. Do not substitute batteries.
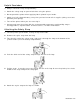
Charging the Backup Battery Some printers support backup battery charging. Contact your Service representative for more information. Checking the Battery Status The printer easily provides the status of the main and backup batteries. 1. Tap the battery icon ( ) on the Status Bar on the display. Power Supply Description Main Battery Shows the status of the main battery. If the status is low, printing may be interrupted. Replace the main battery in the printer with a fully charged battery.
Main Battery Safety Information You must charge the battery before using it. For optimal battery life, charge the battery within three months of receipt. Warning: The battery might explode if placed on a different charger. Take the battery out of the printer when storing the printer for a month or longer. The optimal battery storage temperature is 50°F – 73°F (10°C – 23°C), with a maximum of 104°F (40°C).
2-4 Operator’s Handbook
3 USING SUPPLIES The printer can use three types of supplies: Labels Tags Receipt Paper. See “Selecting the Supply Type” in this chapter for more information. There are two print modes. The way you load the supplies depends on the print mode you use. Peel mode removes the backing paper from the supplies as it prints the labels. This mode allows you to apply the label immediately. It is only for labels.
4. Open the spring-loaded supply holder. Spread the supply holder tabs apart with one hand so it adjusts to the size of your supply roll. You can set it at 1.2”, 1.5”, and 2.0”. Supply Holder 5. Place the supply roll in the supply holder so the supply feeds labels from the bottom. 6. Load the supplies for the print mode you want. See “Loading for Peel Mode” or “Loading for Non-Peel Mode” for more information. Loading for Peel Mode To load supplies for peel mode: 1.
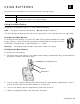
3. Feed all four inches of the backing paper under the applicator roller, over the peel bar, and under the label deflector. 4. Push the label deflector up until it snaps into place. 5. Partially close the cover to the first position. Partially closed cover 6. Pull enough backing paper over the guide roller to reach the pinch and feed rollers. Ap plicator Roller Peel Bar Label Deflector Pinch Roller 7. Hold the backing paper edge between the feed and pinch rollers and press the trigger.
Loading for Non-Peel Mode To load supplies for non-peel mode: 1. Feed the supply under the applicator roller and over the label deflector. Ap plicator Roller Label Deflector 2. Close the supply cover. 3. Tap Load Supply from the printer icon menu, then Calibrate. Selecting the Supply Type To select the supply type: 1. Tap the printer icon from the Status Bar. 2. Tap Load Supply.
3. Select the supply type you are using: Supply Used For Paper Labels and tags Fax Receipt paper Synthetic Labels and Tags 4. Tap Feed to advance a label or Calibrate to register the black mark. Removing Supplies in Peel Mode To remove supplies in peel mode: 1. Tear the backing paper just above the pinch roller. 2. Open the supply cover completely. 3. Spread the supply holder tabs apart with one hand and remove the supply roll. 4.
3-6 Operator’s Handbook
E N T E R I N G & P R I N T I N G D ATA 4 This chapter explains the printer’s features and how to use them. Using the Keypad The printer’s keypad appears below. Key(s) Description Enter Accepts data or a menu selection. Tab Tabs to the next tab stop or the next field. Pressing Fct + Tab backspaces a tab stop or returns to the previous field. Fct Performs an application-defined function when pressed with a single-digit number. Esc Exits the current screen or application.
Entering Special Characters/Symbols The table shows how to enter special characters and symbols when in Lower-case and Uppercase Alpha Mode. For lower-case Alpha mode, press Alpha once. For upper-case Alpha mode, press Alpha twice. Press Key Lower-case Alpha Mode Upper-case Alpha Mode 1 : < ( ‘ ; > ) “ 0 . - + / * . = @ % $ Using the Display The printer has a touch screen display similar to a hand held computer. Use the stylus to select the option you want from the display.
Scanning Bar Codes Your printer may have a built-in scanner. To scan a bar code: 1. Attach the safety strap to your wrist. 2. Point the scanner at a slight angle approximately 4 – 8 inches from the bar code symbol. 3. Press the trigger or other key specified by your System Administrator. Caution: Do not stare into the beam. The scanner LED is at the top left of the keypad, opposite the On/Off key. Scanner LED Description Green Successful scan. Amber Unsuccessful scan.
Certification Note This product is certified to be a Class II laser product with the United States DHHS Center for Devices and Radiological Health and complies with 21CFR1040.10 and 1040.11 except for deviations pursuant to Laser Notice No. 50, dated July 26, 2001, The scanner emits less than 2.0 milliwatt beam of laser light from the scanning window. Laser light in excess of Class I limits must be inside a protective cover.
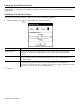
Printing When and how you print depends on your printer’s application. It may print only after you press a certain key automatically as soon as you press a key automatically with no input from you one label or a strip of labels. Adjusting the Print Contrast To adjust the print contrast: 1. Tap the printer icon from the Status Bar. 2. Tap Printer Configuration.
Select: Description Adjust Contrast Scroll to change contrast. The higher the number, the darker the print; the lower the number, the lighter the print. The print contrast controls the darkness of the printing on your supply. The range is –28 to +40 and the default is 0. You may need to increase or decrease the print contrast depending on your supply type. Having the correct print contrast setting is important because it affects how well your barcodes scan and how long your printhead lasts.
5 CARE & MAINTENANCE Caring for and properly maintaining your printer protects it and keeps it running smoothly. This chapter explains how to clean the printhead, platen roller, sensors, and scanner window clear supply jams store the printer. Cleaning It is important to keep the printer clean. You must clean five main areas: Printhead Platen Roller Sensors Scanner Window Scanner Flex Cable Do not use sharp objects to clean the printer.
3. Check the supply holder for adhesive buildup and clean it if necessary. 4. Ground yourself by touching a metal object other than the printer. Grounding prevents electrostatic discharge, which may damage your printer. 5. Clean the printhead area of all adhesive and label particles using a Cleaning Pen (#114226) or a soft cloth moistened with isopropyl alcohol. 6. Reload the supply roll and close the supply cover.
2. Remove the supplies. See “Removing Supplies” in Chapter 3 for more information. 3. Open the label deflector by gently pressing down with two fingers. 4. Clean the on-demand sensor with a soft cloth moistened with distilled water. 5. Reload the supplies, close the label deflector and supply cover. To clean the black mark sensor: 1. Turn off the printer and open the supply cover. 2. Remove the supplies. See “Removing Supplies” in Chapter 3 for more information. 3.
4. Carefully remove any jammed supply and close the deflector. Note: Do not pull the jammed supply out through the front of the label deflector. Do not use sharp objects to remove jammed supplies. 5. Carefully remove any jammed supply between the pinch and feed rollers. 6. Clean any adhesive build-up. 7. Reload the supplies and close the label deflector.
6 TROUBLESHOOTING This section lists some common printer problems and their solutions. Problem Solution Printer does not feed. Switch to a fully charged battery. Close the supply cover completely. Load the supply correctly. See “Loading Supplies” in Chapter 3 for more information. Check the platen roller for jammed labels. Printer does not print. Switch to a fully charged battery. Load the supply correctly. See “Loading Supplies” in Chapter 3 for more information. Clean the printhead.
Checking the Software Version To check the Software version of the printer, the Ultra Class library, the scanner configuration, printer diagnostics, and the Application version: 1. Tap the printer icon from Status Bar on the display. 2. Tap About. Printing a Test Label To print a Test Label: 1. Tap the printer icon from Status Bar on the display. 2. Tap Printer Diagnostics. 3. Tap Printer from the Printer Diagnostics menu. 4. Tap Diagnostic Labels from the Printer Tests menu. 5.
Error Codes This section lists common error codes and what they mean. Code(s) Description 004 - 005 Supply size is incorrect. Reload the correct supplies. 267 – 271 410 - 413 Communication error. See your System Administrator. 703 - 704 Supply Error. Load supplies or make sure they are loaded correctly. See “Loading Supplies” in Chapter 3 for more information. 750 Printhead is overheated. Turn off the printer to let it cool. 751 - 753 The printer sensed a problem with a mark on the supplies.
6-4 Operator’s Handbook
A S P E C I F I C AT I O N S & A C C E S S O R I E S Specifications Dimensions: Width – 9.2" (233mm) Length – 3.5" (89mm) Height – 10.35" (263mm) Weight – 2.25 lbs. (1 kg) Shipping Weight – 5.86 lbs. (2.66 kg) Printhead: 1.89" (48mm/384 dots) (203 dots per inch) Printing: Thermal direct (no ink /ribbon) Print Speed: Up to 4" (102 mm) per second Memory: 64MB RAM and 64MB Flash Battery Type: 7.4V Lithium-Ion (110V – 240V AC adapter) 3.
Accessories This section lists accessories available for your printer and their part numbers.
0 28028 Avery Dennison Printer Systems Division 170 Monarch Lane Miamisburg, OH 45342 1-800-543-6650 (In the U.S.A.) 1-800-387-4740 (In Canada) www.monarch.