VENUE MADI Option Card For VENUE Systems Avid 2001 Junipero Serra Boulevard Daly City, CA 94014-3886 USA Product Information For company and product information, visit us on the web at www.avid.
Legal Notices Communication Statement This guide is copyrighted ©2010 by Avid Technology, Inc., with all rights reserved. Under copyright laws, this guide may not be duplicated in whole or in part without the written consent of Avid Technology, Inc. NOTE: This equipment has been tested and found to comply with the limits for a Class B digital device, pursuant to Part 15 of the FCC Rules. These limits are designed to provide reasonable protection against harmful interference in a residential installation.
Contents Chapter 1. Overview . . . . . . . . . . . . . . . . . . . . . . . . . . . . . . . . . . . . . . . . . . . . . . . . . . . . . . . . . . . . . . . . . . . . . . . . . . . . . . 1 MADI Card Capabilities and Features . . . . . . . . . . . . . . . . . . . . . . . . . . . . . . . . . . . . . . . . . . . . . . . . . . . . . . . . . . . . . . . 1 MADI Card Components. . . . . . . . . . . . . . . . . . . . . . . . . . . . . . . . . . . . . . . . . . . . . . . . . . . . . . . . . . . . . . . . . . . . . . .
Chapter 1: Overview Welcome to the VENUE MADI Option card for VENUE systems. With the MADI card you can connect your qualified VENUE system to any MADI-compatible device, enabling you to take advantage of the MADI format’s multi-channel audio distribution capabilities. MADI Card Capabilities and Features • Allows up to 64 channels of 24 bit, 48 kHz digital audio to be sent to and from a qualified VENUE system. (For more information, see “Qualified VENUE Systems” on page 1.
Compatibility Information Avid can only assure compatibility and provide support for hardware and software it has tested and approved. For a list of Avid-qualified computers, operating systems, hard drives, and third-party devices, refer to the latest compatibility information on the website (www.avid.com), click on the Products and Services menu at the top of the page, and choose the product you are interested in from the menu.
Chapter 2: Installing the MADI Card To install the MADI card in your VENUE system, you need to first install the software update (if required), then install the MADI card (or cards) in your FOH Rack or Mix Rack, and finally confirm installation. 5 In the left column, select the items you want to transfer from the VENUE system to your portable storage device. Installing D-Show Software VENUE D-Show software 2.8.5 is required to use the MADI card.
FOH Rack MADI Card Installation Install the MADI card in your FOH Rack after installing the software update (if necessary). A maximum of two MADI cards can be installed in an FOH Rack. One MADI card and one HDx card can be installed and used simultaneously in an FOH Rack. If your system includes two MADI cards, or a MADI card and an HDx card, a second Snake card must be installed in your FOH Rack, even if you are not using two Stage Racks.
11 Still inside the rack, attach the included ribbon cable to the ribbon connector on the MADI card. Make sure that the notches on the ribbon cable line up correctly with the notch on the ports. Mix Rack MADI Card Installation Install the MADI card in your Mix Rack after installing the software update (if necessary). One MADI card can be installed in a Mix Rack, and may not be used simultaneously with an FWx card. To install the MADI card in your Mix Rack: 1 Shut down your sound system.
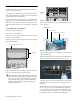
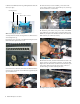
6 Remove the MADI card from its packing material. Hold the card by its edges. 10 Inside the rack, locate an available power cable. If the power cable is attached to the chassis with zip ties, cut the zip ties. Be careful not to cut the wires. Mounting bracket Power connector Ribbon Cable connector Cuttiing the zip tie 11 Attach the power cable to the power socket on the MADI MADI card showing bracket and connectors 7 Gently slide the card into the expansion slot. Make sure it is card.
13 Attach the other end of the ribbon cable to the ribbon connector socket on the MADI card. Make sure that the notch on the ribbon cable lines up correctly with the notch on the port. Confirming MADI Card Installation After you have updated the software and installed the MADI card(s) in your FOH Rack or Mix Rack, you should confirm that it has been successfully installed.
8 VENUE MADI Option Card Guide
Chapter 3: Connecting and Using the MADI Card After installing the MADI card, you can make audio connections between your VENUE system and your MADI device. If you are sending audio to your MADI device, see “Sending Audio” on page 9. If you are receiving audio from your MADI device, see “Receiving Audio” on page 9.
3 Go to the System page and, under Inputs 1-48 or Inputs 49-96, choose either Optical Priority, Optical, or Coaxial from the Input Format pop-up menu. Using Word Clock to Synchronize Two VENUE Systems When using MADI to connect two VENUE systems, one of the systems provides word clock to the other system. The system receiving word clock detects it automatically.
Using Word Clock to Synchronize a VENUE System and another MADI Device Using an External Master Clock to Synchronize Devices When using MADI to connect your VENUE system to an external MADI device such as a digital mixing console, the VENUE system can send or receive word clock. When using MADI to connect your VENUE system to an external MADI device, you may want to use an external master clock to provide word clock to both your VENUE system and the external MADI device.
Using MADI You can use MADI with your VENUE system in the following ways: Stage mode Your Stage inputs are the main source of audio signals for your VENUE system. In this mode, you can send a one-for-one digital split of VENUE Stage input channels to an external MADI device such as a MADI router, another digital mixing console, or a digital recorder. See “Sending A Direct Digital Split of Stage Inputs” on page 12.
• For Stage inputs 49-96, do the following: • Select Enable Stage 2. • Select Enable MADI 2. Enabling the second Stage Rack and MADI card • In the Inputs section of the System Configuration page, beneath Inputs 49–96, select Stage 2. • For inputs 1-48, in the Inputs section of the System Configuration page, beneath Inputs 1–48, select MADI 1, then select Virtual Soundcheck from the MADI Format pop-up menu.
Gain Settings in Virtual Soundcheck Mode VENUE systems use a hybrid analog/digital gain approach for analog Stage inputs. The behavior of gain settings when changing between modes is explained below. • Apply the gain change, yielding a Stage Rack gain increase of 6 dB, or a final setting of +36 dB (30+6). – or – • Discard the gain change, leaving the original Stage input gain unchanged at +30 dB.
4 Do either or both of the following depending on your sys- tem configuration: • For inputs 1-48, in the Inputs section of the System Configuration page, beneath Inputs 1–48, select MADI 1, then select Input Mode from the MADI Format pop-up menu. When switching from MADI input mode to Stage mode, all MADI digital gain settings are replaced by pre-existing Stage gain settings.
Sending Direct Outs Using Assignable Channels Sending the Stereo L/R Mix or any Submix The following shows how to send the Direct Out of a channel to your MADI device. The following example shows how to send your the stereo L/R mix or any submixes to your MADI device. Sending audio using output channels is always post-fader.
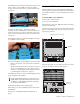
4 Click in the channel grid to route a MADI assignable chan- nel (listed across the top to an available input channel or FX Return (listed on the left). Patching MADI channels to the FX Returns for playback 5 Activate each input by turning on the assigned input channels, and adjust the level by adjusting the faders of the assigned input channels.
18 VENUE MADI Option Card Guide