
Specifications

Chapter 2: Installing the MADI Card 7
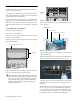
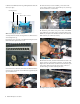
13 Attach the other end of the ribbon cable to the ribbon con-
nector socket on the MADI card. Make sure that the notch on
the ribbon cable lines up correctly with the notch on the port.
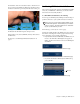
14 Reattach the Mix Rack faceplate using its screws.
15 Reconnect power, audio, FOH Link, and any other cables to
the Mix Rack.
16 Proceed to “Confirming MADI Card Installation” on
page 7.
Confirming MADI Card Installation
After you have updated the software and installed the MADI
card(s) in your FOH Rack or Mix Rack, you should confirm
that it has been successfully installed.
To confirm MADI card installation, do the following:
1 Power up your VENUE system, making sure that all amps or
speakers connected to your system are muted or turned off.
2 In D-Show, go to the Options > Devices page.
3 When successfully installed, the MADI card is auto-detected
and shown on the Options > Devices page in the following
ways, depending on your system configuration:
• In systems that include an FOH Rack, the MADI card con-
nected to the inner-most Mix Engine card appears as
MADI 1, and the card connected to the second Mix Engine
card MADI 2.
• In systems that include a Mix Rack, the MADI card ap-
pears as MADI 1.
Attaching the ribbon cable to the Mix Engine Card
When you power up your MADI-equipped VENUE system,
all MADI card outputs are muted until full system initial-
ization is complete. All MADI outputs are also muted dur-
ing the system shutdown procedure
.
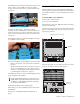
MADI card indicated in the FOH Rack icon in the Devices page
Two MADI cards indicated in the FOH Rack icon in the Devices page
MADI card indicated in the Mix Rack icon in the Devices page
MADI card