
Specifications

VENUE MADI Option Card Guide6
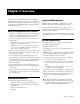
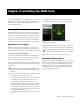
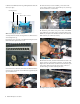
6 Remove the MADI card from its packing material. Hold the
card by its edges.
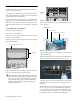
7 Gently slide the card into the expansion slot. Make sure it is
oriented right-side up.
8 Secure the card to the back of the Mix Rack using the screws
that secured the expansion slot cover.
9 From the front of the rack, reach inside the Mix Rack and se-
cure the card to the chassis of the Mix Rack by tightening the
captive thumbscrews.
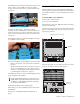
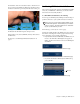
10 Inside the rack, locate an available power cable. If the
power cable is attached to the chassis with zip ties, cut the zip
ties. Be careful not to cut the wires.
11 Attach the power cable to the power socket on the MADI
card. When the power cable plug is correctly attached to the
MADI card, the yellow wire should be the first wire on the left.
Make sure they are connected securely.
12 Still inside the rack, attach the included ribbon cable to the
ribbon connector socket labelled “FireWire” on the first Mix
Engine card (the inner-most card when viewed from the open
front panel). Make sure that the ribbon cable connector’s
notch is facing you when attaching the cable.
MADI card showing bracket and connectors
Installing the MADI card in the Mix Rack
Tightening the captive thumbscrew
Mounting bracket
Power connector
Ribbon Cable connector
Cuttiing the zip tie
Attaching the power cable
Attaching the ribbon cable to the MADI card