
User's Manual


Battery Installation
Low battery warning:
It is necessary to replace the batteries
when the Low Battery symbol “
”
appears on the display, or when the
display does not turn on after the
POWER button is pressed.
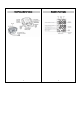
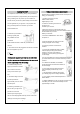
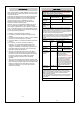
Replacing the Battery:
1. Press down on latch and lift the cover on the bottom of
the monitor.
2. Insert or replace 4 x 1.5 V AA batteries into the battery
compartment, ensuring to match the indicated polarity
symbols.
Always use new batteries.
3. Replace the battery cover.
Battery-operated
1. Always use NEW batteries; never mix old and new
batteries.
2. Do not use rechargeable batteries; rechargeable batteries
can vary greatly in quality and strength.
Use of rechargeable batteries may affect the performance of
this device.
3. Please properly dispose of the batteries away from small
children and heat.
4. It is recommended to remove the batteries if the unit will
not be used for an extended period of time.
5. Batteries must be disposed of in accordance with local
environmental and institutional policies.
6. Remove the battery during extended storage.
5
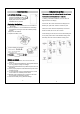
Setting the Date and Time
It is necessary to set the date and time for the unit every
time batteries are initially installed or replaced.
1. Loading 4 AA alkaline batteries; the Year value will
begin to flash on the display.
2. Press the “M1” button to advance the display to the
desired year, press “M2” button to confirm the year.
3. Next, the month will blink. Repeat steps 2 to set the
month and date, then hours, then minutes.
4. After setting the minutes, the unit will automatically exit
out or press power button of the date/time setting mode
and briefly show the word OFF before shutting down.
6