
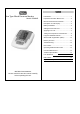
User's Manual


Applying Your Cuff
It is important to avoid smoking, eating, taking medication,
alcohol consumption or physical activity 30 minutes prior to
taking a reading. If for any reason you are unable to or
should not use your left arm, please modify the instructions
for cuff application to your right arm. Your physician can
help you identify which arm is best for you to take
measurements from.
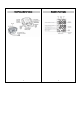
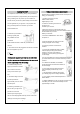
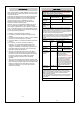
1. Remove any constrictive
clothing or jewelry that
may interfere with cuff
placement.
2. Be seated at a table or desk with your feet flat on
the floor.
3. The cuff should not be plugged into the monitor until after
the cuff is applied to your arm.
Note:
Blood pressure naturally varies from one arm to the other;
therefore, measure your blood pressure on the same arm to
ensure comparability of the two readings.
4. Unfold the Easy Cuff and
apply to your left arm. Position
the air tube over the main
artery on the inside of your
arm.
5. The bottom edge of the cuff
should be positioned
approximately one inch above
the elbow joint.
6. Reaching underneath your
left arm with your right hand,
pull the end of the cuff
towards your body to tighten
the cuff. Incorrectly applied cuffs may result in inaccurate
readings or showing error message.
7
Taking a blood pressure measurement
Please read the preceding portions of this manual prior to
taking your first reading.
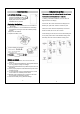
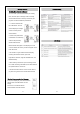
1. Position the monitor on a flat,
stable surface with the
digital display in view.
2. Insert the cuff tubing connector into
the port on the
left side of your monitor.
3. Rest your elbow on a solid surface with your
palm facing upward. Elevate your arm so that the cuff is at
the same level as your heart.
Relax your left hand.
4. Press the POWER button. This will turn
the power on.
5. After the self-test, the values for the last
reading will appear on the display.
6. The blood pressure monitor start to
measure.
7. The cuff will automatically begin to inflate,
with the display showing the increasing
pressure in the cuff. As the pressure
increases, an arrow pointing up will appear
on the display.
8. As the cuff inflates, the monitor automatically determines
your ideal inflation level. This monitor detects your blood
pressure.
9. To detect the heartbeat, the heartbeat
symbol will appear and continuous flashes on
the LCD display.
10.Your blood pressure measurement and
pulse will display simultaneously on the
screen.
11.The Hypertension Indicator will indicate
your reading range on the display separately.
12. Your reading will be automatically stored in "MEMORY
Recall" Button.
13. Select POWER to turn the unit off and conserve energy
and battery life. The unit will automatically shut-off
approximately 2 minutes.
8