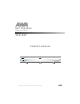
Set Top Box Digital receiver STB 237 OWNER'S MANUAL STB 237 CHANNEL English Read this manual before installation and use.
SAFETY INSTRUCTIONS TO REDUCE THE RISK OF FIRE AND ELECTRIC SHOCK, DO NOT EXPOSE THIS UNIT TO RAIN OR MOISTURE. : To reduce the CAUTION risk of fire and electric shock, do 10. Water and Moisture- do not use this video product near water for example, near a bath tub, wash bowl, kitchen sink or laundry tub, in a wet basement, or near a swimming pool and the like. Caution: Maintain electrical safety.
SAFTY IMFORMATION This STB has been manufactured to satisfy international safety standards. Please read the following recommended safety precautions carefully. MAINS SUPPLY: AC230~240V 50Hz OVERLOADING: Do not overload wall outlets, extension cords or adapters as this can result in fire or electrical shock. LIQUIDS : Keep liquids away from the STB. CLEANING: Before cleaning, disconnect the STB from the wall socket. Use a cloth lightly dampened with water(no solvents) to clean the exterior.
CONTENTS SAFETY INFORMATION INTRODUCTION About STB Front panel Rear panel Remote control 1 1 2-3 SYSTEM CONNECTION General about connections Connecting to the TV aerial Connecting to the TV Connecting a HiFi system Connecting a video recorder 4 4 5 6 7 GETTING STARTED Switching on System setup Automatic channel scan Manual channel scan 8 8 9 9 OPERATION Changing channels Volume control Auto control Soundtrack language Accessing the favorite channels Displaying program information Accessing the Electro
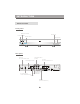
INTRODUCTION About the STB Front panel Main Power button Channel up Power indicator Remote sensor Channel down STB 237 CHANNEL Rear panel TV aerial for an external TV aerial Component Video (Y Cb Cr) TV Scart for connection to the TV Coaxial Digital Audio AC 220-240V ~50/60Hz STB 237 N294 MADE IN CHINA Down Mix Audio 2 channel L/R R F Loop though for an external TV aerial CompositeVideo S-Video USB port (for connection to PC) 1 21
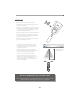
INTRODUCTION Remote control Remove the battery compartment cover. Load two AAA (UM-4 or R03) batteries into the battery compartment. Make sure that the batteries have been inserted in the correct polarities matching to the symbols +, - marked in the battery compartment. Close the battery compartment cover. When replacing batteries, replace both batteries. Do not mix new and used batteries operating together, otherwise, the operation lifetime will be much shorter than normal.
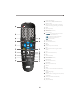
INTRODUCTION 1 Power On/Standby (Switch the STB ON/STANDBY mode) 2 Numeric entry (Enter numeric values and to select the channel firectly by entering it's number) 3 Menu (Open up menu) 4 Red Button (For teletext function) 5 Cursor/ Enter ( to select sub-menu from the main menu and channel +/-, 1 2 MENU EXIT 3 CH+ 4 5 VOL 12 VOL + OK - 6 7 ( to select menu and sub-menu from the menu and volume +/-, ( Press to enter.
SYSTEM CONNECTION General There are many different types of TV/VCR and other equipment that you can connect to the STB. In this manual you will see some of the most common ways to connect your equipment. Connecting to the TV aerial You can connect the STB to the following type of aerials: 1 Standard outdoor aerial Please note the following: In some block of flats, the roof-mounted aerial system includes a filter and channel selector. If so, the aerial may not work with the STB.
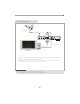
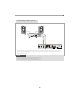
SYSTEM CONNECTION Connecting to the TV Blue Green RF cable Red Antenna AC 220-240V ~50/60Hz STB 237 N294 White Red Yellow MADE IN CHINA Yellow White Red Scart cable Green Blue Red Remove the aerial lead from your TV and connect this to the TV AERIAL input socket on the STB. Switch on your TV, plug in and switch on your STB. You may need to select the CVBS or Y Cb Cr channel on your TV to watch Digital TV.
SYSTEM CONNECTION Coaxial cable Hi-Fi Optical cable Connecting a HiFi system AC 220-240V ~50/60Hz STB 237 N294 MADE IN CHINA You can connect an RCA/Cinch single cable from the DIGITAL AUDIO socket on the STB to a HiFi system equipped with digital audio input. This output is also used for connection to an external Dolby digital decoder. NOTE To avoid interference you must use screened audio cables. Never connect digital output to any analogue input.
SYSTEM CONNECTION Connecting to Video Recorder Antenna Red Green Blue Green Red Blue AC 220-240V ~50/60Hz STB 237 N294 White Red RF cable Yellow MADE IN CHINA TV Yellow White Red VCR Video Cassette Recorder RF cable Remove the aerial lead from your TV and connect this to the TV AERIAL input socket on the STB. Connect a Y Cb Cr cable between Y Cb Cr socket on the TV and the Y Cb Cr on the STB. Connect a CVBS cable between the video and the STB.
GETTING STARTED Switching on Turn on your TV set and select the corresponding AV input (with the AV key, or simular, on the television remote control). Turn on the main power supply to the STB, the indicator on the front of the unit will turn red and then green. In standby mode, the indicator light will be red. In working mode, the indicator light will be green. System setup 1 Press the "MENU" button to enter the setup menu of the STB. 2 Press the "LEFT" or" RIGHT" cursor button to select .
GETTING STARTED Automatic channel scan 1 Press the "MENU" button 2 Press the "LEFT" or "RIGHT" cursor button 3 Press the "OK" Button 4 Select the "Scan Type" and press "LEFT" or "RIGHT" cursor button to select "Auto scan". 5 Press "UP" or "DOWN" cursor button "Start Scan" and press the "OK" button 6 Press "EXIT"button to enter the setup menu of the STB. to select Scan . to enter the sub-menu. to select the to start searching. Channel to quit.
OPERATION Changing Channels There are four ways of channel selection - stepping through the channel list, selection by number, from the on-screen channel list, and using the electronic programme guide(EPG). 1 Stepping through the channel list: To move through the channel list, press the upward arrow or downward arrow key on the remote control. 2 Selection by number: Enter the channel list number directly by remote control to select desired channel. auto scan will clean the channels that stored first.
OPERATION Volume Control The volume level of the STB can be altered with the "Left" or "Right" cursor button remote control. on the NOTE The volume level selected will remain set, even when the receiver is turned off and on again, until it's altered. You can silence the sound from the receiver by pressing the "MUTE" button . The sound remain muted until the "MUTE" button is pressed again, the "LEFT" or "Right" cursor button is pressed, or until the receiver is turned off and on again.
OPERATION Displaying program information You can read the current program information by pressing "INFO" button control. Press the button again to hide the program information table. on the remote Accessing the Electronic Program Guide (EPG) Accessing the EPG of all channels: EPG 1 Press the "EPG" button to enter EPG menu . 2 Press "UP" or "Down" cursor button to preview channel. 3 Press "Left "or "Right" cursor button information within 30 minutes.
OPERATION Channels List Some channels broadcast material which you do not want younger members of the family to watch. Any channel can be locked so that it cannot be selected for viewing without entering PIN code. Locking/Unlocking a channel: 1 Press the "MENU" button of the STB. 2 to enter the setup menu Press the "LEFT" or "RIGHT" cursor button to select . Channel Channel 3 Press the "OK" button 4 Press "UP" or "DOWN" cursor button channel. to enter the sub-menu. Favorite 1. BBC1 2.
OPERATION Auto Power On/Off You can set the STB to power on and power off automatically. Auto power on: Press the "MENU" button 1 2 to enter the setup menu of the STB. Press the "LEFT" or "RIGHT" cursor button 3 Press the "OK" button 4 Press "UP" or "DOWN" cursor button Setting" and press "OK" button . arrows key to select Setting . to enter the sub-menu. Channel 5 Favorite Select the "Auto Power On" and press "LEFT" or "RIGHT" cursor button to select "Enable".
SYSTEM SET-UP Many aspects of your STB can be set to reflect your circumstances and preference. The SETTINGS menu screen is accessed from main menu. GMT setting Various time zone can be set, such as current local time, switch on/off time. The exact local present time can be adjusted by using the GMT. 1 Press the "MENU" button to enter the setup menu of the STB.
SYSTEM SET-UP A/V setting Various A/V modes can be set in this menu, such as TV shape, conversion, TV standard and Video output. 1 Press the "MENU" button to enter the setup menu of the STB. 2 Press the "LEFT" or "RIGHT" cursor button to select Setting . 3 Press the "OK" button 4 Press "UP" or "DOWN" cursor button and press OK button . 5 Select the desired items and press "LEFT" or "RIGHT" cursor button desired settings. 6 Press "EXIT" button 3 times to enter the sub-menu.
SYSTEM SET-UP Sort Channel You can sort the TV channels in alphabetical or numerical order. 1 Press the "MENU" button to enter the setup menu of the STB. 2 Press the "LEFT" or" RIGHT" cursor button to select . Setting Channel 3 4 Press the "OK" Button Favorite Setting Scan to enter the sub-menu. Press "UP" or "Down" cursor button and press "OK" Button to comfirm.
FAVORITE LIST Favorite list There are some channels that you tend to watch more often and some only occasionally. Although some duplicate channels you may want to delete from channel list, others although not watched frequently, you will not want to do away with altogether. The favourite mode allows the most-watched channels to accessed more easily, leaving the less-watched channels accessible but out of the way.
TROUBLESHOOTING In some region, the digital terrestrial signal may be weak. So you'd better use the antenna in which the booster was built,for watching the weak sinal channels.
SPECIFICATIONS SYSTEM RESOURCE FLASH SDRAM EEPROM TUNER & CHANNEL RF INPUT CONNECTOR x1 (F-TYPE, IEC169-2, FEMALE) 1MB 8MB 2KB RF OUTPUT CONNECTOR x1 (F-TYPE, IEC169-2, MALE (LOOPTHROUGH)) FREQUENCY RANGE: 174MHz ~230MHz (VHF) & 470MHz ~862MHz (UHF) SIGNAL LEVEL: -15 ~ -70 dbm DECODER TRANSPORT STREAM MPEG-2 ISO/IEC 13818 PROFILE LEVEL MPEG-2 MAIN PROFILE @MAIN LEVEL INPUT RATE MAX. 15Mbit/s VIDEO FORMATS 4:3/16:9 SWITCHABLE Audio Format MPEG Layer I & II, 32 / 44.
NOTE
NOTE