IMPORTANT SAFETY INSTRUCTIONS When using an electrical appliance, basic safety precautions should always be followed, including the following. Read all instructions before using this sewing machine. DANGER - To reduce the risk of electric shock: 1.This sewing machine should never be left unattended when plugged in. Always unplug this sewing machine from the electric outlet immediately after using and before cleaning. 2.Always unplug before replacing light bulb. Replace bulb with same type rated 1 watts.
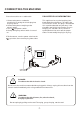
CONTENTS IMPORTANT SAFETY INSTRUCTIONS CONTENTS MAIN PARTS 1 2 ACCESSORIES 4 OVERCASTING-OVERLOCKING 21 USING THE OVERCASTING FOOT 21 USING THE GENERAL PURPOSE FOOT 21 22 EXTENSION TABLE / ACCESSORY STORAGE 4 BLIND HEM STITCHING REMOVING THE EXTENSION TABLE 5 5 BUTTONHOLE SEWING 5 MULTI-STITCH ZIGZAG 25 6 ELASTIC STITCH SEWING 25 6 STRAIGHT STITCH SEAMING AND QUILTING 26 OPENING THE ACCESSORY STORAGE TOTE BAG CHANGING THE PRESSER FOOT REMOVING THE PRESSER FOOT HOLDER INSERTING THE
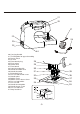
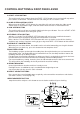
MAIN PARTS 17 16 15 14 13 12 1 2 3 11 10 9 4 5 6 18 19 8 7 1.Face Cover 10.Pattern selector button 2.Needle Up / Down button 11.Stitch width button 3.Reverse Stitch button 12.Handwheel 4.Low speed button 13.Bobbin winder stop 5.Thread cutter 14.Bobbin winder shaft 6.Start / Stop button 15.Horizontal spool pin 7.Extension table / Accessory Storage 16.Thread Tension Dial 8.Slide speed control lever 17.Bobbin winder tension disc 9.Stitch length button 18.Direct select buttons 19.
21 20 27 22 26 23 25 24 20.Carrying Handle 21.Thread guide for upper threading 22.Power switch 23.Air vent 24.Foot control plug 28 25.Plug socket 26.Power cord 29 27.Foot control 28.Lower thread guide 30 29.Needle threader lever 30.Needle threader 31 31.Buttonhole lever 32.Presser foot thumb screw 32 33.Needle plate 34.Bobbin cover 33 35.Bobbin cover release lever 36.Presser foot holder 34 37.Presser foot 38.Needle thread guide 39.Needle clamp screw 40.Presser foot lever 41.
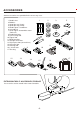
ACCESSORIES Some accessories are provided in the accessory case. 1.Needle Set 2.Bobbins 3.Spool pin cap (large) 4.Spool pin cap (small) 5.Needle plate screwdriver 6.Screwdriver 7.Seam ripper / buttonhole cutter / lint brush 8.Buttonhole foot 9.Overcasting foot 10.Zipper foot 11.Blind hem foot 12.Straight stitch foot 13.All purpose foot (on machine) 14.Open toe foot 15.Darning foot 9 16.1/4 inch foot 17.
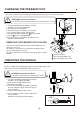
a. REMOVING THE EXTENSION TABLE Hook your finger in the bottom of extension table and slide to the left. To attach, position and slide to the right. b.OPENING THE ACCESSORY STORAGE To open the accessory storage box, remove extension table from machine and open as illustrated. TOTE BAG Unzip the tote bag for storing or carrying the machine.
CHANGING THE PRESSER FOOT The presser foot must be changed according to the stitch you sew, or work you do. CAUTION:To prevent accidents. Turn OFF the power switch before you change the presser foot. 1.Turn the handwheel toward you until the needle is at its highest position. 2.Raise the presser foot lifter. 3.Remove the presser foot by pushing the presser foot release lever toward you. 4.Place desired foot with its pin A directly under the slot B in presser foot holder. 5.
CONNECTING THE MACHINE Place the machine on a stable table. POLARIZED PLUG INFORMATION 1.Connect the power cord to the machine by inserting the 2-hole plug into the plug socket. 2.Connect the power cord plug to the electric outlet. 3.Turn the power switch. 4.A lamp will light up when switch is turned on. This appliance has a polarized plug (one blade wider than the other). To reduce the risk of electric shock, this plug is intended to fit in a polarized outlet only one way.
CONTROL BUTTONS & DROP FEED LEVER A.START / STOP BUTTON The machine will start running when the START / STOP button is pressed and will stop when pressed the second time. The machine will sew slowly the first 3 stitches sewn. B.SLIDE SPEED CONTROL LEVER When using the START / STOP button, the machine will sew faster when the slide speed control lever is moved to the right, and sew slower when the lever is moved to the left. C.
FOOT CONTROL Use of foot control will permit control of start, stop and speed with your foot. CAUTION: To prevent accidents. 1.Turn OFF the power switch. 2.Push foot control plug into receptacle on machine. 3.Place foot control at your feet and turn ON power switch. Sew faster by increasing the pressure on the foot control. To stop, remove your foot from the foot control.
STITCH SELECTION 01. STRAIGHT STITCH 02. LEFT POSITION, STRAIGHT STITCH 03. QUILT STITCH, LIKE HAND SEWN 04. TRIPLE STRAIGHT STITCH 05. STEM STITCH FOR STRETCH FABRICS 06. ZIGZAG STITCHING 07~14. BUTTONHOLES 15. 3-STEP ZIGZAG 16. SATIN STITCH 17. RICK-RACK 18. OVERLOCK 19. DOUBLE OVERLOCK 20. SHELL 21. BLIND HEM 22. STRETCH BLIND HEM 23. DOUBLE ACTION 24. BRIDGING 25. FEATHER 26. FEATHER 27~66.
BOBBIN WINDING REMOVING THE BOBBIN 1 2 1.Remove the bobbin cover by sliding the release lever to right and push down the left corner of bobbin cover at the same time. 2.Remove the bobbin from the machine. WINDING THE BOBBIN 1 2 4 3 5 1.Raise presser foot lever. Pivot spool pin into highest position. Place a spool of thread on the spool pin. Secure it with the spool cap to ensure smooth flow of thread. Use a spool cap closest in size to the spool of thread being used. 2.
INSERTING THE BOBBIN 1. Place bobbin into bobbin holder with the 1 thread unwinding counter clockwise. 2. Draw thread into notch (A). 2 A 3. Pull thread toward the left and along the inside of spring (B) until it slips into notch (C) being sure that thread does not slip out of notch (A). 3 C B A C B 4. Pull thread out about 10 inches and replace the bobbin cover by inserting the left side and lowering the right side till snaps into position.
THREADING THE MACHINE THREADING THE UPPER THREAD 2 1 1. Raise presser foot lever.up position. 2. Press the needle up / down button or rotate the handwheel toward you to raise the needle into the up position. 3. Place a spool of thread onto the spool pin and secure with the proper size spool cap (see page 11). 4. Pass the thread into the thread guide for upper threading and snap forward between the thread guide and guide plate. 5.
NEEDLE THREADER 1.Lower the presser foot. 2.Set needle in up position. 3.Lower the threader slowly and draw thread through thread guide (A) and pull toward the right. 1 2 3 A 4.Lower the lever as far as it will go The threader will turn and the hook pin will go through the needle eye. 5.Position thread below the needle eye and under the hook pin. 5 4 6.Hold thread loosely and slowly return lever to original position. Hook will turn and pass thread through needle eye while making a loop of thread. 7.
STARTING TO SEW The machine will be set at 01 automatically to sew straight stitches when power switch is turned on. CAUTION:To prevent accidents. While sewing, special care is required around the needle. The machine will automatically feed the fabric, do not pull or push fabric. Simply guide the fabric to sew straight. 6 3 4 7 1 2 5 8 1. Check the presser foot (All Purpose Presser Foot is on new machine.) Refer to page 6 for changing the presser foot. 2. Place the fabric under the presser foot. 3.
REVERSE STITCHING 2 Reverse stitching is used for reinforcing the ends of the seams. 3 1 1.Place the fabric in position where back stitching is to be made and lower the presser foot. 2.Press reverse stitch button and sew 4-5 stitches. (If using the foot control, press pedal while pressing reverse stitch button.) 3.Press start button and resume sewing. (If using the foot control, release reverse stitch button and press foot control to sew forward.) 4.
ADJUSTING THE THREAD TENSIONS The thread tension must be properly balanced. If adjustment is required, it can be made by changing the upper thread tension. A 5 4 3 4 3 A. Correct Thread Tension Upper and bobbin threads should interlock in the middle of fabric. B.When bobbin thread appears on top side of fabric. B 5 Turn the tension dial to a lower number to loosen the upper thread tension. TOP BOTTOM C C.When upper thread appears on the bottom side of fabric.
Helpful Hint When stitches on top side of fabric are good but bottom side tends to have a bunch of thread (as illustrated), the upper thread is not threaded correctly, especially in the upper thread tension area. Refer to page 13 and rethread machine correctly. CAUTION:To prevent accidents. The feed dog will feed the fabric automatically. Do not pull or push fabric with hands. This could cause needle breakage or poor quality stitches.
STRAIGHT STITCH SEWING 01 02 Straight stitch patterns should be selected according to the type of fabric being sewn. 01 2 1 START STOP 2 1 Select the straight stitch pattern 01 or 02 Attach all purpose foot. 3 4 Adjust the stitch length and stitch width (see page 10) according to the type of fabric being sewn. START STOP 3 4 1.Position the fabric under the presser foot and lower it. Hold the upper thread and bobbin thread loosely behind the presser foot. 2.
ZIGZAG STITCH SEWING 06 Your machine can sew zigzag stitches of various widths and lengths by changing the settings of the stitch width and stitch length. See page 10 for changing width and length instructions. • Attach all purpose presser foot. • Select stitch 06 by touching direct select button. Zigzag stitches are very good for joining two pieces of fabrics or overlocking. For joining knit or stretch fabrics, sew with the left side of the zigzag stitching along the seam line.
OVERCASTING-OVERLOCKING 18 19 06 37 15 20 18 19 06 37 15 20 15 A B USING THE OVERCASTING FOOT Position the fabric against the guide plate of the overcasting foot so that the needle falls near the edge of the fabric. A. Overcasting stitches (width 6.5-5.0) are used for preventing raveling of fabrics. B. Some stitches can sew the seam and overcasting at the same time. Therefore, it is convenient for sewing easy to ravel and stretch fabrics. CAUTION:To prevent accidents.
BLIND HEM STITCHING 21 22 21 21 This stitch will sew without stitches showing on right side of fabric. 1.Fold the fabric as shown on drawing. Leave 5mm (approximately 3/16 inch) extended past the folded edge. 1 Wrong Side Wrong Side 2.The guide (A) on the blind hem foot ensures even feeding of the fabric when blind hem stitching. The guide (A) is adjusted by turning the adjusting screw (B). 3.
BUTTONHOLE SEWING 07 08 09 10 11 12 13 14 07 1 2 1.Mark position and length of buttonhole on fabric. 2.Set button on the base and slide base forward to secure button. * If button does not fit on the base, adjust slide on base to diameter of button plus thickness of button. a a= Length of button + thickness 3.Pass upper thread through the hole of buttonhole foot and attach buttonhole foot to machine. Bring upper and bobbin threads to the left under foot. 4 3 4.
1 07 4 6 5 08 1 09 3 2 2 3 10 7.Machine will sew the buttonhole in the order as shown and stop automatically when buttonhole is complete. 8.Cut threads. Raise presser foot lever to highest position to restart same Buttonhole in another place on fabric. 2 1 4 11 12 13 8 14 9 NOTE:To sew over buttonhole 08 a second time, raise presser foot to return fabric to starting position. 9.With buttonhole cutter, cut center of buttonhole open. Be careful not to cut stitches on either side.
MULTI-STITCH ZIGZAG 15 15 Used for sewing on elastic band and overcast stitching on knit fabrics. A. Elastic Sewing Stretch elastic in front and back of needle while sewing. Be careful not to bend needle while stitching. B. Overcast stitching Used for easy to ravel and knit fabrics. Guide fabric so stitch on right side is at the edge on the fabric.
STRAIGHT STITCH SEAMING AND QUILTING Select stitch #1 in the center needle position. Because of the small opening, the straight stitch is the ONLY stitch to be used when sewing with the straight stitch, quilting or 1/4 foot. Turn the handwheel and watch that the needle will go into the needle hole of the foot. STRAIGHT STITCH SEAMING The straight stitch foot is designed with a small opening in the foot to provide additional support against the feed dog teeth when sewing lightweight fabrics.
36
INSERT ZIPPERS AND PIPING 01 01 1 Align the right side or the left side of the zipper foot pin with the presser foot holder, lower the presser foot lever to attach the foot. 1.Needle stitches to the left of foot. 3 2.Needle stitches to the right of foot. 3.To insert zippers, consult the zipper package for instructions on how to prepare zipper placket and place zipper.
SCALLOP STITCH 28 29 66 These stitches are used to sew a decorative edge on garments and table cloths. 66 SCALLOP HEM 28 1. Fold the fabric with right sides together and sew near the edge. 2. Cut the fabric along the seam leaving an allowance of 3 mm(1/8 )for seaming. Notch the allowance. 3.Turn fabric with right sides out and gently push out the curved seam press. 2 DECORATIVE SCALLOP EDGE 29 66 1. Place the fabric with wrong sides together and stitch near the edge. 2.
CARING FOR YOUR MACHINE To ensure the best possible operation of your machine, it is necessary to keep the essential parts clean at all times. Always disconnect the machine from power supply by removing the plug from the electric outlet. (1) CLEANING THE FEED DOGS AND HOOK AREA 1.Raise the needle to its highest position. 2.Remove the needle plate (1) 3.Remove the bobbin and bobbin case (2) 4.Clean the feed dogs and hook area with the lint brush.
HELPFUL HINTS CAUSE CORRECTION Machine not properly threaded. Thread entwined around bobbin. Rethread machine. Clean bobbin area and rethread bobbin case. Reinsert needle. Readjust thread tension. Choose correct thread. 13 12 Bobbin threaded incorrectly. Bobbin wound unevenly or too full. Dirt in the bobbin and hook area. Rethread the bobbin. Rewind the bobbin. Clean the bobbin and hook area. 12 11 30 Needle inserted incorrectly. Bent or blunt needle. Incorrect size of needle. Reinsert needle.
BL67 -STITCH CHART CONVERSION 4 = 4 LED lights = LED light blinking 3 = 3 LED lights 2 = 2 LED lights 2 = 2 LED plus one blinking 1 = one LED light 3 = 3 LED plus one blinking 4 = 4 LED plus one blinking 5 = 5 LED lights 1 = one LED plus one blinking The default stitch length and width settings have been underlined on the chart for your reference. All measurements are listed in millimeters.
No. Stitch Stitch name Stitch Length (L) - 1 L W L W Stitch Width (W) 1 L W 2 L W - 2 L W LED light conversion chart in millimeters (mm) 3 L W 3 L W 4 L W L 4 W 5 L W (mm) (mm) (mm) (mm) (mm) (mm) (mm) (mm) (mm) (mm) (mm) (mm) (mm) (mm) (mm) (mm) (mm) (mm) (mm) (mm) 11 22 23 24 25 26 27 28 29 _ _ 0.6 0.6 _ _ _ _ _ _ _ _ _ _ _ 5.0 5.0 _ _ _ _ 0.6 2.0 0.6 _ _ 2.0 2.0 5.0 5.0 _ _ 2.0 5.0 _ _ 3.5 _ _ 2.0 2.0 5.0 5.0 1.0 3.5 _ _ 2.0 _ 1.0 3.
No. Stitch Stitch name Stitch Length (L) - 1 L W L W Stitch Width (W) 1 L W 2 L W - 2 L W LED light conversion chart in millimeters (mm) 3 L W 3 L W 4 L W L 4 W 5 L W (mm) (mm) (mm) (mm) (mm) (mm) (mm) (mm) (mm) (mm) (mm) (mm) (mm) (mm) (mm) (mm) (mm) (mm) (mm) (mm) _ _ _ _ _ _ 0.6 0.6 2.5 2.5 _ _ _ _ 0.6 0.6 2.5 2.
No.