
Instruction manual


-8-
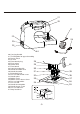
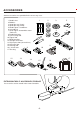
CONTROL BUTTONS & DROP FEED LEVER
A.START / STOP BUTTON
B.SLIDE SPEED CONTROL LEVER
C.LOW SPEED BUTTON
D.REVERSE STITCH BUTTON
E.NEEDLE UP / DOWN BUTTON
F.DROP FEED LEVER
G.READY INDICATOR
The machine will start running when the START / STOP button is pressed and will stop when
pressed the second time. The machine will sew slowly the first 3 stitches sewn.
When using the START / STOP button, the machine will sew faster when the slide speed
control lever is moved to the right, and sew slower when the lever is moved to the left.
The machine will sew in low speed while holding the low speed button. Press the START / STOP
button or foot control to return toregular speed.
Stitches 1, 2 and 6: The REVERSE STITCH button will sew in reverse while the button is
pressed and return to forward stitching when the button is released.
Other stitches: The REVERSE STITCH button will sew 3-4 stitches to tie-off the stitching
and then stop sewing. Continue sewing by pressing the START / STOP button or foot control.
When the presser foot is down, the needle can be raised or lowered by pressing this button.
When the presser foot is up, press this button for one complete stitch.
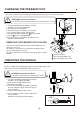
The feed dogs project up through the needle plate, directly below the presser foot move the
fabric being sewn. Located under the left end of the free arm, the drop feed lever moves the
feed dogs into the up or down position.
For darning or free motion embroidery or whenever fabric is to be fed by hand, push the lever
in and to the back of machine to lower the feed dogs into the DOWN position.
For return to ordinary sewing, move the lever in and forward to release the lever to move out.
This will position the feed dogs in the UP position for machine feeding.
Green light indicates that the machine is ready to sew.
Red light means an additional step is needed before beginning to sew.
See instructions for the specific stitch selected.
H.DIRECT SELECT BUTTONS
Press one of the seven lighted buttons to quickly select one of the most often used stitches
(For other stitches, refer to page 10).
C
G
D
E
A
B
F
H
I
I.REINFORCEMENT BUTTON
Stop the machine and press this button to sew 4 stitches and tie-off your stitching.