ABOUT THIS MANUAL ABOUT THIS MANUAL This manual provides details on the new functions added from Destiny ( the title denotes a new or enhanced features, within the Destiny ). Please refer to this manual for the functions of IQ Designer.
CONTENTS CONTENTS ABOUT THIS MANUAL .......................................................................................................... 1 ABOUT IQ DESIGNER ............................................................................................................ 3 Basics: Creating a Pattern................................................................................................................................ 3 PATTERN DRAWING SCREEN ........................................................
ABOUT IQ DESIGNER ABOUT IQ DESIGNER With IQ Designer, you can use the functions listed below: • Hand-drawn functions - creating embroidery patterns by drawing on the LCD screen • Scanning functions - creating embroidery patterns by not only scanning object with built-in camera, but also imported data from USB media, SD card or computer. You can also combine patterns that you have created with the machine’s built-in patterns.
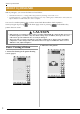
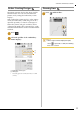
ABOUT IQ DESIGNER 3. Select colors, fill stitches and desired patterns to complete your design. b b b Shows the stitch settings for the selected region. 4. Specify stitch settings. (page 14) * Further customize your pattern by specifying embroidery stitch settings, such as satin stitch width and density. 5. Convert image data to embroidery data. The embroidery image preview screen appears. (page 17) a a a Shows the stitch settings for the selected line.
ABOUT IQ DESIGNER 6. Edit the pattern in the embroidery edit screen, for example, by combining it with the machine’s built-in patterns. * For details on how to edit the pattern, refer to “EDITING PATTERNS” in the Instruction and Reference Guide. Embroidering begins.
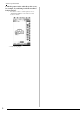
PATTERN DRAWING SCREEN PATTERN DRAWING SCREEN d e f c b a g h j l n p q v i k m o u t s r a Pattern drawing area b Pattern preview area Memo • The actual dimension of the pattern area is the size of the embroidery frame, which is 36 cm × 24 cm (approx. 14 inches × 9-1/2 inches). The pattern you drew may be bigger than you expected. Please resize the pattern after converting the design to the embroidery pattern.
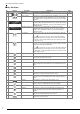
PATTERN DRAWING SCREEN ■ Key functions No. Display Key Name Explanation Page c Magnify key Press this key to magnify the pattern. 10 d Image scan key Press this key to scan the attached frame and display on the screen as the background while using the IQ Designer. You can scan the fabric as the background or scan the picture as the reference when creating the pattern.
PATTERN DRAWING SCREEN Before Creating Designs Drawing Lines The pattern preview displays the design smaller than the actual size. You can view the actual pattern size by setting the “Embroidery Frame Display”. With “Embroidery Frame Display” in the settings screen, the embroidery frame and grid can be specified separately. For details on the types of embroidery frames and grids available, refer to “Changing the Embroidery Frame Display” in the Instruction and Reference Guide included with the machine.
PATTERN DRAWING SCREEN ■ Setting the line types, stitch types and colors Stitch types Zigzag stitch You can set or change the line types, stitch types and colors anytime. You can also specify the line types, stitch types and colors before drawing lines. a Press Running stitch Triple stitch to set the line types, stitch types Candlewicking stitch and colors. Chain stitch Line without stitch for creating a region. Created region will be defined by the gray line.
PATTERN DRAWING SCREEN c Press then press on the line to change its color. The connected line will be changed to the selected color included with the machine. ■ Setting the brush types and fill colors a Press colors. to set the brush types and fill Memo • Press to magnify the image when you cannot press on the line correctly. For details on magnify the image, refer to “Displaying Patterns in the Screen Magnified” in the Instruction and Reference Guide included with the machine.
PATTERN DRAWING SCREEN b Press to return to the pattern drawing screen. The color bar on the brush tool key is changed to the selected color. Using the stamp key a Press b Select a stamp type and stamp shape. . a a Color bar * If a stippling pattern or decorative fill pattern has been specified, the settings are displayed. c Press and press on the brush line to change color and fill stitch types.
PATTERN DRAWING SCREEN Stamp shapes Using the erase key Basic shapes Closed shapes a Press b Select the size and shape of the eraser. . Open shapes Stamp types (Only for Basic shapes) Outline Fill stitch Outline and fill stitch * Select the outline ( and fill stitch ( ), fill stitch ( ), or outline ) of a basic shape. Saved outlines Embroidery pattern outlines can be registered as stamp shapes. When registering stamp shapes, select from the last six embroidery patterns used.
PATTERN DRAWING SCREEN Using the select key c When is pressed, the pattern size is displayed in the screen. You can select the part of the design to move and/ or edit. Some keys are available only after you select the part. a Press a . b a Shows the size for the selected part. b Reverts to the original size. d b * When is pressed, the pattern rotation angle is displayed in the screen. Select the area you want to edit.
STITCH SETTINGS SCREEN STITCH SETTINGS SCREEN Before creating the embroidery pattern, specify the stitch settings. Lines of the design are sewn with various stitches and areas are sewn with fill stitches or stippling stitches. Stitching of the areas were already selected in “Drawing Regions” on page 10, so specify values of detailed settings. After specifying the settings, press to create the embroidery pattern. If the design data is saved, the settings can be changed after a trial embroidering.
STITCH SETTINGS SCREEN a ■ Region settings Use changed. to select the line or region to be Each press of moves the highlighting of the selected pattern in order. b Select the setting to be changed, and then change the setting in the screen that appears. (In this example, the sewing direction will be changed.) a b The setting screen appears. a Shows the stitch type and color for the selected region. b Shows the stitch settings for the selected region.
STITCH SETTINGS SCREEN Specifying global stitch settings The same stitch settings can be changed at the same time for multiple patterns of the same type. a After specifying the settings Press to create the embroidery pattern. Use to select the stitch whose settings are to be changed, and then press . The same stitch type areas will be selected at the same time. b Follow steps b through d in “Specifying individual stitch settings” on page 15 to change the settings.
EMBROIDERY IMAGE PREVIEW SCREEN EMBROIDERY IMAGE PREVIEW SCREEN You can check the total stitch number, embroidery time and spool thread color number to embroider the pattern. Press Press to check the pattern image within the embroidery frame. to proceed to the embroidery edit screen. Note • Once you proceed to the embroidery edit screen, you cannot return to the IQ Designer. Press Press 17 to save the pattern as the embroidering data. to return to the stitch settings screen.
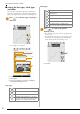
IQ DESIGNER WITH SCAN IQ DESIGNER WITH SCAN Using the Scan Frame a Prepare the desired drawing/illustration. CAUTION Note • When placing the paper in the scanning frame, make sure that the white balance area is not hidden; otherwise, the drawing cannot be scanned correctly. At the same time, be sure to place the scan image within the scan area. The image out of the scan area will not be scanned.
IQ DESIGNER WITH SCAN c * Attach the embroidery unit to the machine, and then turn on the machine. Refer to “Attaching the Embroidery Unit” in the Instruction and Reference Guide included with the machine. Note • Unthread the machine to avoid having the thread slipping out of the needle or getting caught on the embroidery frame. d * The presser foot is not raised high enough when raised with the presser foot lever. CAUTION * Drawings and illustrations can also be scanned using an embroidery frame.
IQ DESIGNER WITH SCAN b Using the magnets, affix a picture to the scanning frame and attach the frame to the machine. Refer to “Using the Scan Frame” on page 18. c Press d When scanning is finished, scanned image is dimly displayed in the pattern drawing area. e Using the included touch pen, press , and then draw lines to trace the image. . * Note • When scanning starts, some of the machine lights will turn off in certain circumstances, in order to increase the scan quality.
IQ DESIGNER WITH SCAN ■ Importing the Background image c Select the data, and then press d The selected image is dimly displayed in the pattern drawing area. . Prepare the data file of your favorite picture so that you can create an embroidery pattern. Save data in your computer, on a USB media stick or SD card. a Press . The image display screen appears. b Select the device you saved the data to.
CREATING LINE IMAGE CREATING LINE IMAGE Custom patterns can be created from drawings. You can create patterns by scanning your drawings using the included scan frame or importing an image from USB media, computer or SD card. Using the Scanning Frame to Create a Pattern with Line Scan a * Press . You can also start the function by pressing in “Embroidery” mode. b Press . Recommended line drawings for Line Scan • Line drawings must be drawn clearly using lines with approximately 1 mm thickness.
CREATING LINE IMAGE c * Press To import an image from USB media, computer or SD card, press * d . , , or The “Gray-Scale Detection level” can change the black and white threshold for the image. . For details, refer to page 21. If you scan the image, make sure that the scanning frame is attached to the machine. Refer to “Using the Scan Frame” on page 18. * * • When scanning starts, some of the machine lights will turn off in certain circumstances, in order to increase the scan quality.
CREATING LINE IMAGE g In the screen for confirming the converted image, you can adjust the “Gray-Scale Detection level” again, if necessary. i If necessary, edit the scanned image. a a a The settings for the lines to be sewn appear. * If you do not know how the settings should be changed, first continue the operation without specifying settings and check the results. * * To enlarge the image, press . To display the image before being converted, press .
ILLUSTRATION SCAN ILLUSTRATION SCAN Custom patterns can be created from color illustrations. You can create patterns by scanning an illustration using the included scanning frame or importing an image from USB media, computer or SD card. c * Press . To import an image from USB media, computer or SD card, press , , or . Recommended illustrations for Illustration Scan • Patterns that are clearly drawn, with no gradation, fading or blurriness.
ILLUSTRATION SCAN d When scanning is finished, specify the necessary settings in the scan image confirmation screen. e Change the settings to adjust the image so it can easily be converted to the desired pattern. f Move to frame the image for the pattern. Press . The screen for confirming the converted image appears. a g In the screen for confirming the converted image, adjust the image as necessary as in step d . * * To enlarge the image, press .
ILLUSTRATION SCAN i If necessary, edit the scanned image. a * After the scanned image is converted to stitching, it appears as a background in the pattern drawing screen. Use gauge a to adjust the transparency of the background. Each press of lightens the background, making the illustration pattern darker. Each press of darkens the background, making the illustration pattern lighter. Note • During scanning, the small dots that appear and unnecessary lines can be erased.
STIPPLING STIPPLING Basic Stippling with IQ Designer c Select the square shape, and then press . Create a stippling design with the basic procedure. Example: a * Press . You can also start the function by pressing in “Embroidery” mode. b Press . d Press .
STIPPLING e Select the heart shape, and then press . h Press f Press i Press . Press g 29 Press until the heart shape fits in the square shape, and then press . , and then . , and then select the stitch color. after setting the color.
STIPPLING j Select the area you want to set stippling effect. l Adjust the stippling settings to create the desired effect, and then press * . For details, refer to “Specifying individual stitch settings” on page 14. a a Select this area. k Press . m When the following message appears, press . n Press to convert into embroidery. When the following message appears, press .
STIPPLING o Follow the procedure described on “EDITING PATTERNS” in the Instruction and Reference Guide included with the machine to edit the pattern as desired. d Position the scanning frame on the machine, and then press . Scanning Drawing to Create Stippling Pattern Create a custom pattern with stippling design. Example: a b * Place a drawing of your design on the scanning frame. Press . You can also start the function by pressing in “Embroidery” mode. c Press .
STIPPLING When the following message appears, press . g To set the outline of the pattern, press and then , . Scanning begins. * To stop scanning and return to the screen in step e d , press . When scanning is finished, move to frame the image for the pattern, and then press . h Press , and then . This will set the outline without a stitch. f The screen for confirming the converted image appears, adjust the image if necessary and then press .
STIPPLING i k Select the outline of the pattern. Press then press and select the stitch color, and . a a Outline of the pattern j Press to select the color of the stitch around the stippling effect. l Select the stitch line around the stippling effect.
STIPPLING m To set the stitch color and fill stitch type, press , and then . n Press Press , and then select the stitch color. after setting the color. o Select the area you want to set stippling effect. p Follow the procedure from step k on page 28 of “Basic Stippling with IQ Designer”.
STIPPLING Scanning Fabric and Stippling Memo • Although the instructions in the LCD screen refer to the scanning frame, this example uses an embroidery frame for scanning. Use the fabric pattern to coordinate with the stippling pattern. a b * Set the fabric to the embroidery frame. Press Note • When scanning starts, some of the machine lights will turn off in certain circumstances, in order to increase the scan quality. The machine lights will return to their original brightness when scanning ends.
STIPPLING f Select the circle shape, and then press h . Press until the size of circle fits the pattern on the fabric, and then press * Use . to align the position of the circle to the pattern on the fabric. g Press to increase or decrease the size of the circle. i To set the stitch color and fill stitch type, press , and then .
STIPPLING j Press Press k 37 , and then select the stitch color. l To set the outline of the pattern, press and then . m Press and then . This will set the outline without a stitch. after setting the color. Select the area you want to set stippling effect.
STIPPLING n Select the outline of the pattern. Embellishing around a pattern in embroidery (a quilting function) Memo • For best results, reduce the sewing speed. a A quilt can be created with stippling around an embroidery pattern. a Hoop the embroidery frame with batting sandwiched between two layers of fabric, and then attach the frame to the machine. b Press and select the pattern that embellishment will be added around, and then press a Outline of the pattern o in the embroidery edit screen.
STIPPLING c Press . A message appears, and the pattern outline is registered as a stamp shape in IQ Designer. Press . d Press to continue to the embroidery screen, and then embroider the pattern. e Press in the home page screen to start the IQ Designer. 39 f Press fabric. g Press , press to recall the stamp shape registered in step c , and then arrange it over the scanned pattern.
STIPPLING h Use a stamp or rectangular frame to determine the area to be embellished. j Fill the area to be embellished outside of the stamp shape outline. k Set the line type for the frame and pattern Note • If the area is to be drawn by hand, be sure to draw a completely closed shape. If the area is not closed, it cannot be correctly filled with the decorating. to * i , and then press . Stitch settings can be adjusted in the stitch settings screen.
STIPPLING l Specify the stitch spacing and length in the stitch settings screen, and then press . Check the pattern, and then press m 41 Embroider the stippling around the embroidery pattern. .
Stippling Without Using IQ Designer Stippling Without Using IQ Designer Stippling can easily be sewn around an embroidery pattern. c After specifying the stitch settings for the stippling, press . Memo • If this simple stippling operation is used with batting sandwiched between two layers of fabric, the embroidery pattern and stippling may become misaligned. For quilting, refer to “Embellishing around a pattern in embroidery (a quilting function)” on page 38.
Other Useful Functions Other Useful Functions Various pattern editing functions have been improved for easier use. Additional built-in patterns 20 Exclusive and 30 “Vine” Alphabet built-in patterns have been added. For details, refer to the Embroidery Design Guide. Specifying individual appliqués When multiple patterns are arranged in the embroidery edit screen, you can select the pattern that will be used to create the appliqué. a Select the pattern to be used for the appliqué, and then press .
Other Useful Functions Combining bobbin work patterns Bobbin work patterns can be combined and sewn together. For details on creating bobbin work, refer to “How to Create Bobbin Work” in the Instruction and Reference Guide included with the machine. a b Press . A message appears after sewing is finished for each pattern. Complete the operation according to the instructions in the message. After the first bobbin work pattern has been selected, press , and then add the second bobbin work pattern.
Other Useful Functions b Press . Adding line feeds and inserting new embroidery character patterns ■ Line feeding When a line feed is added, the line feed code appears in the text box on the right side of the screen. * Press colors. again to check the sorted thread ■ Inserting Even after text has been entered, characters can be selected and edited (resized, etc.). a b a Directly select a character. b Press and character. The embroidery color order is rearranged and sorted by thread colors.
Other Useful Functions Character alignment Each press of switches between right alignment, left alignment and center alignment, in that order. Selecting multiple patterns at the same time Multiple patterns can easily be edited, for example, when moving patterns that are combined, if they are all selected together. a Right alignment Press . Left alignment The Multiple Selection screen appears. Center alignment b Touch each pattern to select multiple patterns.
Other Useful Functions Memo • Multiple patterns can also be selected by dragging your finger on the screen. • Multiple patterns can be selected or deselected from the Multiple Selection screen. Press or to select the patterns, and then press . Grouping multiple selected patterns If the multiple patterns selected in “Selecting multiple patterns at the same time” on page 46 are grouped, they can be edited as a single pattern. a Press so that it changes to . The selected patterns are grouped.
Other Useful Functions Saving/deleting multiple patterns It may be useful to save all or multiple data from USB media, for example, to the machine. The data can only be saved to the machine’s memory (pocket). a Press , and then either select the thumbnails of the patterns or press . The thumbnails of selected patterns appear in blue. To deselect the pattern, either press the thumbnail again or press . Memo • When selecting USB media or SD card, is displayed.
XG6970-001