WB31GTF WB31BCF CUSTOMERSERVICE@BADGERPOWERPRODUCTS.
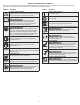
• SAFETY & INTERNATIONAL SYMBOLS • This operator's manual describes safety and international symbols and pictographs that may appear on this product. Read the operator's manual for complete safety, assembly, operating and maintenance and repair information. SYMBOL MEANING SYMBOL • SAFETY ALERT SYMBOL MEANING • ON/OFF STOP CONTROL ON / START / RUN Indicates danger, warning or caution. May be used in conjunction with other symbols or pictographs.
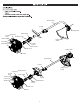
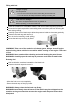
Shaft Housing Coupler Cutting Head On/Off Switch Spark Plug Air Filter Throttle Lockout Cover Handle Choke Lever Cutting Head Shield Primer Bulb Throttle Control Starter Rope Grip Rear Handle Muffler cover Cutting Head Fuel tank Shaft Housing Coupler Cutting Head Shield Throttle Lockout Spark Plug Air Filter Rear Handle Cover Choke Lever Handle Primer Bulb Starter Rope Grip Throttle Control On/Off Switch Muffler cover Fuel tank 5
WB31GTF WB31BCF
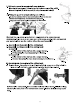
c) Release the Nylon cutting head. Use screw driver to hold flange and then rotate the Nylon cutting head clockwise, it will be replaced. d) Fit the blade. Take the outer flange off after release the nut, then put the blade, outer flange, shield and nut according to priority as below picture. Note the blade rotation direction needs be same as below picture. Use screw driver to hold flange and tighten nut counter-clockwise, ensure the nut is tightened enough. e) Release blade.
5. Fit the betl. According to picture showing, fit the belt well. OPERATION When operating this machine, please follow the instructions for operations steps. Before starting the equipment Each time before use, check the following: • That there are no leaks in the fuel system. • That the equipment is in perfect condition and that the safety devices and cutting devices are complete. • That all screws are securely fastened. • That all moving parts move smoothly.
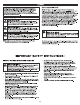
Filling with fuel Danger of injury! Fuel is explosive! - Turn off and cool the motor down before filling the tank with fuel. - You must observe all safety instructions relating to handing fuel. Risk of device damage! The device is supplied without motor or gearbox oil. Before operating, you must fill it with fuel. Place the machine on a flat stable surface, with the fuel tank cap facing upwards. Clean the fuel tank cap and the surrounding area to avoid any dirt from entering the tank during refilling.
Start on the unit Do not start the unit until it has been completely assembled. Before switching on the unit, always check the oil. Check before use! Danger of injury! Do not operate the device unless you did not find any faults. If a part has become defective, make sure to replace it before you use the device again. Check the safe condition of the device: – Check the device for leaks. – Check the device for visual defects. – Check that all parts of the device have been securely fitted.
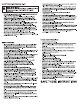
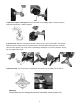
3. Pull the recoil starter handle 3-5 times to start the engine. Hold the machine firmly on the ground with one hand on the power unit, in order not to lose control of the machine during startup as following picture. 4. Pull the starter grip slowly for 10 - 15 cm until you feel some resistance, then tug it a few times until you hear the engine turn over. Then adjust the choke lever to (RUN) position. START UP RUN 5. Pull the starter grip again until the engine starts as normal.
6. When the engine is running and idling, the throttle lever on handle is as below picture. First press the lock off lever and then switch the throttle lever on, the machine will be working. 7. Adjusting line length when working: This machine is fitted with a “Tap & Go”head.To release more line, tap the cutting line head against the round with engine at top speed: the line will be released automatically and the knife cut off the excess length. 8.
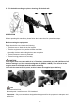
11.WARNING! Do not use the machine for sweeping, tilting the cutting line head. The power of the engine could throw objects and small stones 15 metres or more, causing damage or injuries to people. Note: 1. Do not start the motor in tall grass 2. While mowing, lay the connection cable safely on footpaths and on areas which have already been mown. 3.
Before performing any maintenance or cleaning work, always turn off the engine. 1. Do not spray the unit with water. Ingress of water may damage the engine and electrical connection. 2. Clean the unit with a cloth, hand brush, etc. WARNING! During maintenance operations: – Remove the spark plug cap. – Wait until the engine is sufficiently cold. – Never dispose of oils, fuel or other polluting materials in unauthorized places.
Change and clean the spark plug -Periodically remove and clean the spark plug using a metal brush to get rid of any deposits. -Check and reset the correct distance between the electrodes. -Replace the spark plug and fasten it firmly using the supplied wrench. -The spark plug must be replaced with one with the same characteristics whenever the electrodes have burnt or the insulation has worn, and in any case every 100 working hours.
Head line replacement SHARPENING THE LINE CUTTING KNIFE Remove the line cutting knife (1) from the guard (2) by unscrewing the screws (3). Fix the line cutting knife in a vice and sharpen it using a flat file, being careful to retain the original cutting angle. Refit the knife on the guard. CLEANING AND STORAGE CLEANING Short-term Storage (1-2 weeks) WARNING: To avoid serious personal injury, always 1. Store the unit in a horizontal position.
TROUBLESHOOTING PROBLEM THE ENGINE WILL NOT START SOLUTION The fuel tank is empty The primer bulb was not pressed enough Fill the fuel tank with properly-mixed fuel Press the primer bulb 10 times or until fuel is visible The engine is flooded Squeeze the throttle control and pull the starter rope until the engine starts The fuel is old (over 30 days) and/or improperly mixed Drain the fuel tank and add fresh, properly-mixed fuel The spark plug is fouled The choke lever was not flipped Replace the sp
NOTES 19
MANUFACTURER’S LIMITED WARRANTY The limited warranty set forth below is given by Badger with respect to new merchandise purchased and used in the United States, its possessions and territories . Badger warrants this product against defects in material and workmanship for a period of three (3) years commencing on the date of original purchase and will, at its option, repair or replace, free of charge, any part found to be defective in material or workmanship.