
User's Manual
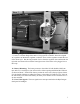


The turn signal switch in
this kit controls both the
lighting and ignition
functions in one compact
package. Using the
lighting selector, push the
switch to the second
position. The rear taillight
should come on. Try the
turn signal switch to the
right and the left. Both the
front and the back signal
should alternate on and off.
Honk the horn (unless its
after 11 PM!). In this
second position, the bike
will now start, and a
headlight running light
will come on. Use this
position during daytime
hours when you don’t
need full headlight
brightness. This position
will ensure that the
battery stays fully
charged even when doing
slow technical trail riding
when the bikes electrical output is low.
First Position:
Shuts off bike, turns
off lights
Second Position:
Turns on Ignition
and running lights
Third Position: Low
Beam
Fourth Position:High
Beam
Kill Button
Horn
Turn Signal
Switch
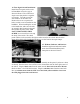
The third switch position turns on the head light’s low beam, and the fourth switch
position powers up the high beam. See diagram to left.
Note: The lighting selector switch must be in positions
two through four for the bike to run!
If every thing is working properly congratulate yourself on a job well done. If not, don't
worry, it's not rocket science and we should be able to figure it out. All the components
were checked for operation prior to being shipped to you so something is probably not
connected correctly. See the trouble shooting list in a later section.
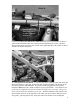
17. Wrapping it Up: It is important that all the wires be properly routed and secured.
Double check the photos and sketches with regards to wire routing. Make sure the wires
14