. Remove cardboard carton, j REV.
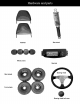
,@ Headrest Rear shock Wheel covers Gas tank Rear wheels Front wheels Steering wheel bolt cover
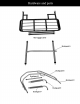
Rearluggage carrier BrushguardA shguard B rush__guard E Brushguard F Br h r us gua d C
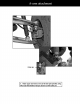
2. Loosen8mmboltson steeringshaftbracket andalignsteeringshaft. Oncesteeringshaft is aligned,torqueboltsto 17ft.lbs. Align 3. Installsteeringwheelmakingsurelarge openingis attop whensteeringis atcenter position.Attachsteeringwheelwith 6mm bolts. Torqueboltsto 8 ft.lbs.Attachbolt cover to steeringwheel,coverwill snapin place.
4. Attachbothfront shockabsorbersto top bracketsonframeand lower a-arm using M10X45 bolts and M10 nuts with 33ft.lbs. of torque.
Cotter pin t I 5. upper and lower a-arms to leftnut andwith right spindles M12Attach nuts with 35ft.lbs of torque. Secure cotter pin.
I 6. Attach left and right tie-rod ends to left and right spindles usingI M10 nuts with 35ft.lbs. of torque. Secure nut with cotter pin.
Rearstabilizerbar 7. Removerearstabilizerbarandthrowaway. Stabilizerbaris forshippingpurposesonly. NOTE:Thereis onlyONEstabilizerbar. 8. Attachrearshockabsorberwherestabilizerbarwasusing M10x43boltandM10nuton top bracketandM10x45boltand M10nuton bottombracketwith 33ft.lbs.of torqueonboth. NOTE:Theotherrearshockabsorberwill alreadybeattachedat the bottom.Youwill needto attachthetop ofshockto frame.
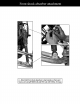
. Attachleftandright headrestsby inserting bracket in holes on seat back. I I Brushguard assembly complete Brushguards B and C 10. Attach brushguards B and C using M8x58 I bolts and M8 nutswith 17ft.lbs. of torque. I Brushguard A 11. Attach brushguardA to Brushguards B and C using M8x58 bolts and M8 nuts with 17ft.lbs. of torque.
I 12. Attach to Brushguards B and C behind seats usingbrushguard M8x58 boltsDand M8 nuts with 17ft.lbs. of torque. I Make sure the brushguard pad and cover are attach to brushguards E and F. Nut Note: Install bolt with nut on rear side Frame 13. Attach brushguards E and F to brushguard B and C and the frame using M8x58 bolts and M8 nuts with 17ft.lbs. of torque. (closests to rear of go-kart) of brushguard.
Arrowmustpointforwardon all wheels Valve stem 14. Attach all wheels to hubs, large wheels on back of kart and smaller wheels on front, make sure arrow on wheel is pointingforward and valve stem is pointed outward. Torque M10 nuts using 33ft.lbs of torque.
15. Pushdustcoversoverwashersin centerof the hubsandmakesuretheyaresecure.
Rearluggage bars 16. Attach rear luggage carrier to frame using M8x51 bolts with 17ft.lbs of torque. I 17. Attach luggage support bars to luggage carrier and frame using M8x37 bolts and M8 nutswith 17ftlbs. of torque.
Taillight Taillightscrewandnut 18. Attachtail light to bracket on rear of luggage rack. Use 6ram Nuts and screws provided. Luggage rack brackets Racksupport 19. Route tail light wire down the bottom f middle rack support. "Cable tie" wire o support. Bunch up excess wire and cable tie" to top of engine mount.
20. Bolt fuel tank to top of luggage carrier using M8x47 bolts and M8 nuts with 17ft.lbs. of torque. Fuelhose Clamp Fuelhose Carburetor 21. Attach fuel hose coming from bottom left of carburetor to fuel valve and secure using provided clamp. With clamp on fuel hose place over nipple on fuel valve, make certain the clamp is secure.
Eye Protection RubberGloves Thefollowing procedureisvery dangerousand shouldbe performedwith the utmostcareand attention.Wearprotectiveeye wear,rubbergloves,and havewateravailableshouldelectrolytecomein contactwith skin or eyes. KEEPALLCHILDRENAWAYFROMTHE AREAWHILETHISPROCEDUREIS BEINGPERFORMED. Figure20 POISON- CAUSESSEVEREBURNS Containssulfuricacid. Avoidcontactwith skin,eyes,or clothing To preventaccidents,rinseemptycontainerwith water. Preparing the battery: Place battery on level surface.
22. Install battery into battery tray located underseat. 23. battery,then Once batteryis attachblacknegative(-) firmlyseated in tray, wireto attachred negative(-) positive(+) terminalon wireto positive(+) battery. terminalon Battery tray Battery strap 24. Place battery cover over battery. Attach battery strap to hold battery in place.
i25. Fill gas tank as specified in owners manual, i / to manualfor oil types and quantity. 26.owners Fill engine with correct amount of oil. Refer 27. Refer to owners manualfor I proper starting instructions. !!WARNING!! This engine may be shippedwith packing oil. This oil should be drained and replacedwith new oil as described in the ownersmanual. Never attemptto start enginewithout first replacingthe engine oil with the properamount and grade as describedin the owners manual.